By: Team T16-04 Since: Aug 2019 Licence: MIT
- 1. Introduction
- 2. Quick Start
- 3. Features
- 3.1. AutoSuggestion
- 3.2. Categories
- 3.3. Expenses
- 3.4. AutoExpense
- 3.5. Income
- 3.6. Budget
- 3.7. WishList
- 3.8. Loan [coming in v2.0]
- 3.9. Statistics
- 3.10. Sorting :
sortExpense,sortIncome,sortBudget,sortWish,sortAutoExp - 3.11. Find :
findExpense,findIncome,findWish,findBudget,findAutoExp - 3.12. Reminders
- 3.13. UI features
- 4. FAQ
- 5. Command Summary
1. Introduction
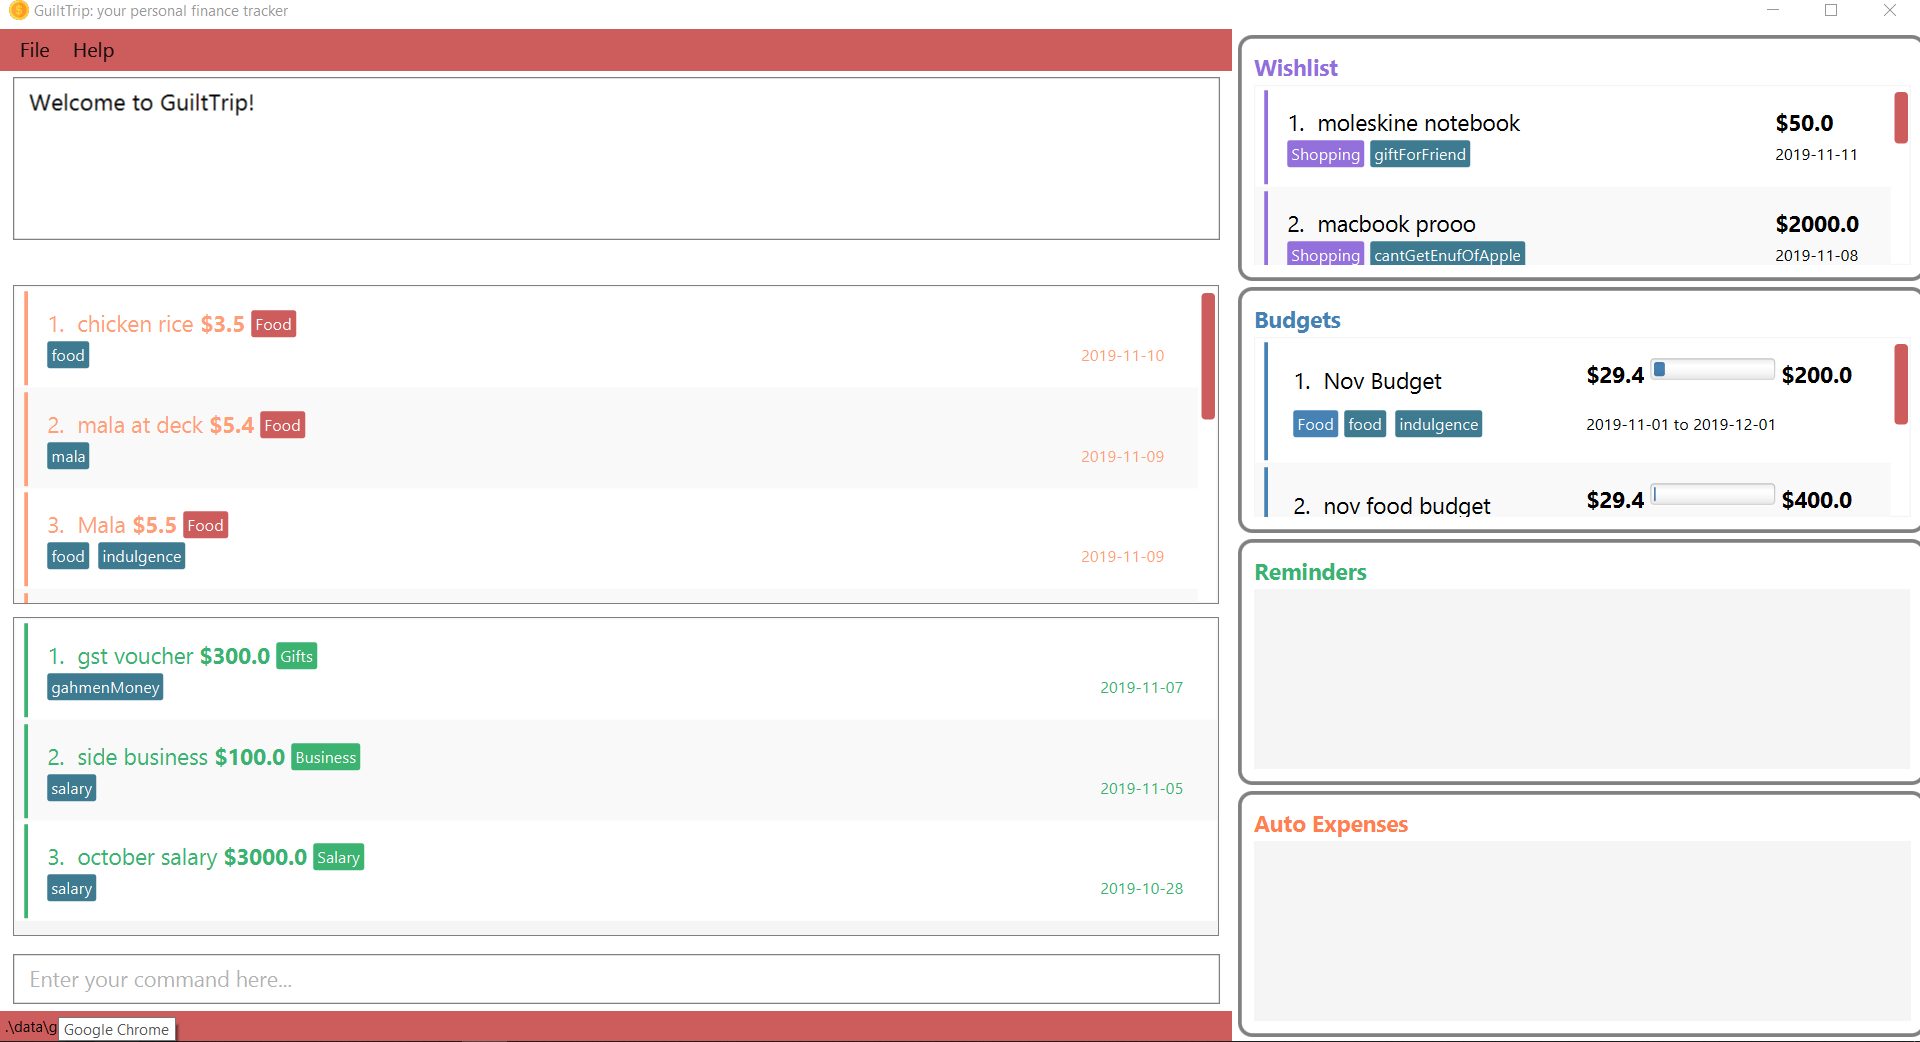
Craving for a nice bowl of Mala but can’t seem to save up enough for it? guiltTrip() is the perfect platform for those aspiring to be able to afford their Mala, finally! More importantly, guiltTrip() is optimized for those who prefer to work with a Command Line Interface (CLI) while still having the benefits of a Graphical User Interface (GUI). If you can type fast, guiltTrip() can get your finance tracker tasks done faster than traditional GUI apps.
2. Quick Start
-
Ensure you have Java
11or above installed in your Computer. -
Download the latest
guiltTrip().jarhere. -
Copy the file to the folder you want to use as the home folder for your guiltTrip.
-
Double-click the file to start the app. The GUI should appear in a few seconds.
-
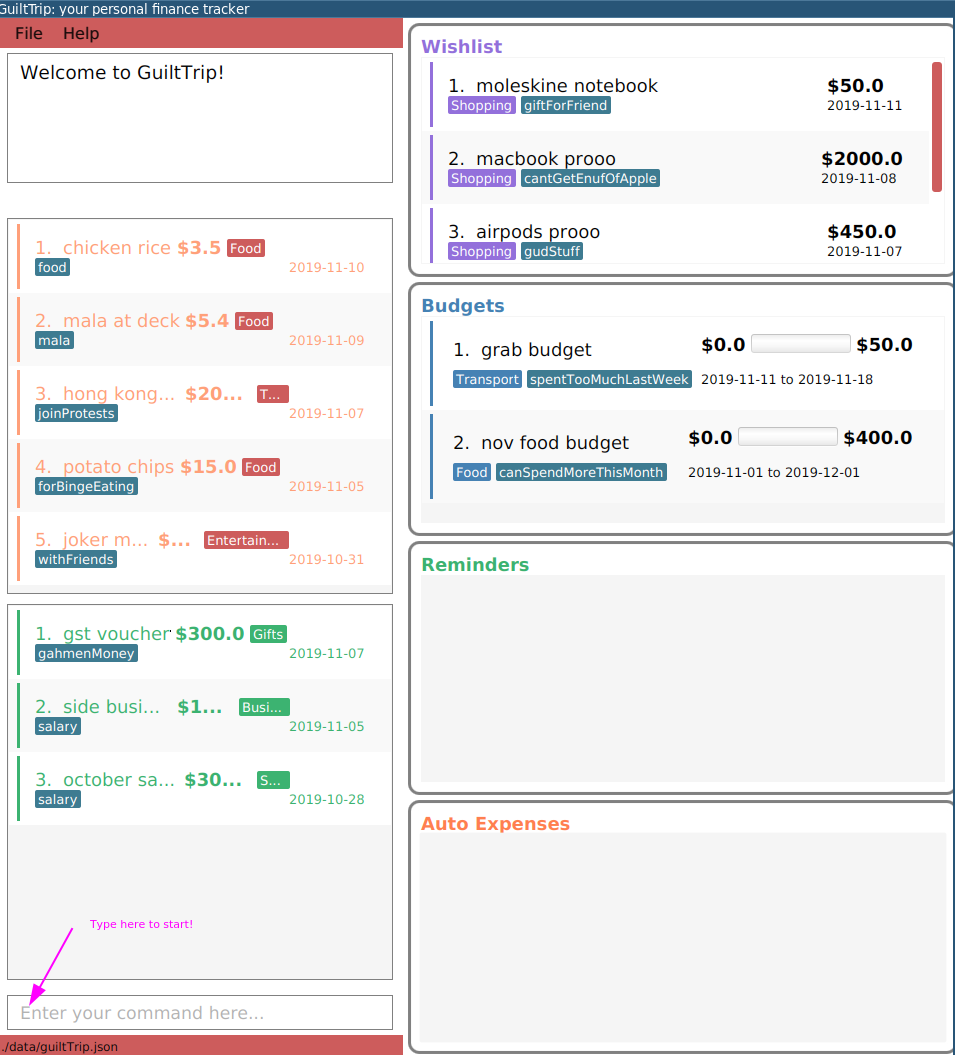
Type the command in the command box and press Enter to execute it.
e.g. typinghelpand pressing Enter will open the help window. -
Some example commands you can try:
-
list: lists all expenses and income -
addAutoExp f/monthly n/drinks amt/11.99 cat/Food: adds a recurring expense that will generate every day. -
addExpense cat/Food n/Mala amt/5.50 d/2019 09 09 tg/food tg/indulgence: adds the specified expense to your list of expenses -
toggle wishlist: toggles the wishlist panel -
exit: exits the app
-
-
Refer to Section 3, “Features” for details of each command.
3. Features
Command Format
-
Words in
<>are the parameters to be supplied by the user e.g. inaddExpense [n/<description>],<description>is a parameter which can be used asn/mala at deck. -
Items in square brackets are optional e.g
n/NAME [tg/TAG]can be used asn/mala at deck tg/malaor asn/mala at deck. -
If multiple Prefixes of the same type were specified, guiltTrip usually accepts only the latest prefix, for example
n/mala tg/drinks n/llama meat, guiltTrip will only accept llama meat as the description.
3.1. AutoSuggestion
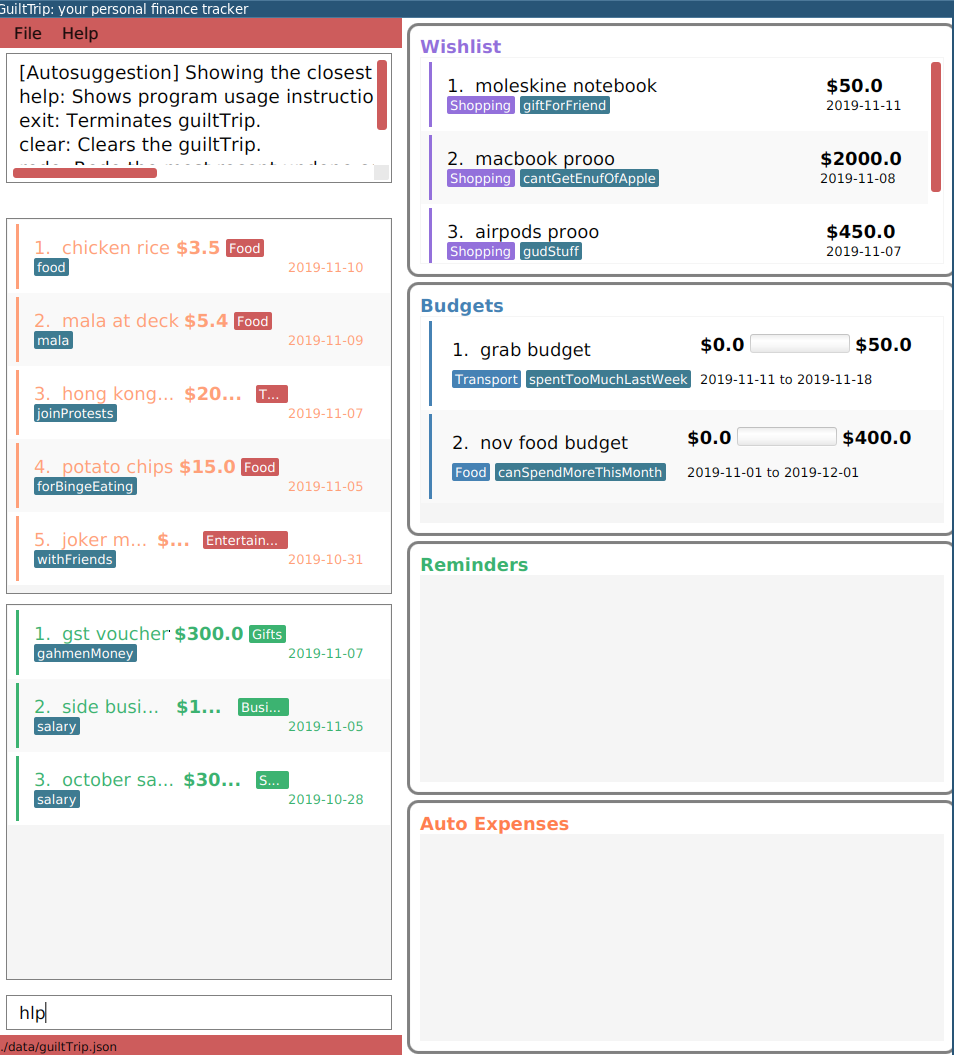
The first thing you will notice once you start typing in the command box, is AutoSuggest. This is an intelligent bot that helps you navigate through your finance journey with GuiltTrip()!
Simply key in anything you like to start!!
For example, you are new and would like to get some help! But your shaky hands made you
type hlp instead! Don’t worry, we have a Edit-Distance-based algorithm that can predict your
command. Isn’t that cool?
Ahh okay! Seems that we can just kick start right away! How about recording that mala we ate at The Deck this afternoon!
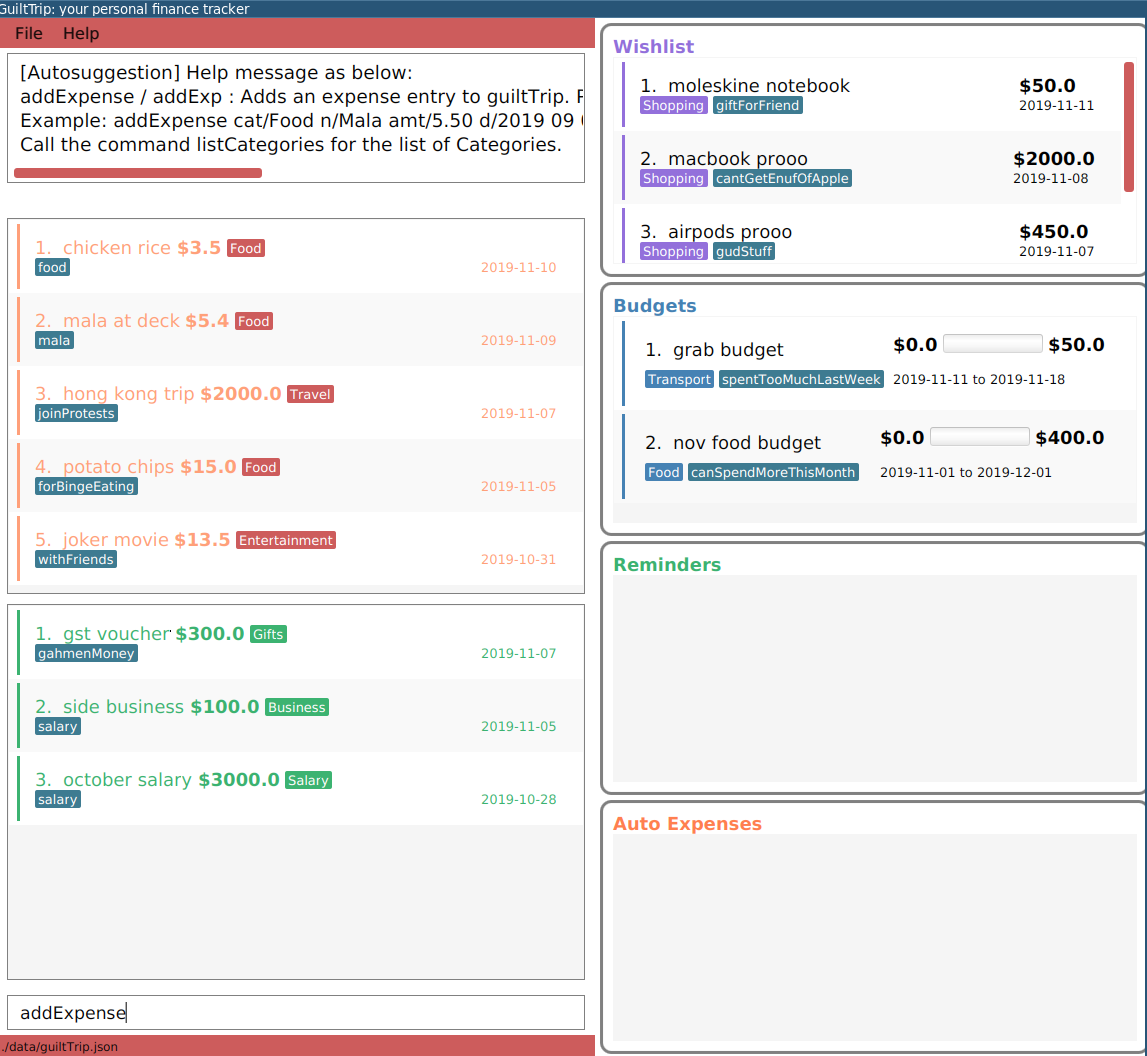
Now since addExpense is a valid command, your friendly AutoSuggester is showing you how to use this command!
Isn’t this COOL?
3.2. Categories
Ever feel like your list of expenses are extremely messy? This is where categories come in handy! Every entry belongs to one category, which makes it easier for you to organize your data! Categories can be either grouped under Expense or Income. GuiltTrip comes with a default set of Categories as listed below. All entries must have a category.
-
Income:
Business, Salary, Gifts, Loans -
Expense:
Food, Travel, Family, Bills, Entertainment, Transport, Shopping, HealthCare, Groceries, Rent
Categories for Expense, Budget and Wish all belong under the Expense Category. Categories for Income belong under the Income Category. An example would be when creating a new Budget, the category that the budget was created must belong to one of the existing categories in Expense.
3.2.1. Adding Category : addCategory
If the default set of categories does not cover your needs, you can add more by calling addCategory.
Adds a new Category for either Income or Expense. The category added must not currently exist in the application. Category names are case-insensitive.
Format: addCategory cat/<category type> n/<category name>
-
<category type>: The type of Category that the new addition is under. -
<category name>: The name of the new Category.
Example Usage:
-
If you want to add a new category CodingServices under Income, enter the command
addCategory cat/Income n/CodingServices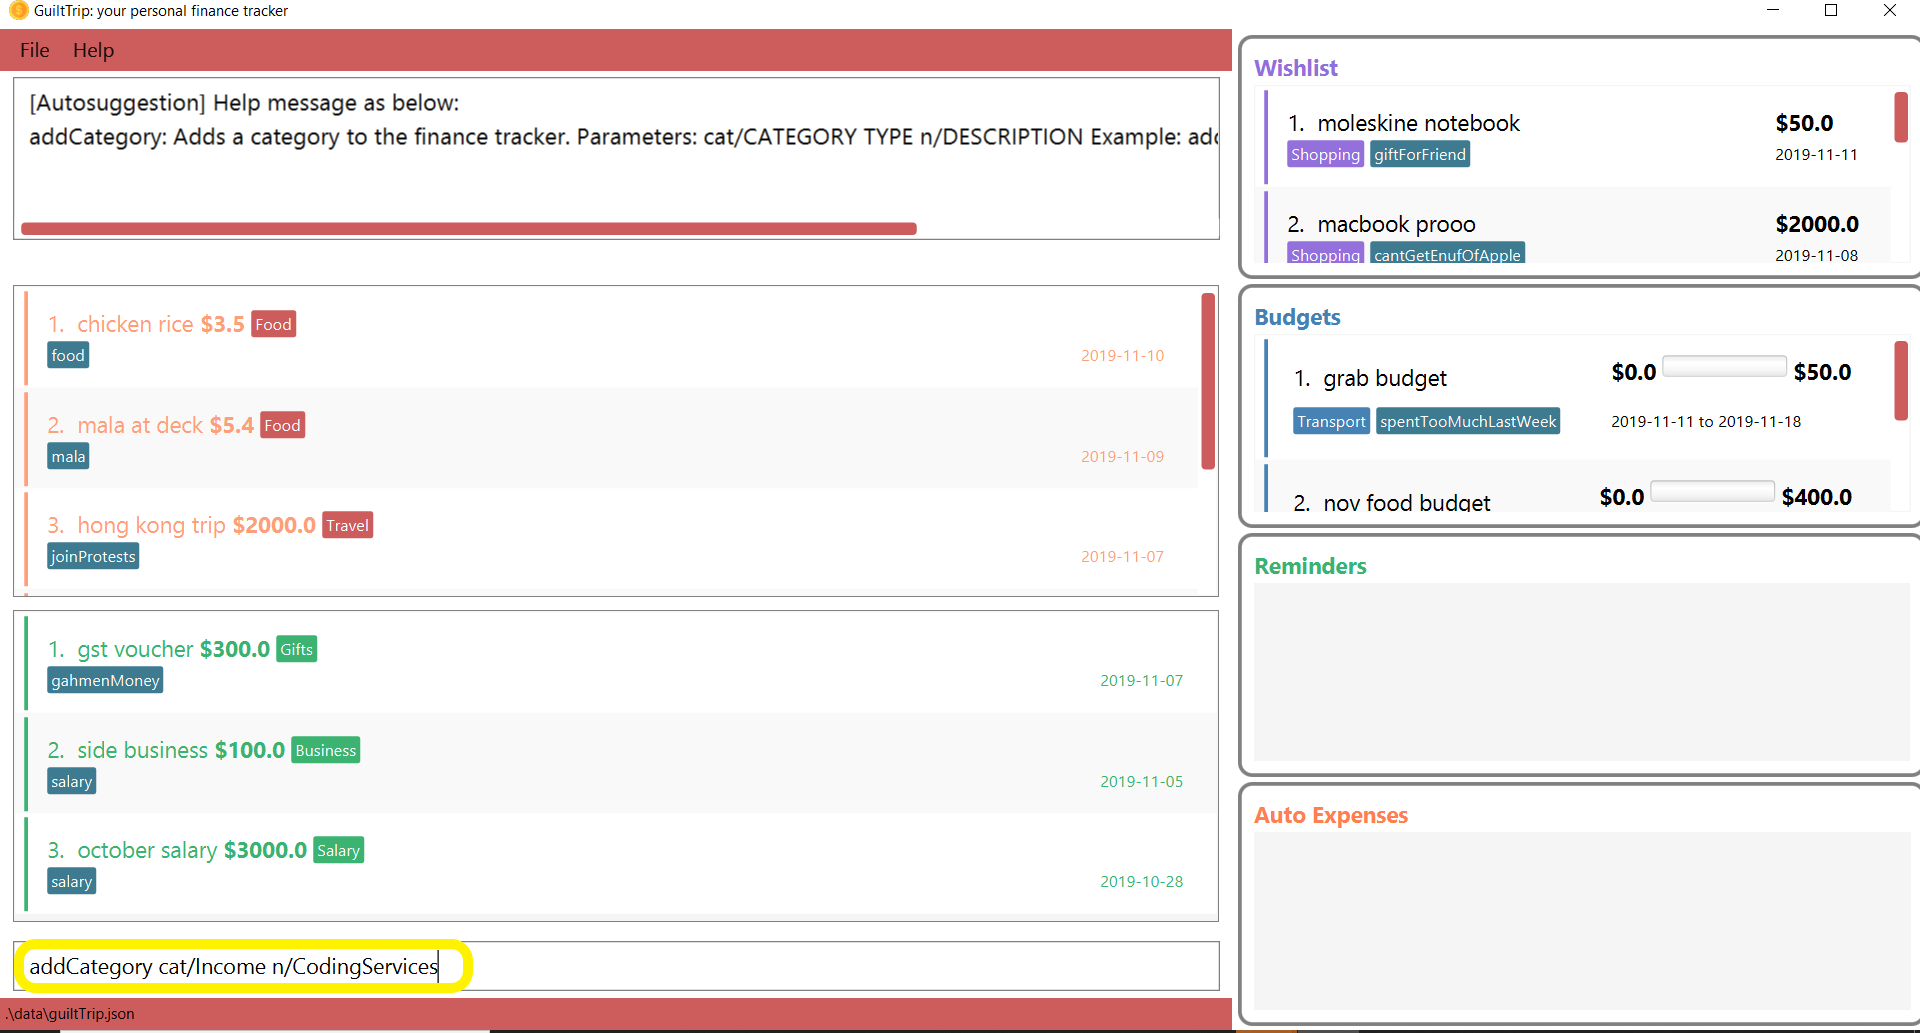
-
The new category will thus be added to guiltTrip. You can verify it using
listCategories.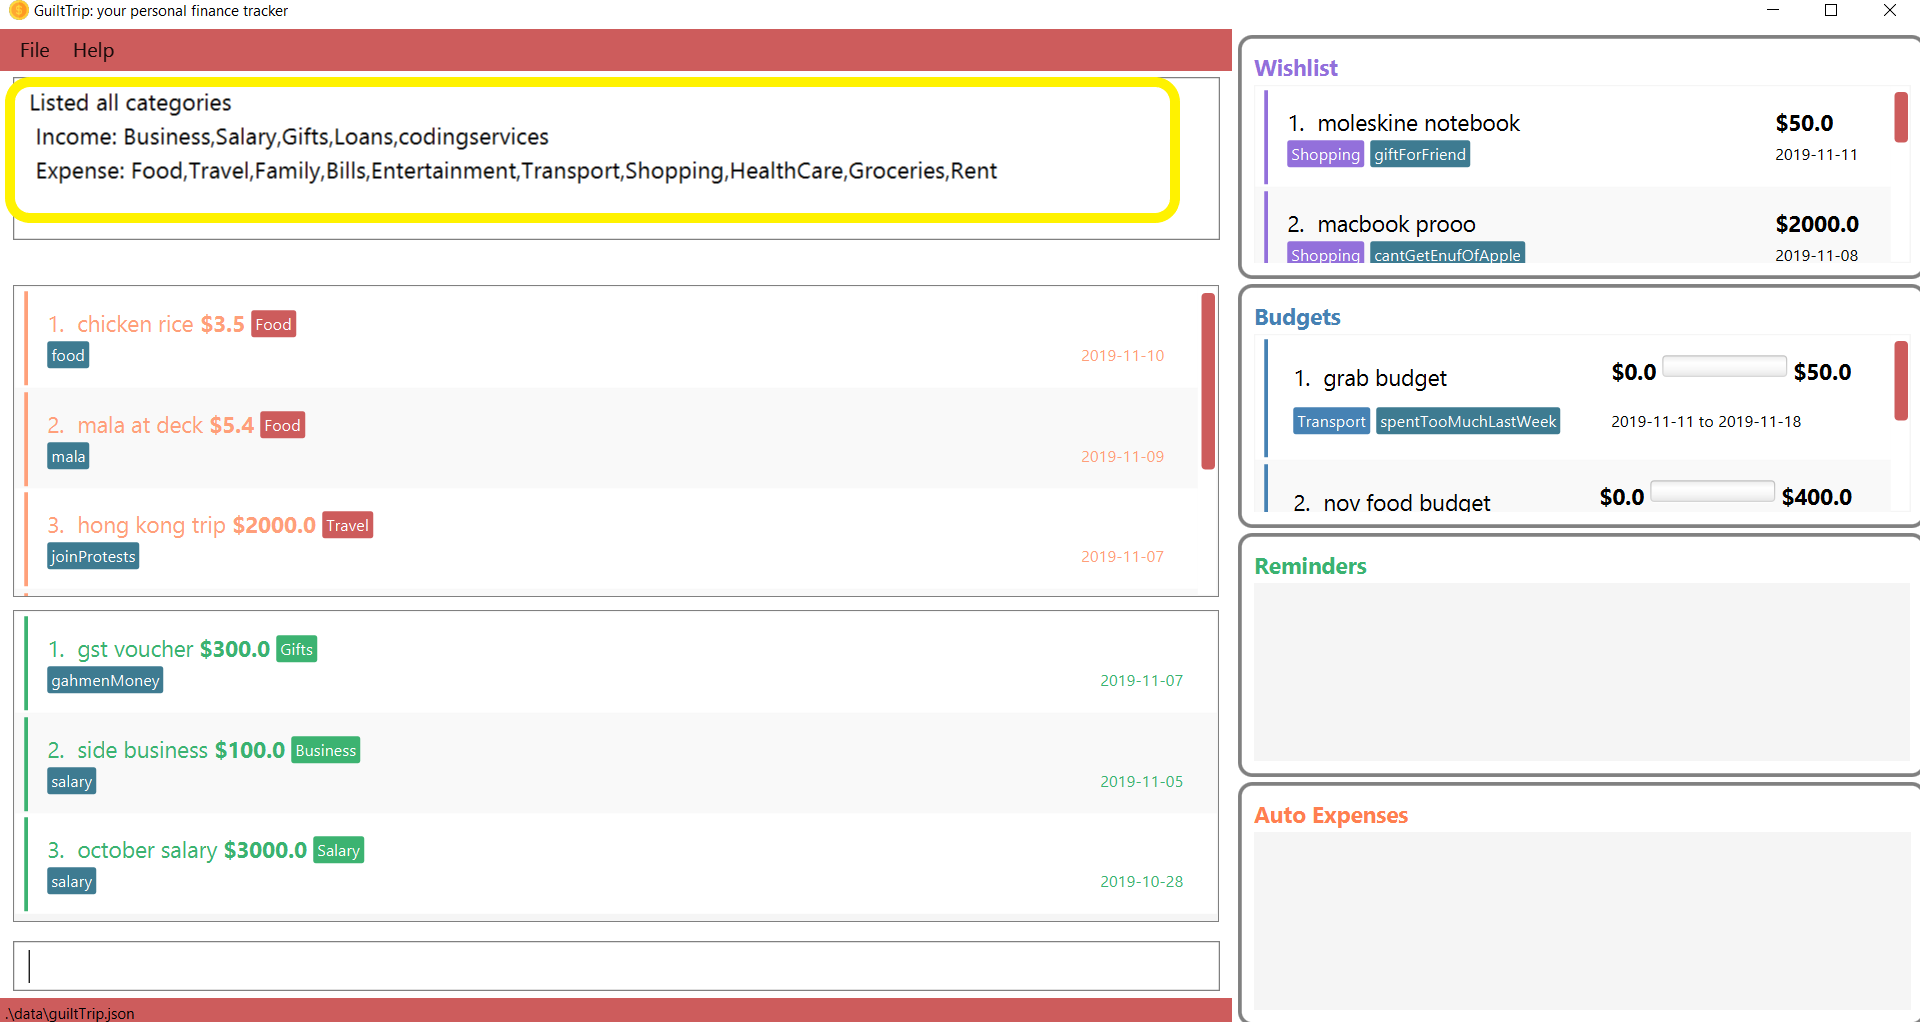
Other Examples:
-
addCategory cat/Expense n/Transport -
addCategory cat/Income n/Lottery
Editing Category : editCategory
Edits a current category’s description. The category to be edited must exist in the current list of Categories whether it be in the Expense CategoryList or the Income CategoryList. The new name for the category must not be a duplicate of existing categories.
Format: editCategory cat/<category type> o/<old category name> n/<new category name>
-
<category type>: The type of Category that the edited Category is under. -
<old category name>: The original name of this Category. -
<new category name>: The new name of this Category.
Example Usage:
-
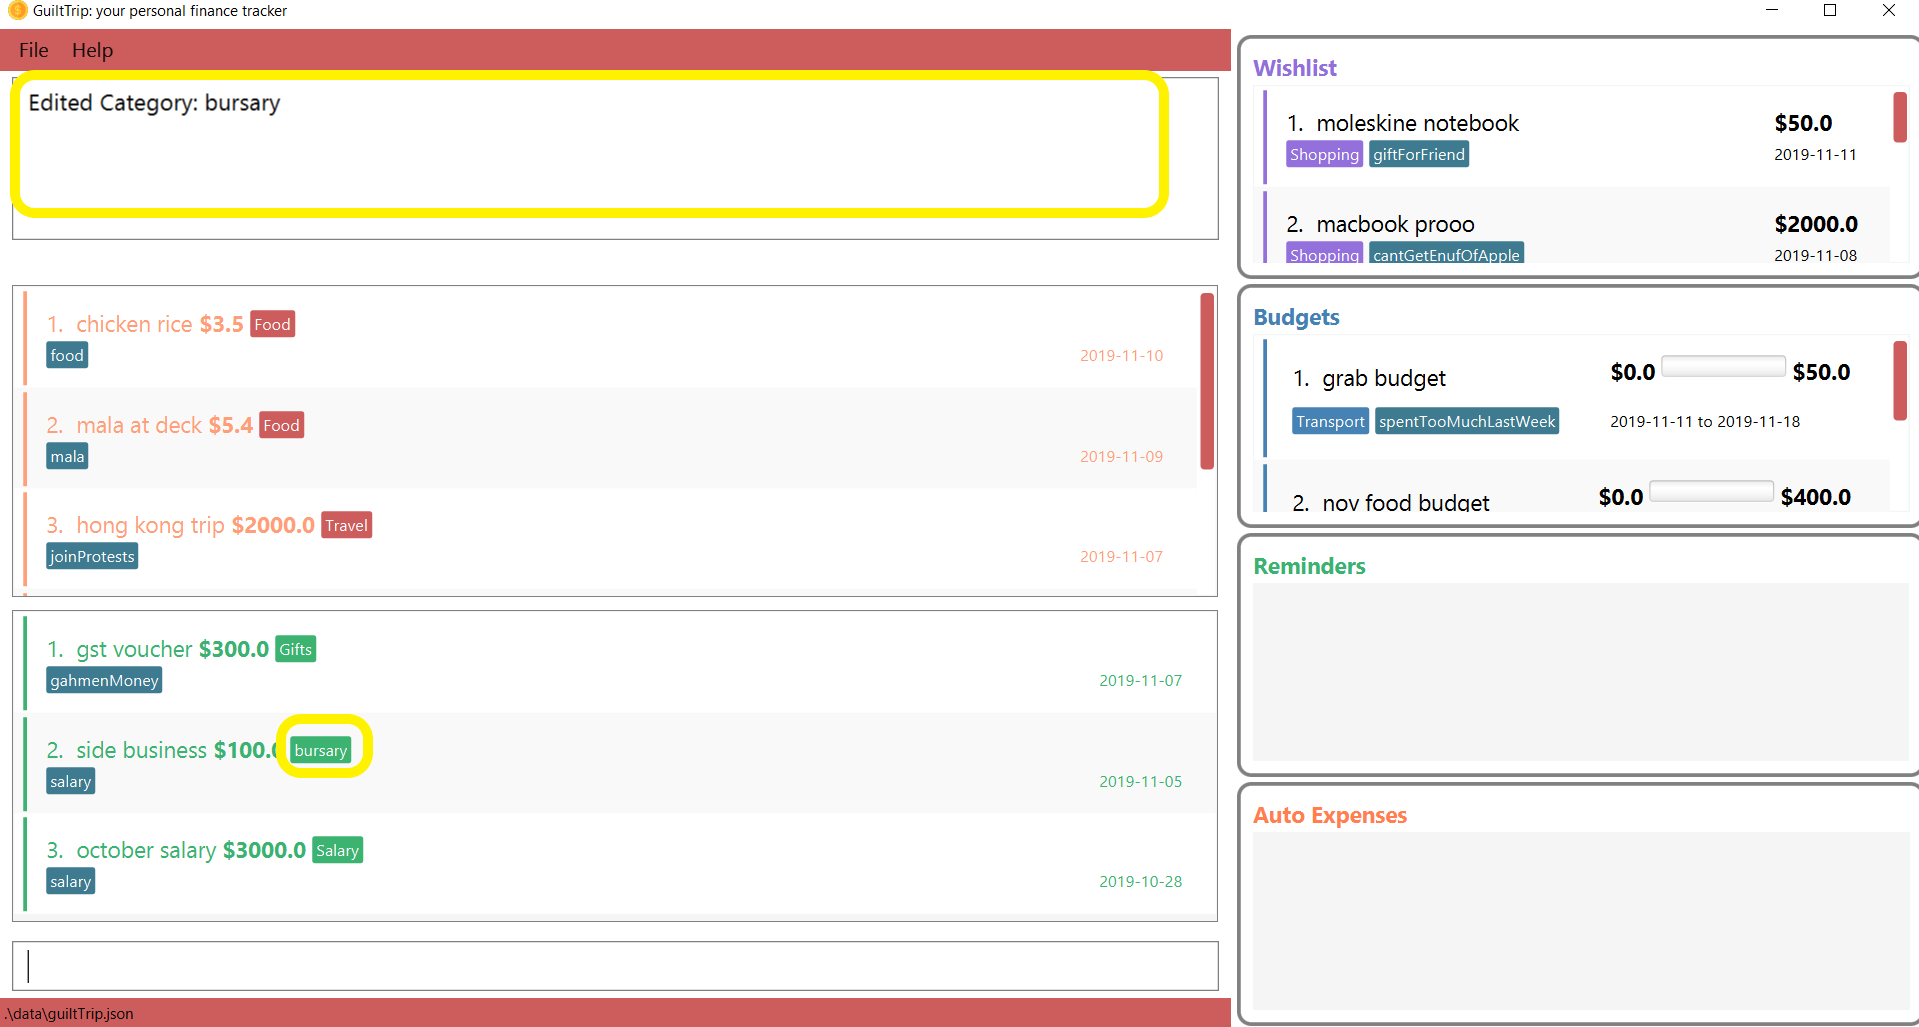
If you would like to edit an existing Category Business to Bursary under Income, enter the command
editCategory cat/Income o/Business n/Bursary.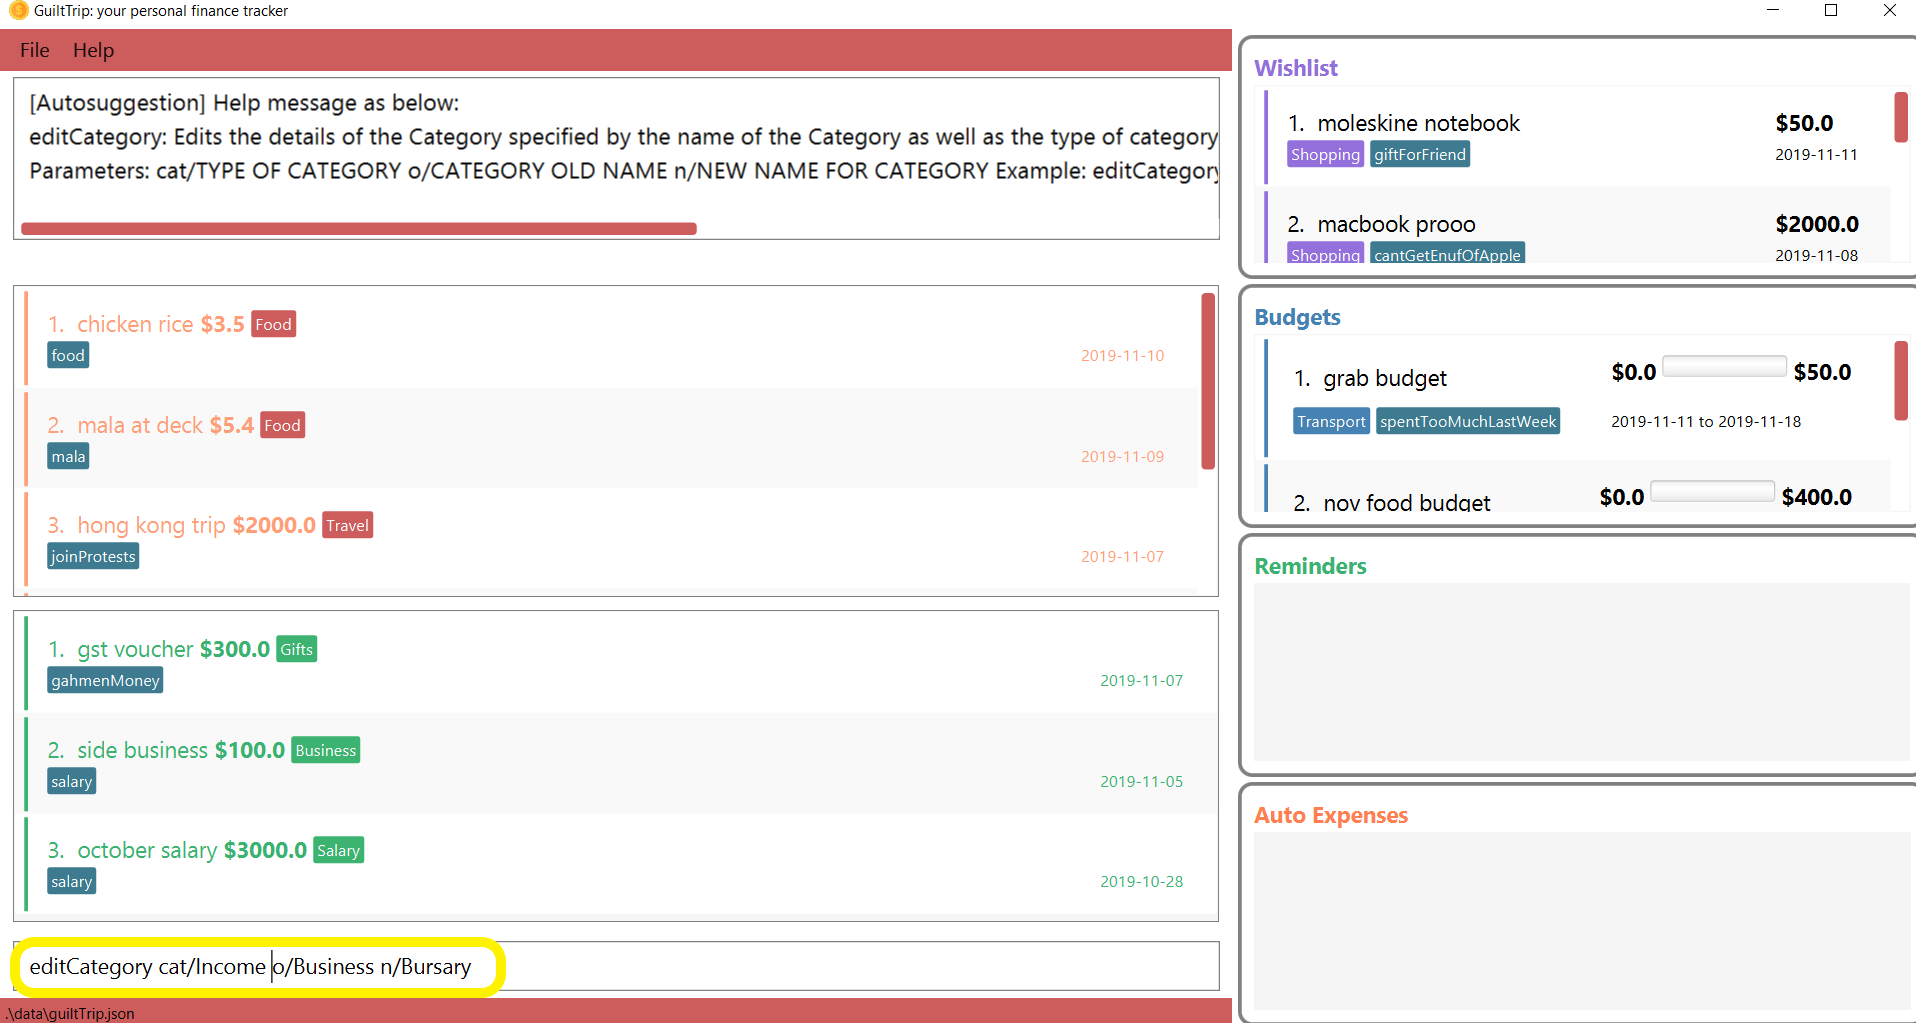
-
The old category will thus be edited in guiltTrip. All existing entries will also be renamed as shown below.
Other Examples:
-
editCategory cat/Income o/Business n/HotelManagement -
editCategory cat/Expense o/Family n/Pets
3.2.2. Listing Categories : listCategories
Lists all the current categories the user has.
Format: listCategories
Example: listCategories
3.2.3. Deleting Category : deleteCategory
Deletes a category from guiltTrip. The category that is deleted should not have any entries under it. It must also already exist in guiltTrip.
Format: deleteCategory cat/<category type> n/<category name>
-
<category type>: The type of Category that the deleted Category is under. -
<category name>: The name of the deleted Category.
Example Usage:
-
If you would like to remove an existing Category Rent under Expense, type
deleteCategory cat/Expense n/Rent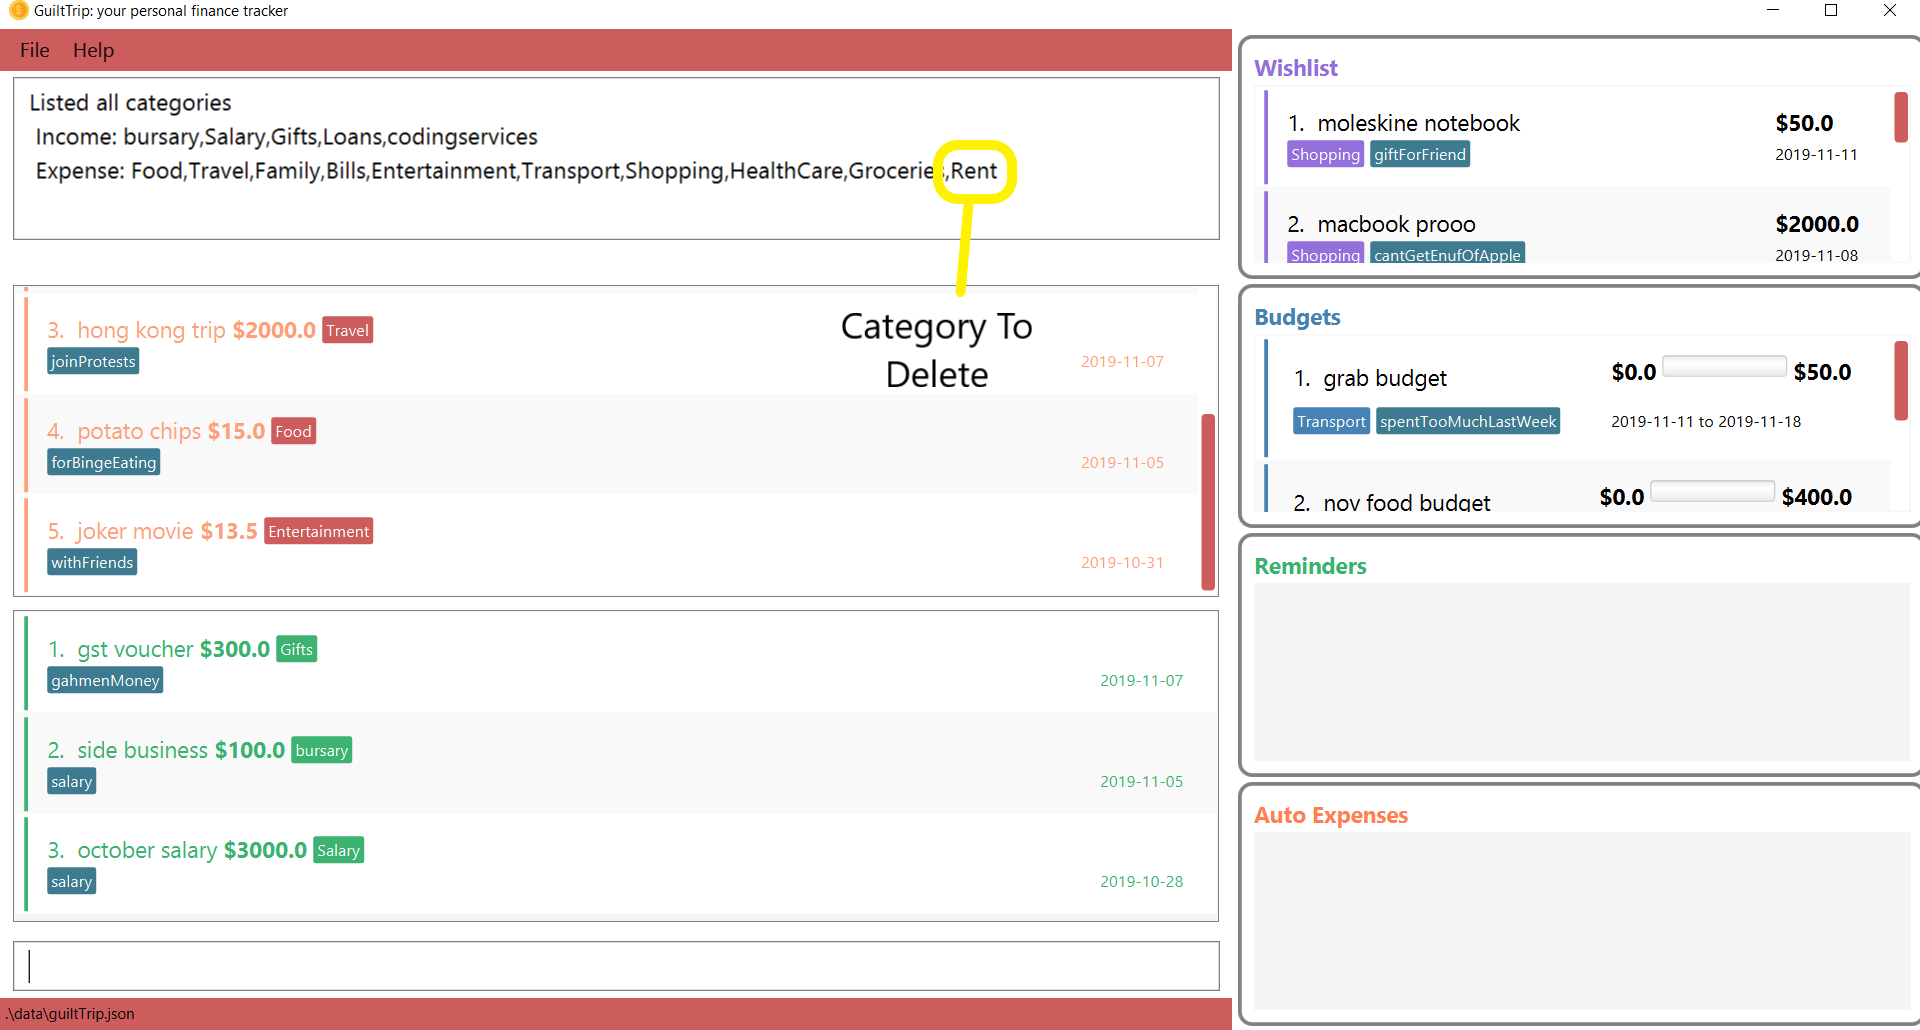
-
The old category will thus be deleted from guiltTrip. You can verify that it is removed using
listCategories.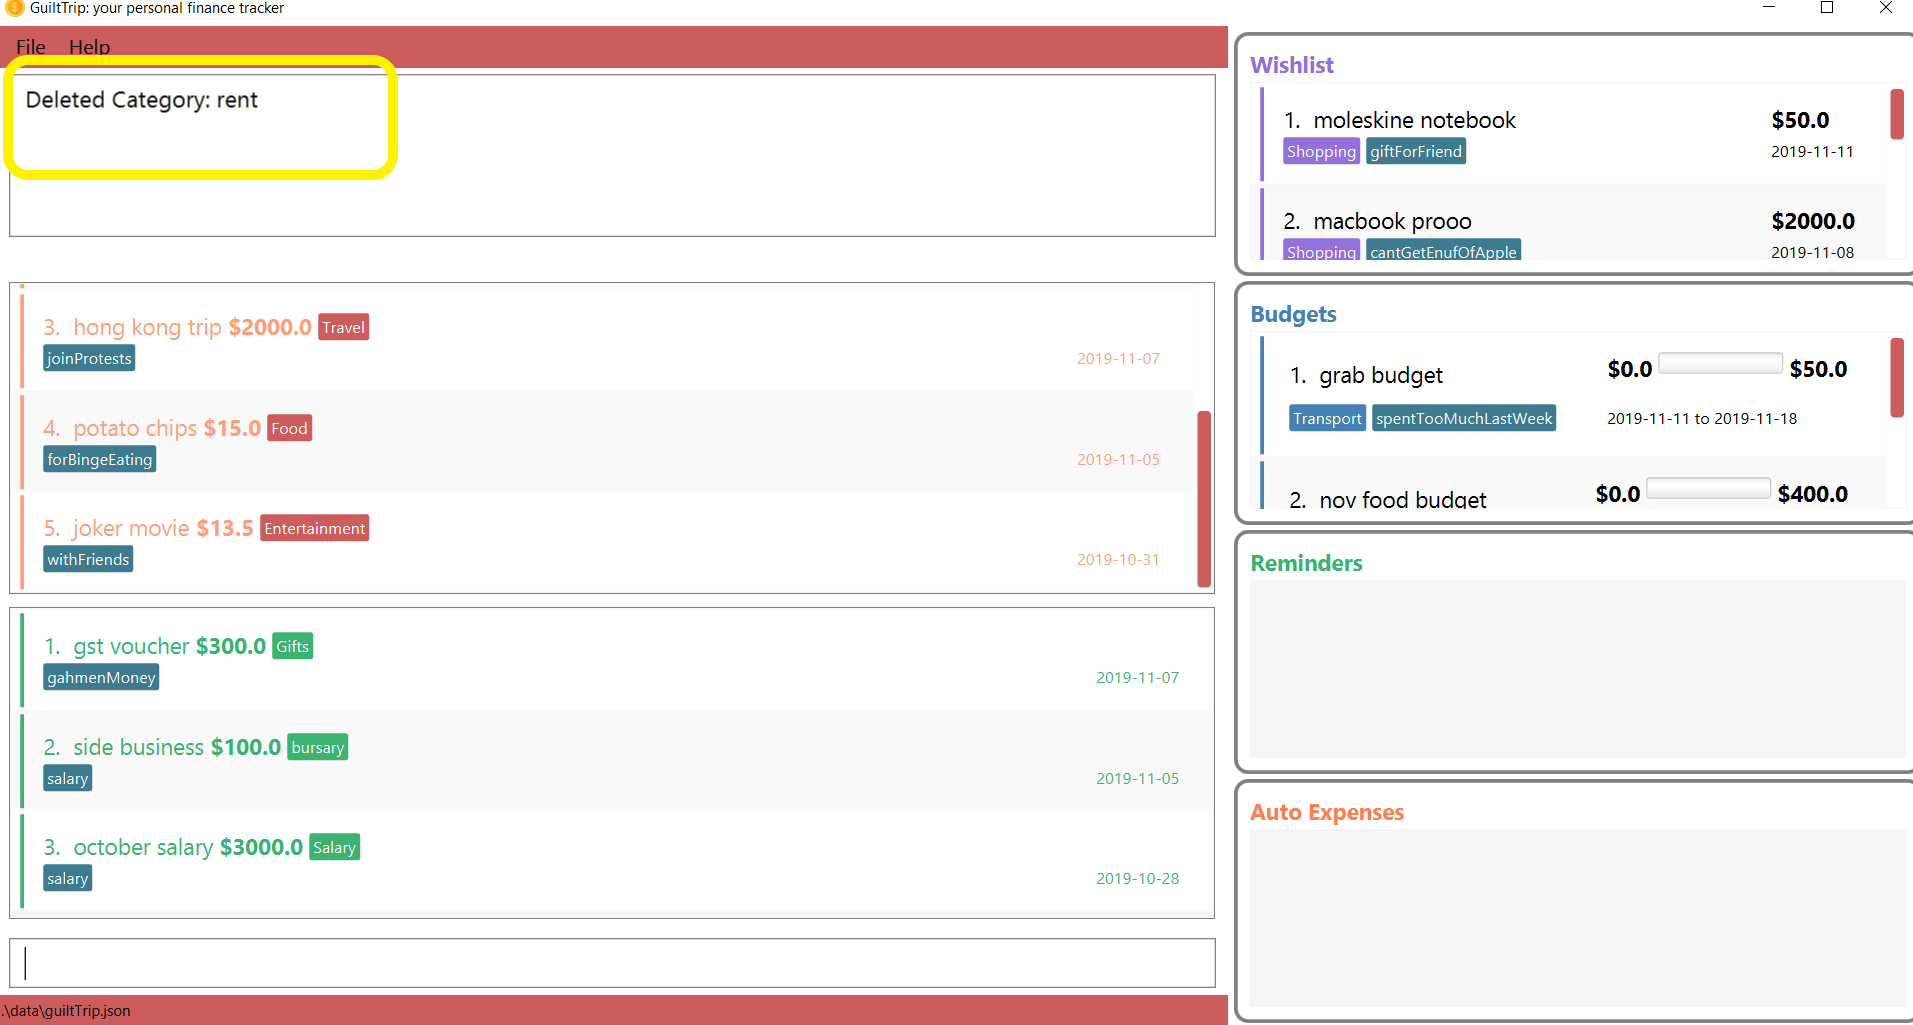
Other Examples:
-
deleteCategory cat/Income n/Business -
deleteCategory cat/Expense n/Food
3.3. Expenses
Want to feel guiltTripped by your one Mala and Bubble Tea per day? GulitTrip’s main function is thus used to record your sinful expenses and income.
3.3.1. Adding Expense: addExpense
Adds a new expenditure to your total spending. Some things to take note:
-
Inputs can be arranged in a different order.
-
Tag may be omitted from the command.
-
Category must already exist in the list of expense categories. (type
listCategories) -
Amount must be larger than 0 and less than 10 million.
Format: addExpense cat/<category> n/<description> amt/<amount> d/<date> [tg/<tag>]
-
<category name>: Thecategorythat the expense falls under to. -
<description>: The name of this expense. -
<amount>: The amount spent for this expense. It can contain at most 2 decimal points. -
<date>: The date of this expense. -
<tag>: Optional tags for this expense. The tag must not have spaces and can only be alphanumeric.
Example Usage:
-
If you would like to add a record of a recent splurging on mala, key in the command
addExpense cat/Food n/Mala amt/5.50 d/2019 11 09 tg/food tg/indulgence.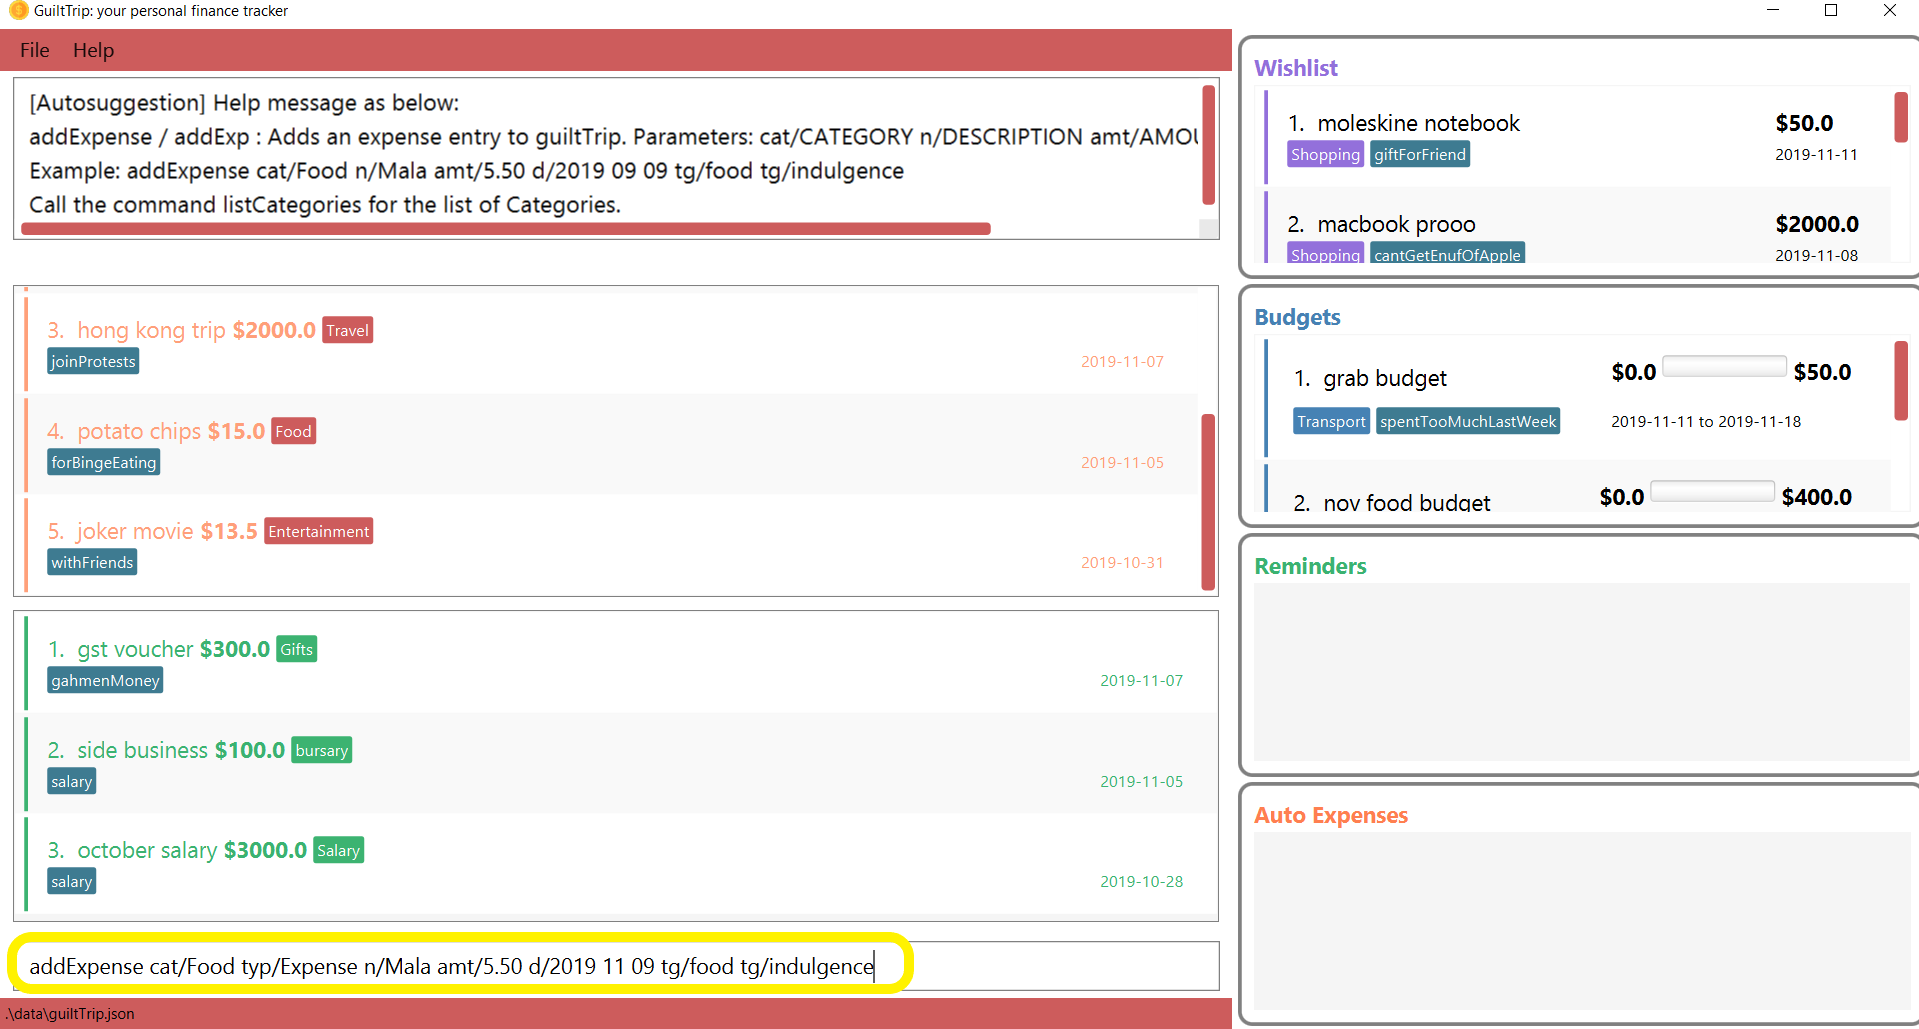
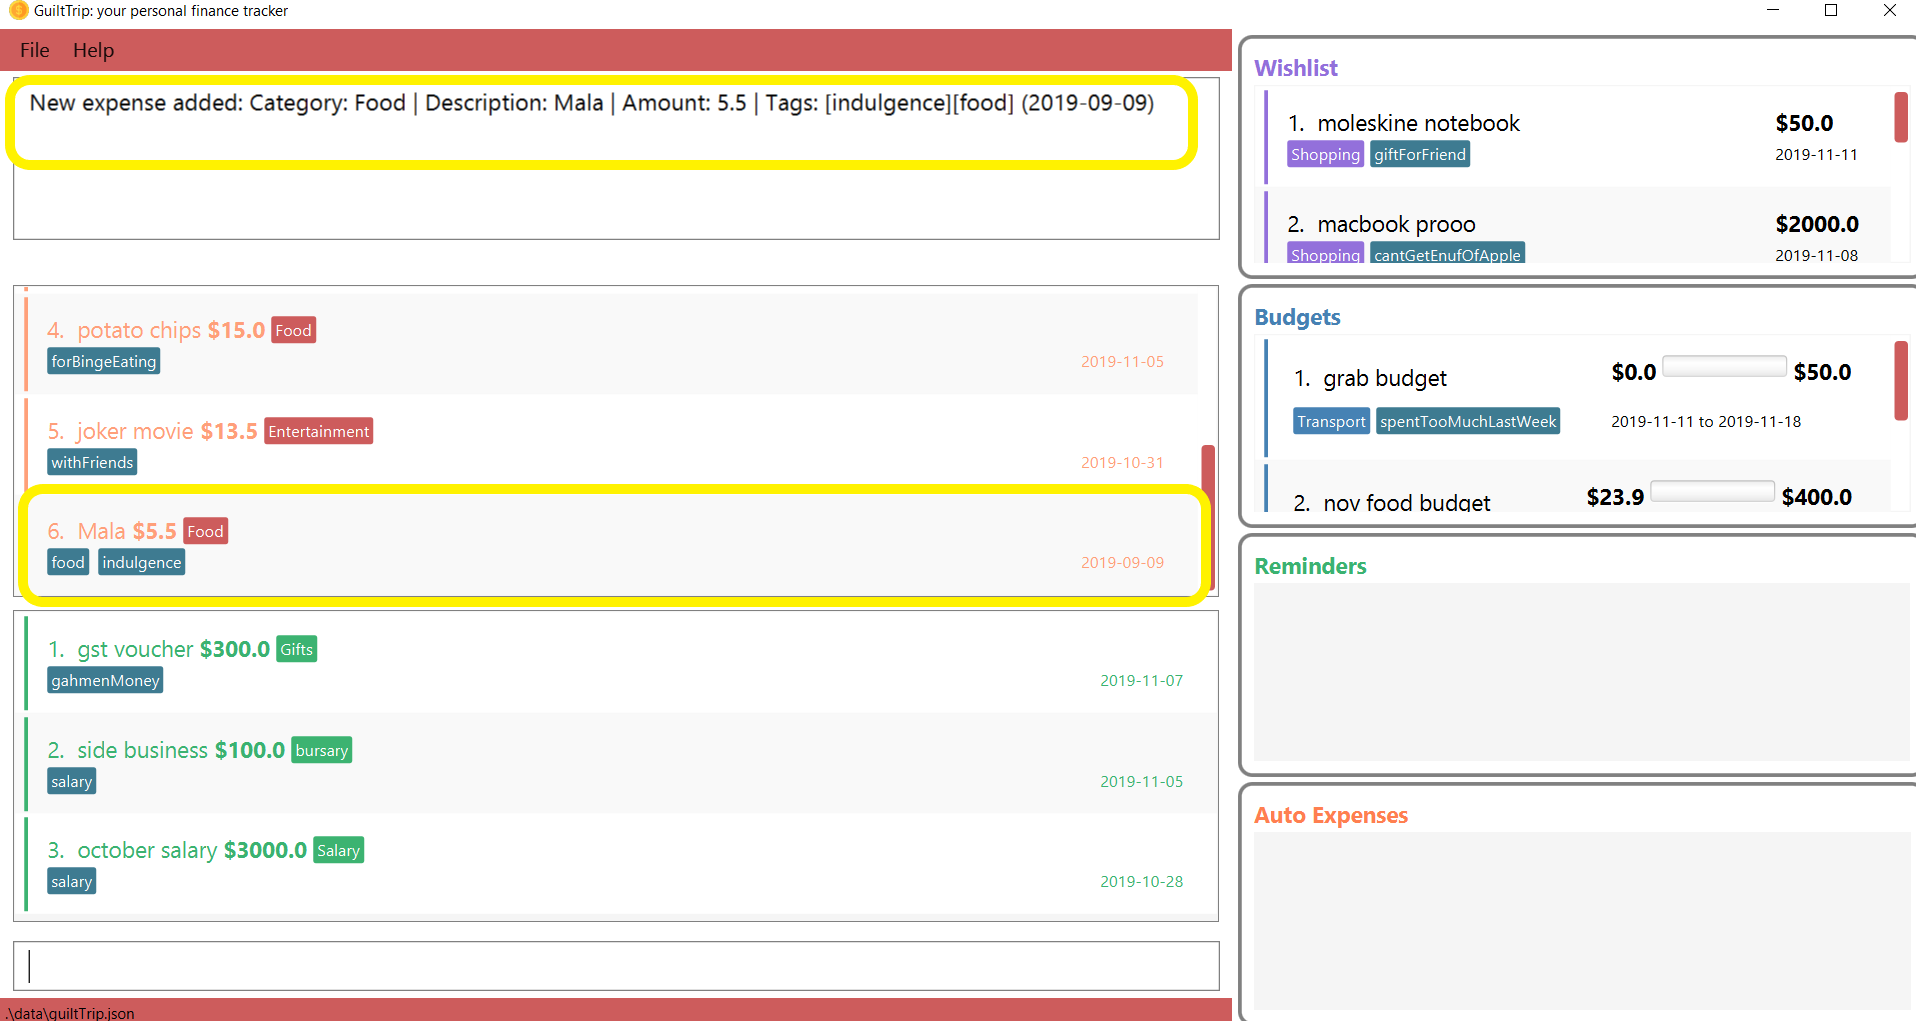
-
You should see the new expense being added into in the list of entries as displayed below.
Other examples:
-
addExpense cat/Gifts n/Rubber Duck for Yee Jian amt/55 d/2019 11 09 tg/sanity check -
addExpense cat/Travel n/Travel To Alaska amt/550000 d/2019 09 09
3.3.2. Listing Expenses: list
Lists the expenses (as well as incomes) in the main panel.
Format: list
3.3.3. Editing a Expense: editExpense
Edits a current entry with the given index number. You may edit one or more fields, but the category must already exist in the list of categories, whether it is Income Category or Expense Category.
Format: editExpense <index> [cat/<category>] [n/<description>] [d/<date>] [amt/<amount>] [tg/<tag>]
-
<index>: Theindexof the entry in the entry panel. Additionally the index must be greater than zero and positive. -
You can update any of the fields of the entry. But you must at least edit one field.
Example Usage:
-
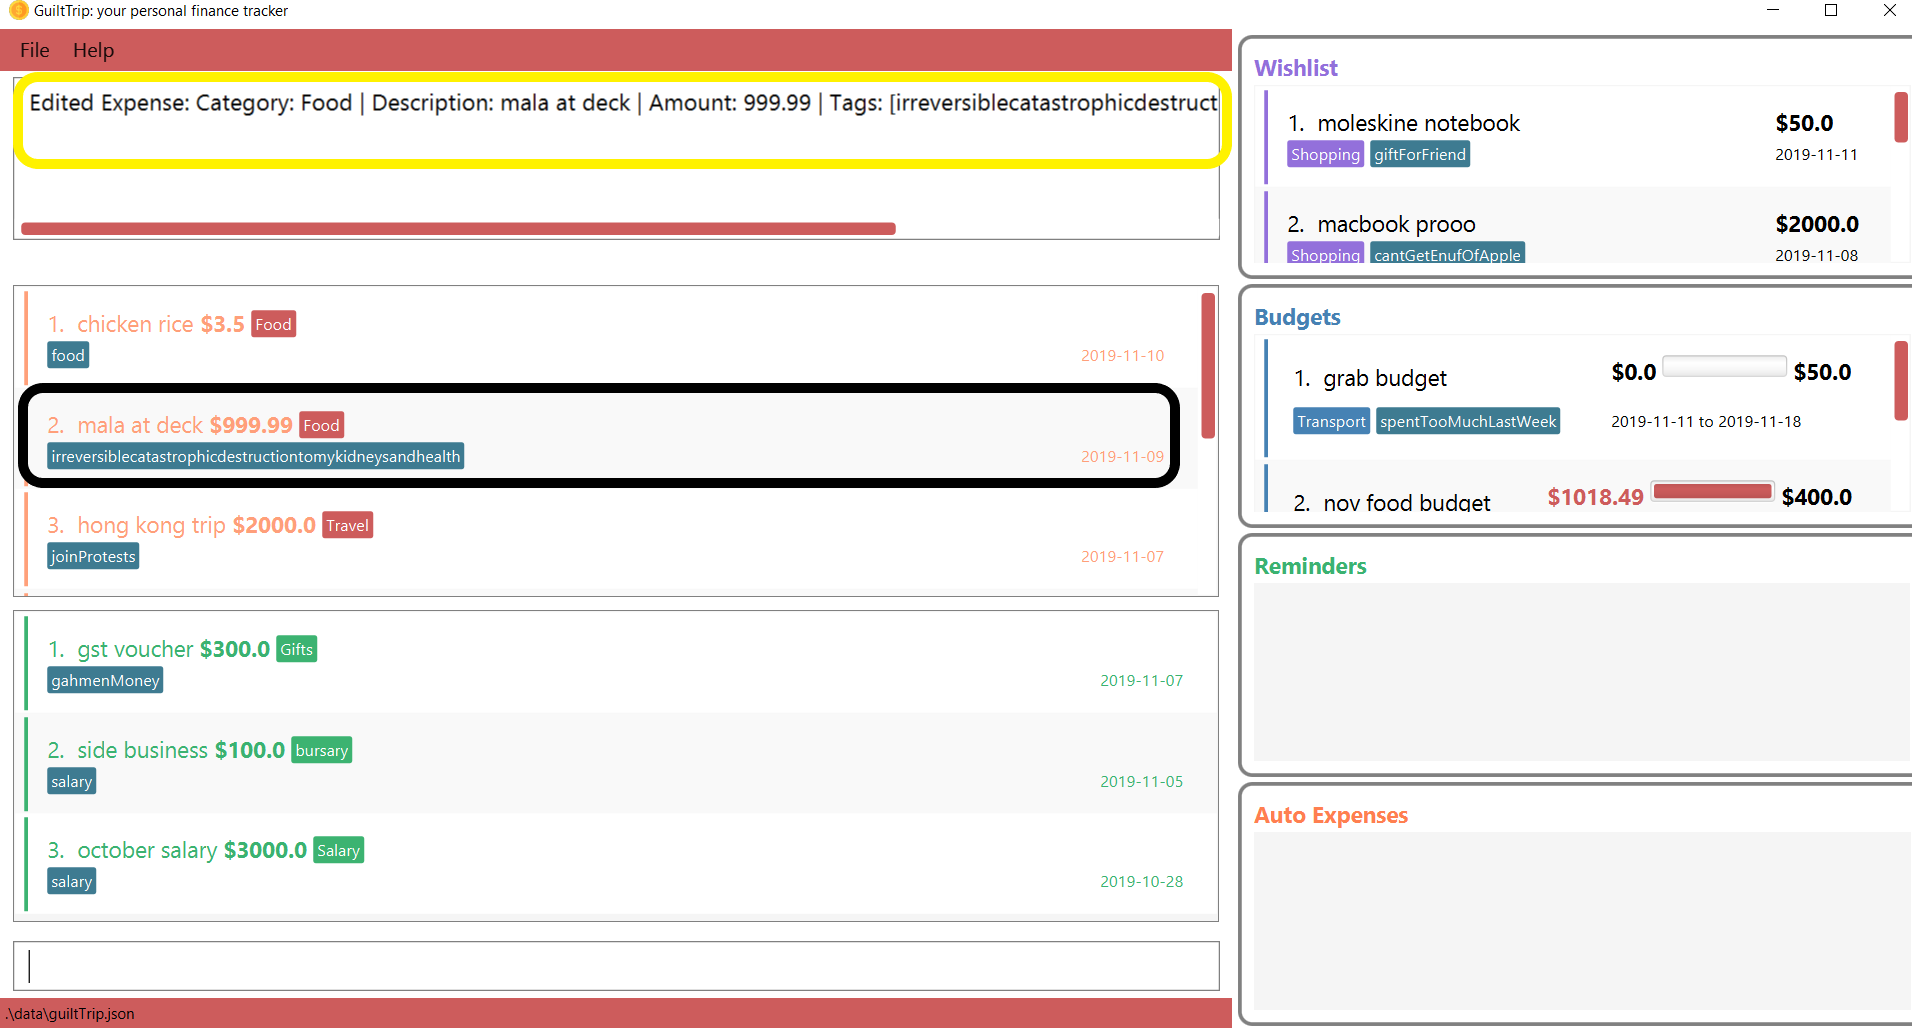
If you would like to edit a recent Expense’s tag, whereby the expense is located at index 2 as shown below, key in the command
editExpense 2 amt/999.99 tg/irreversiblecatastrophicdestructiontomykidneysandhealth.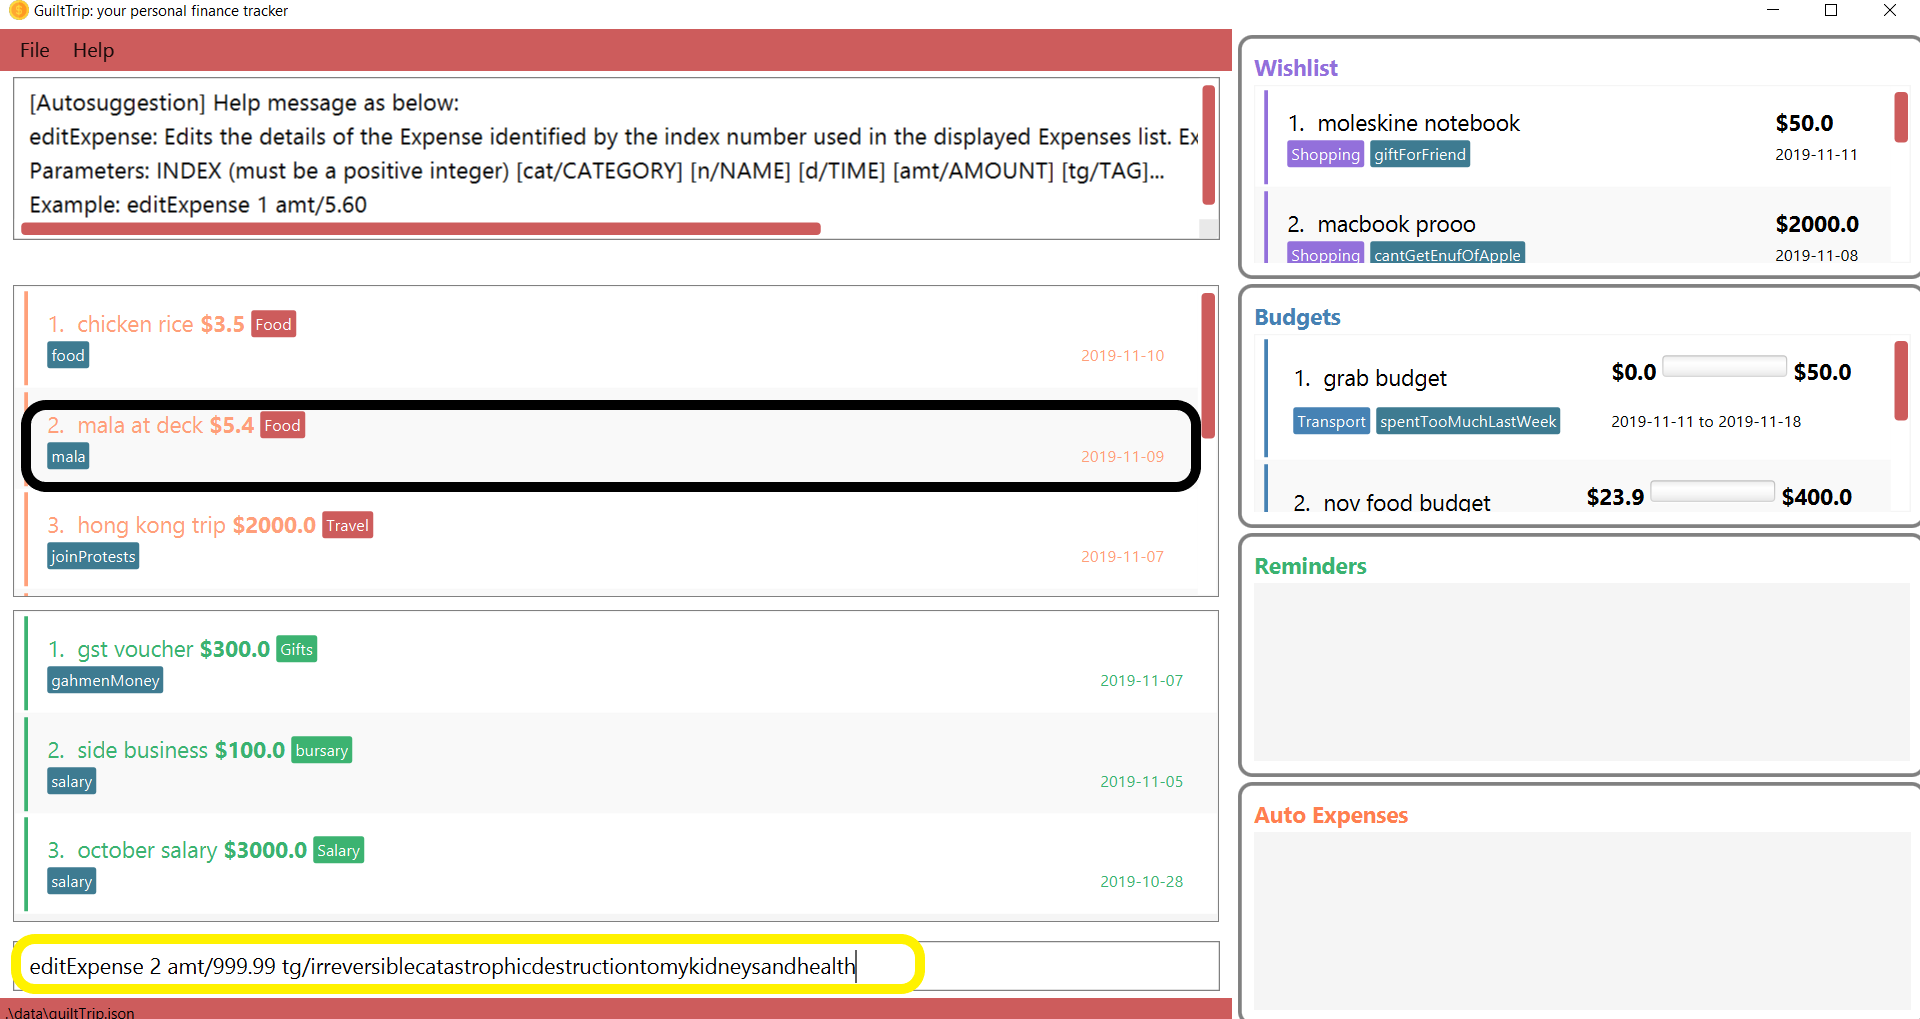
-
You should see the new expense being edited in the list of entries as displayed below.
Other Examples:
-
editExpense 1 cat/Food n/deck mala with friends -
editExpense 3 cat/Business n/Selling Coding Services amt/0.01 -
editExpense 5 tg/helpmykidneys
3.3.4. Deleting a Expense: deleteExpense
Deletes the recorded expenditure with the given index number.
Format: deleteExpense <index>
-
<index>: Theindexof the entry in the entry panel. Additionally the index must be greater than zero and positive.
Example Usage:
-
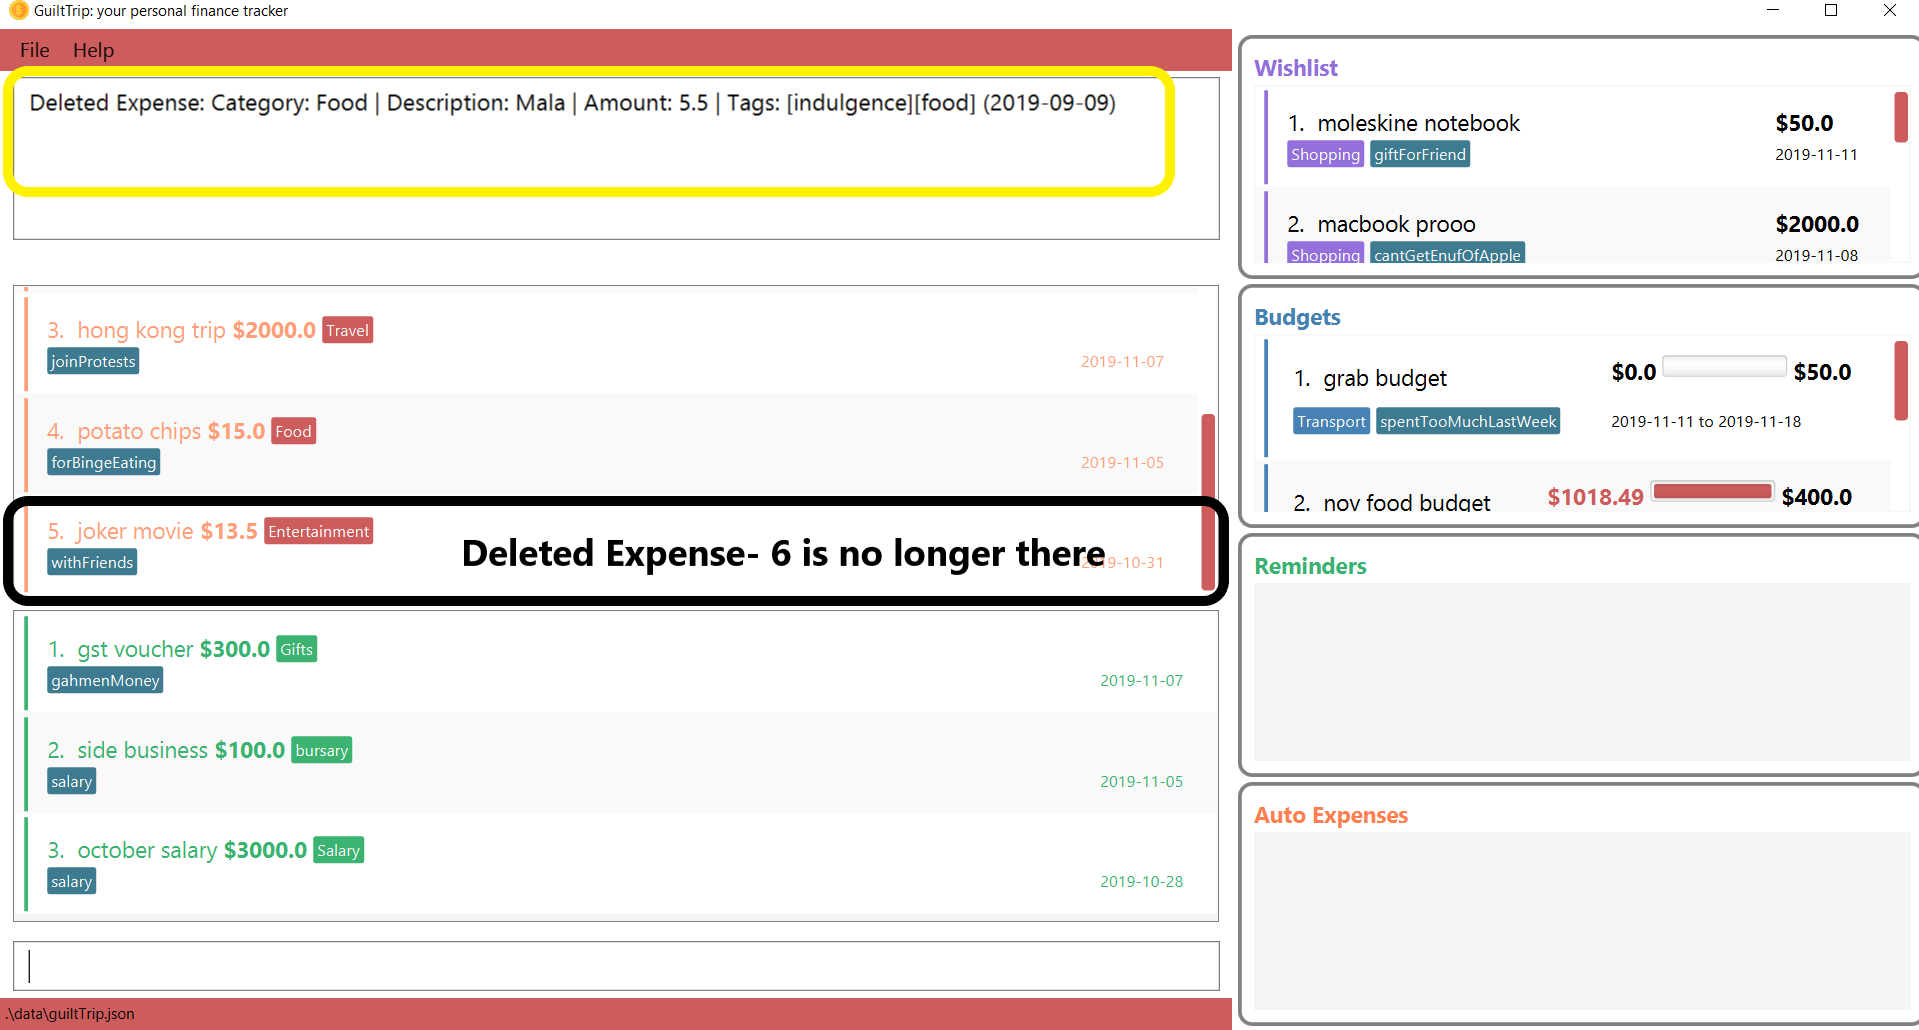
If you would like to delete an expense, whereby the expense is located at index 6 as shown below, key in the command
deleteExpense 6.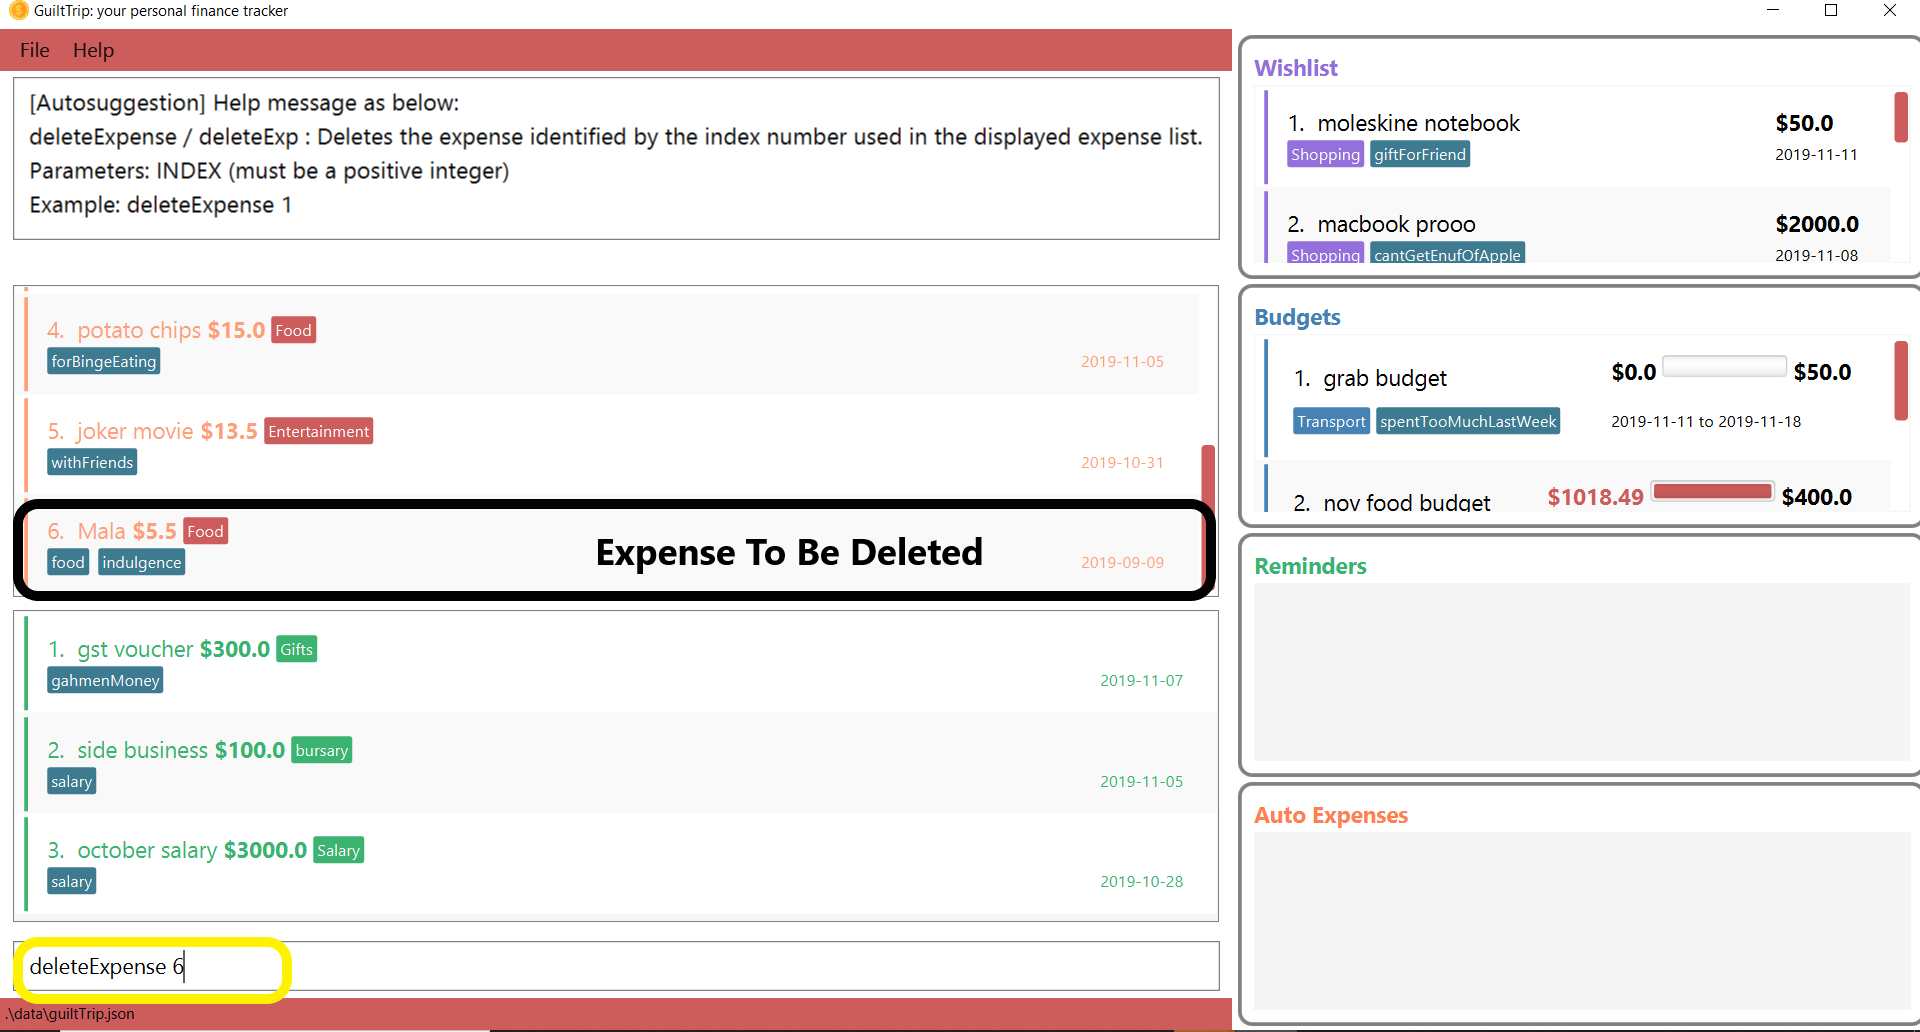
-
You should see the expense being deleted in the list of entries as displayed below.
Other Examples:
-
deleteExpense 2 -
deleteExpense 4
3.4. AutoExpense
3.4.1. Adding AutoExpense : addAutoExp
Adds an automatically recurring expense every day/week/month (frequency) with the given description and amount.
Format: addAutoExp f/<frequency> n/<description> amt/<expenditure> cat/<category>
[tg/<tag1> tg/<tag2> d/<starting date>]
To list all categories, you can type listCategories.
For frequency, we accept month/day/year/week and also monthly/daily/weekly/fortnightly/yearly/anually. Type away
and be pleased by the flexibility!
For dates, only dates within 2000 and 2100 are allowed. When you put a date before the current time, past records will be automatically generated. At your own risk! GuiltTrip can’t trip you for too far back.
Examples:
-
addAutoExp f/monthly n/spotify amt/11.99 cat/Entertainment -
addAutoExp f/week n/whampoa beancurd amt/1.80 cat/Food tg/indulgence d/10/10 -
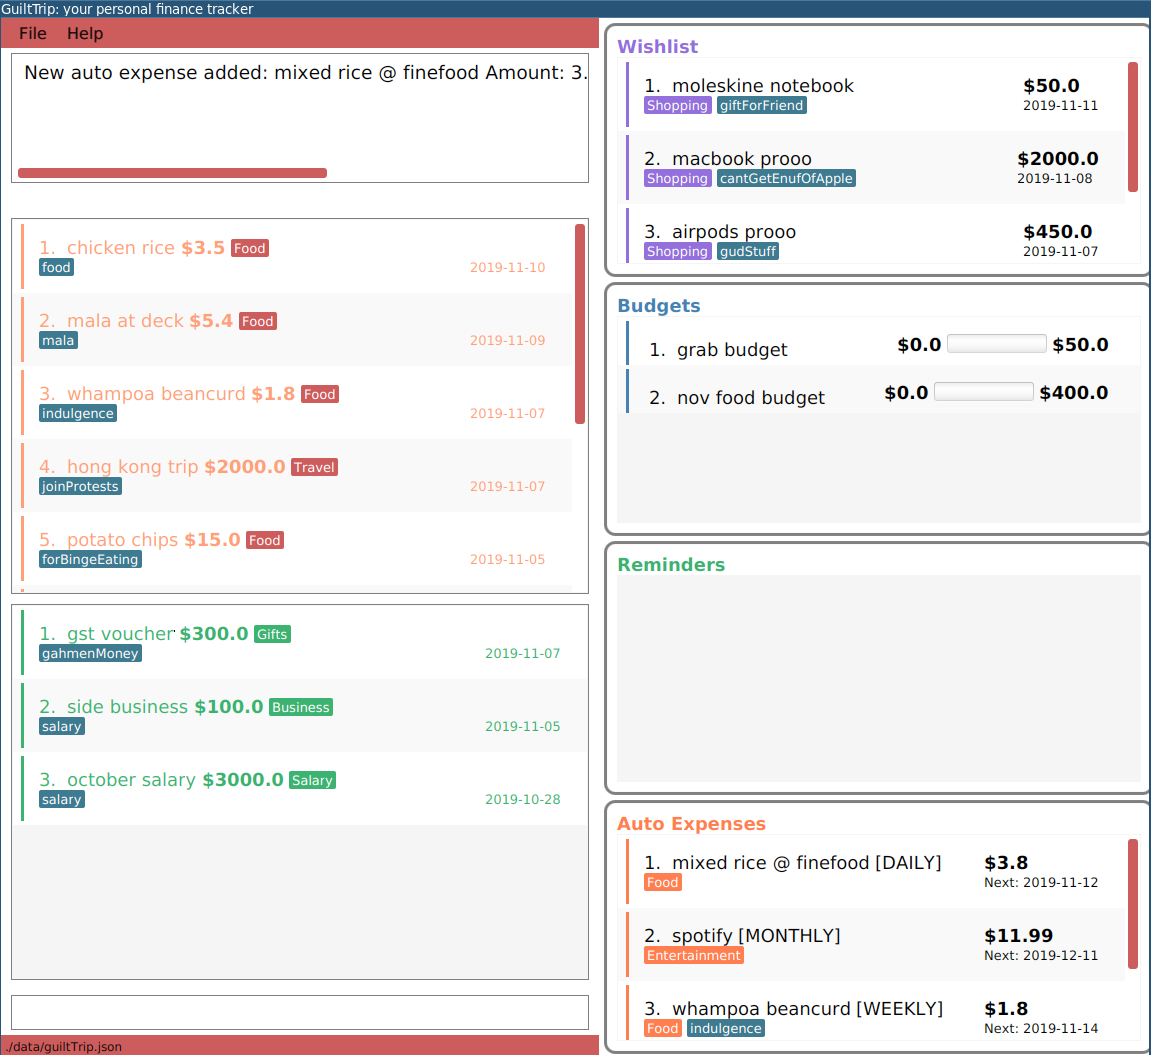
addAutoExp f/every day n/mixed rice @ finefood amt/3.80 cat/Foodyes we have that too!
View after the commands above is executed:
3.4.2. Editing AutoExpense : editAutoExp
Edits an automatically recurring expense every day/week/month (frequency) with the given description and amount.
Format: editAutoExp <index> [f/<frequency> n/<description> amt/<expenditure> cat/<category>
tg/<tag1> tg/<tag2> d/<starting date>]
Note that only future Expenses generated will have the new properties you set in the current
AutoExpense object. Well, you can’t rewrite history! If you made a mistake creating an AutoExpense
entry, try out the undo command, and then recreate it again. Use the history command to copy-paste-edit!
Examples:
-
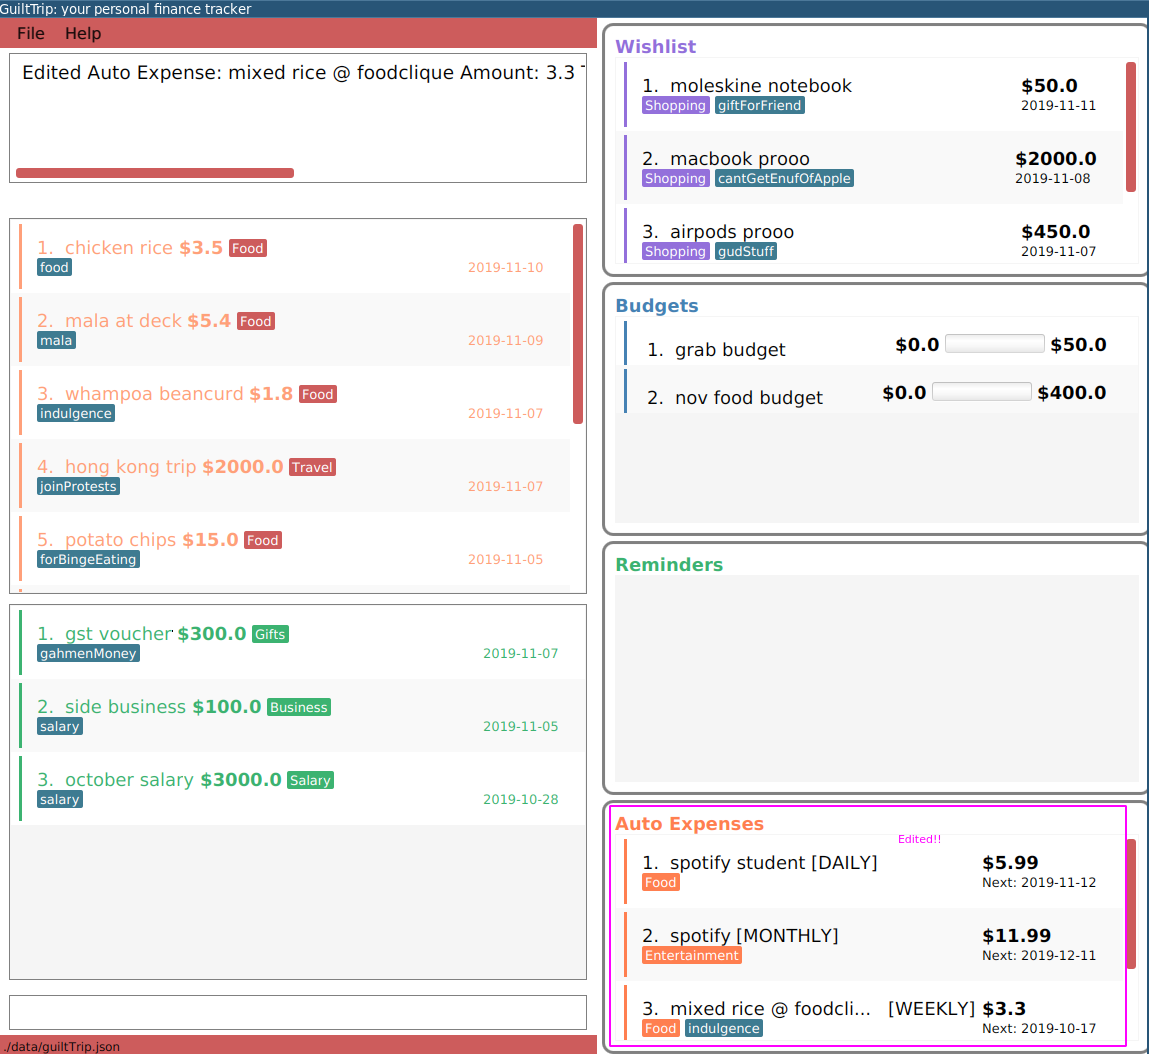
editAutoExp 1 amt/5.99 n/spotify student -
editAutoExp 3 amt/3.30 n/mixed rice @ foodclique
View after the commands above is executed:
3.4.3. Deleting AutoExpense : deleteAutoExp
Deletes a current automatically recurring expenditure at the given index.
Format: deleteAutoExp <index>
This command only deletes the AutoExpense and stops future generation of such Expenses.
A --recursive flag will be shipped in v2.0.
Examples:
-
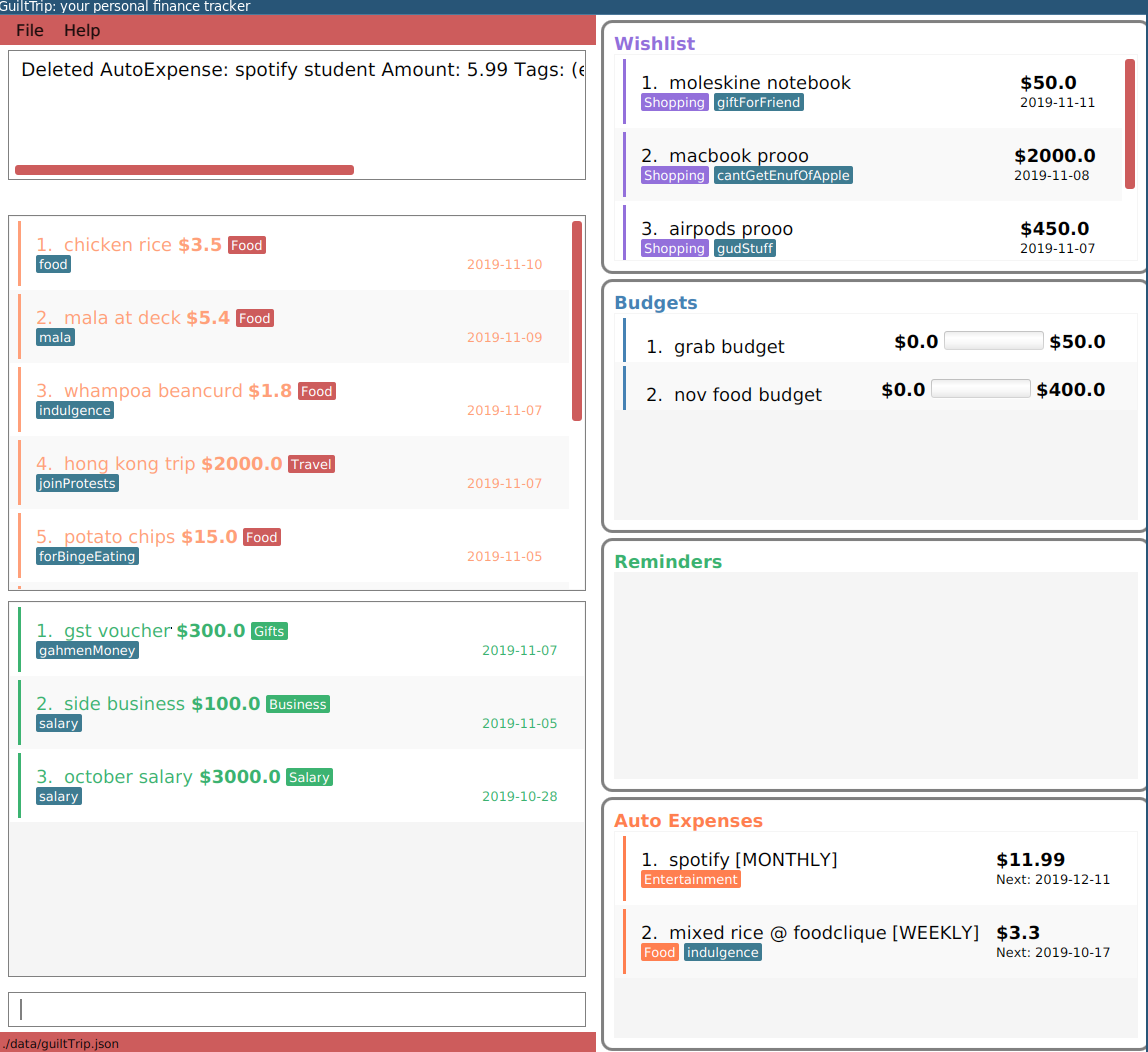
deleteAutoExp 1if you stopped your Spotify subscription.
View after the command above is executed:
3.5. Income
3.5.1. Adding Income : addIncome
Adds a new Income to your total income. Some things to note:
-
Inputs can be arranged in a different order.
-
Tag may be omitted from the command.
-
Category must already exist in the list of income categories. (type
listCategories) -
Amount must be larger than 0 and less than 10 million.
Format: addIncome cat/<category name> n/<description> amt/<income> d/<date> [tg/<tag>]
-
<category name>: Thecategorythat the entry belongs to. -
<description>: The name of this entry. -
<amount>: The amount spent for this income. It can contain at most 2 decimal points. -
<date>: The date of this income. -
<tag>: Optional tags for this income. The tag must not have spaces and must only be alphanumeric.
Example Usage:
-
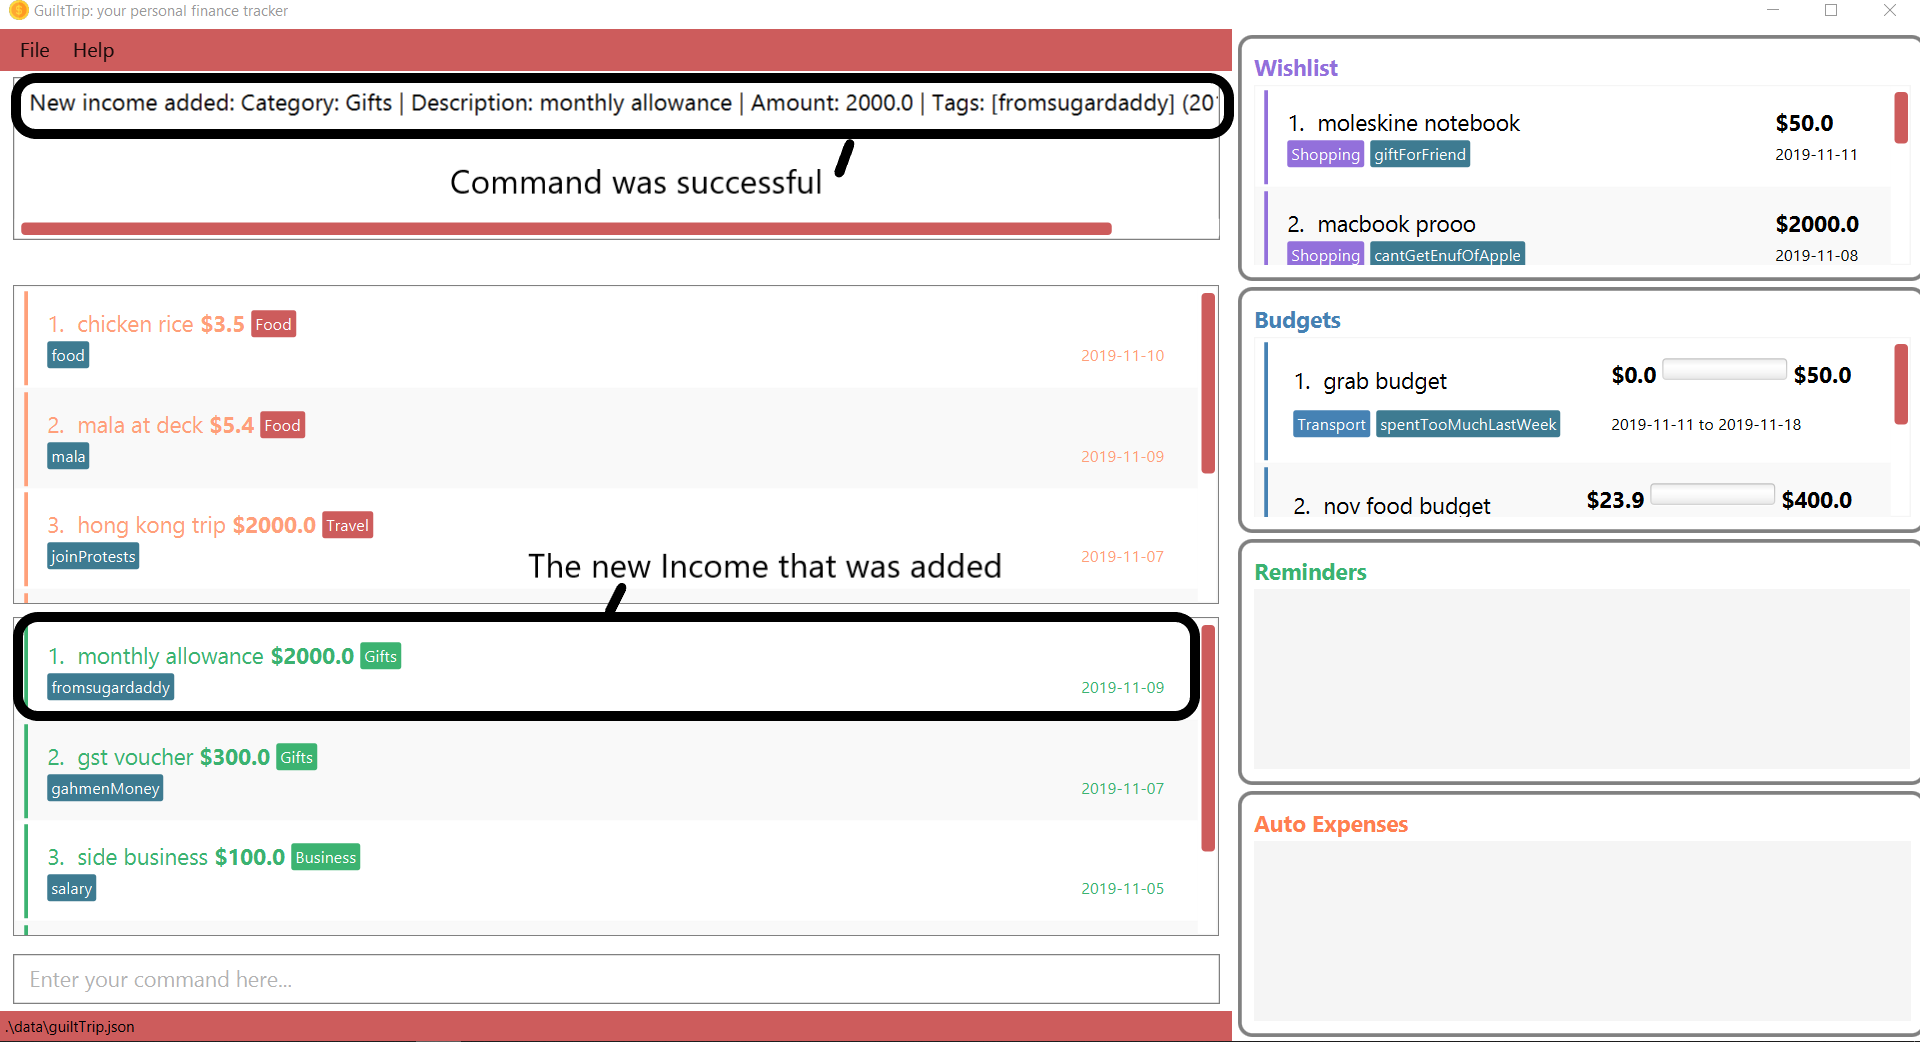
If you would like to add a recent Income, key in the command
addIncome cat/Gifts n/monthly allowance amt/2000 d/2019 11 09 tg/fromsugardaddy.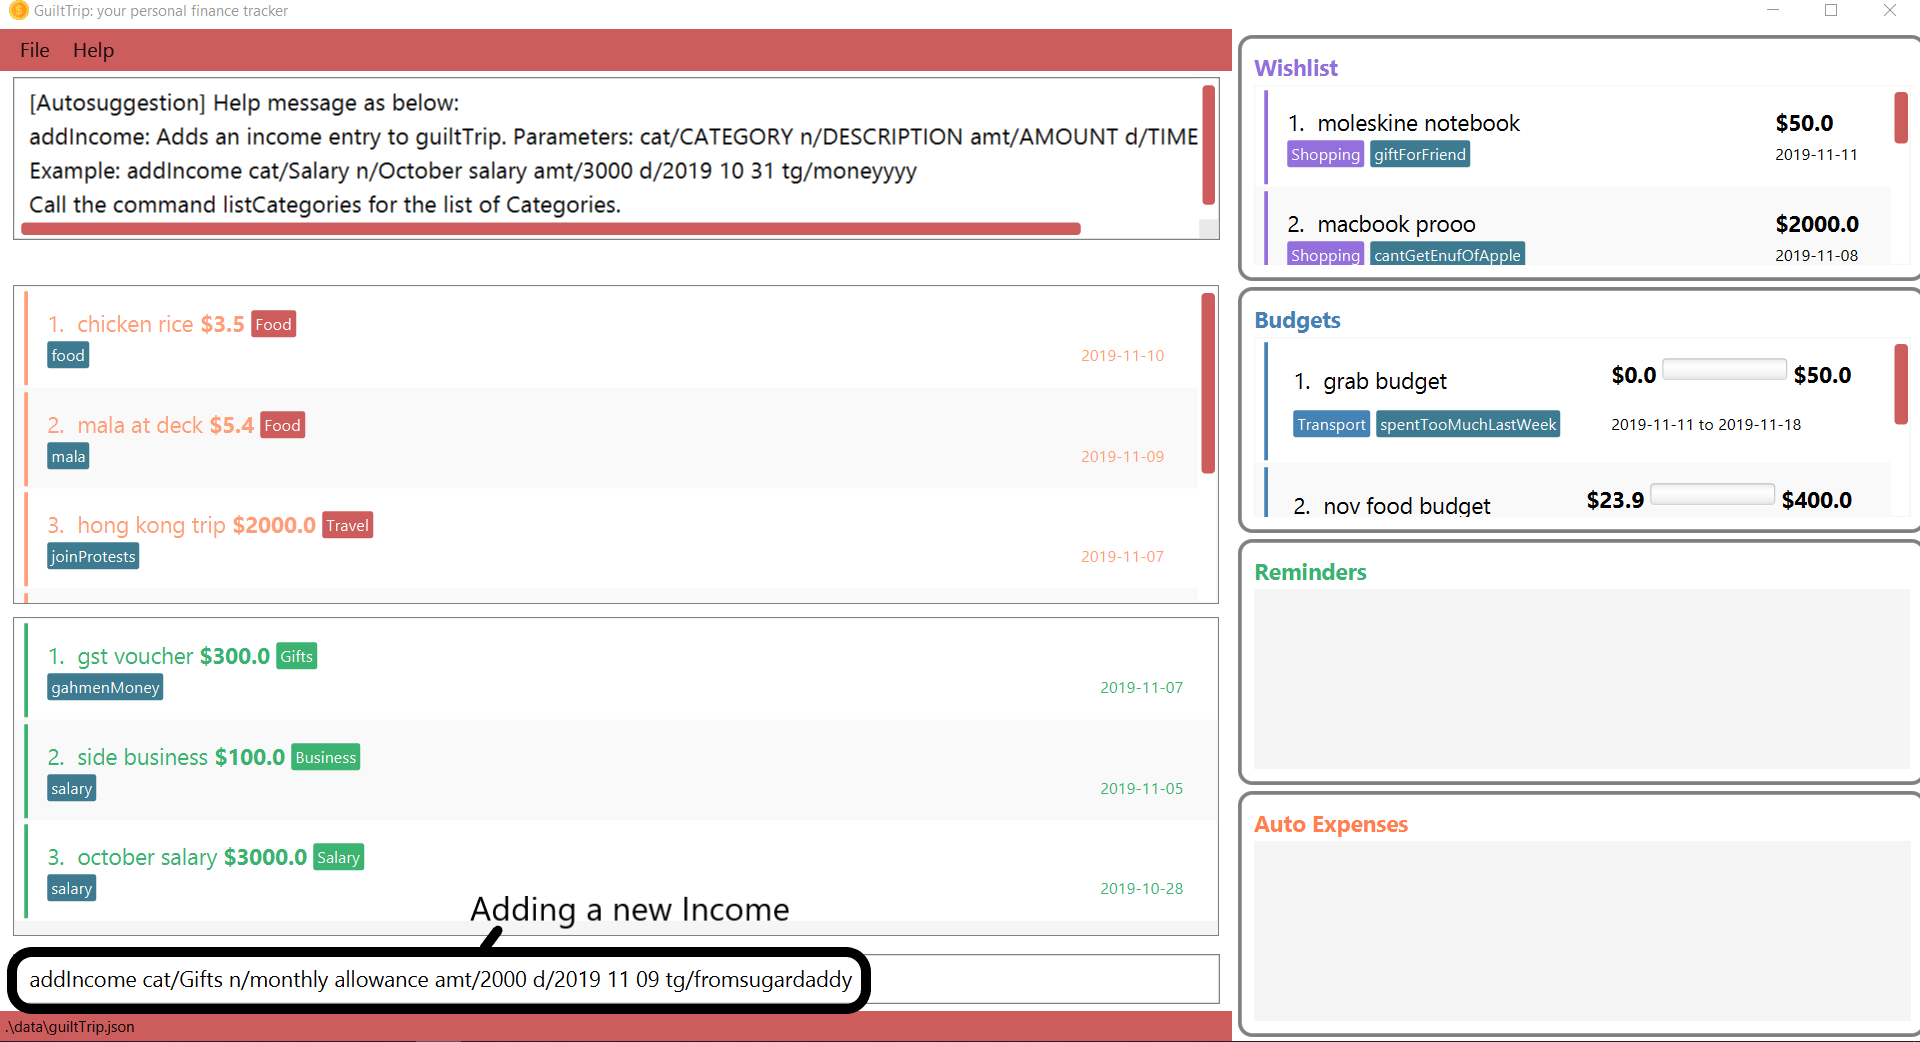
-
You should see the new income being added into in the list of incomes as displayed below.
Other examples:
-
add cat/Gifts n/Durian amt/200.00 d/2019 09 09 tg/food -
add cat/Business n/business Trip To Mars amt/20000.00 d/2019 09 09
3.5.2. Listing Incomes: list
Lists the incomes (as well as expenses) in the main panel.
Format: list
3.5.3. Editing Income: editIncome
Edits an existing Income at the given index. Some things to note:
-
Inputs can be arranged in a different order.
-
If you are editing the category of an Income, it must already exist in the list of income categories. (type
listCategories) -
If you are editing the amount of an Income, it must be larger than 0 and less than 10 million.
Format: editIncome cat/<category name> n/<description> amt/<income> d/<date> [tg/<tag>]
-
<category name>: Thecategorythat the income belongs to. -
<description>: The name of this income. -
<amount>: The amount spent for this income. It can contain at most 2 decimal points. -
<date>: The date of this income. -
<tag>: Tags for this income. The tag must not have spaces and must only be alphanumeric.
Example Usage:
-
If you would like to edit an existing Income, key in the command
editIncome 2 n/selling my soul.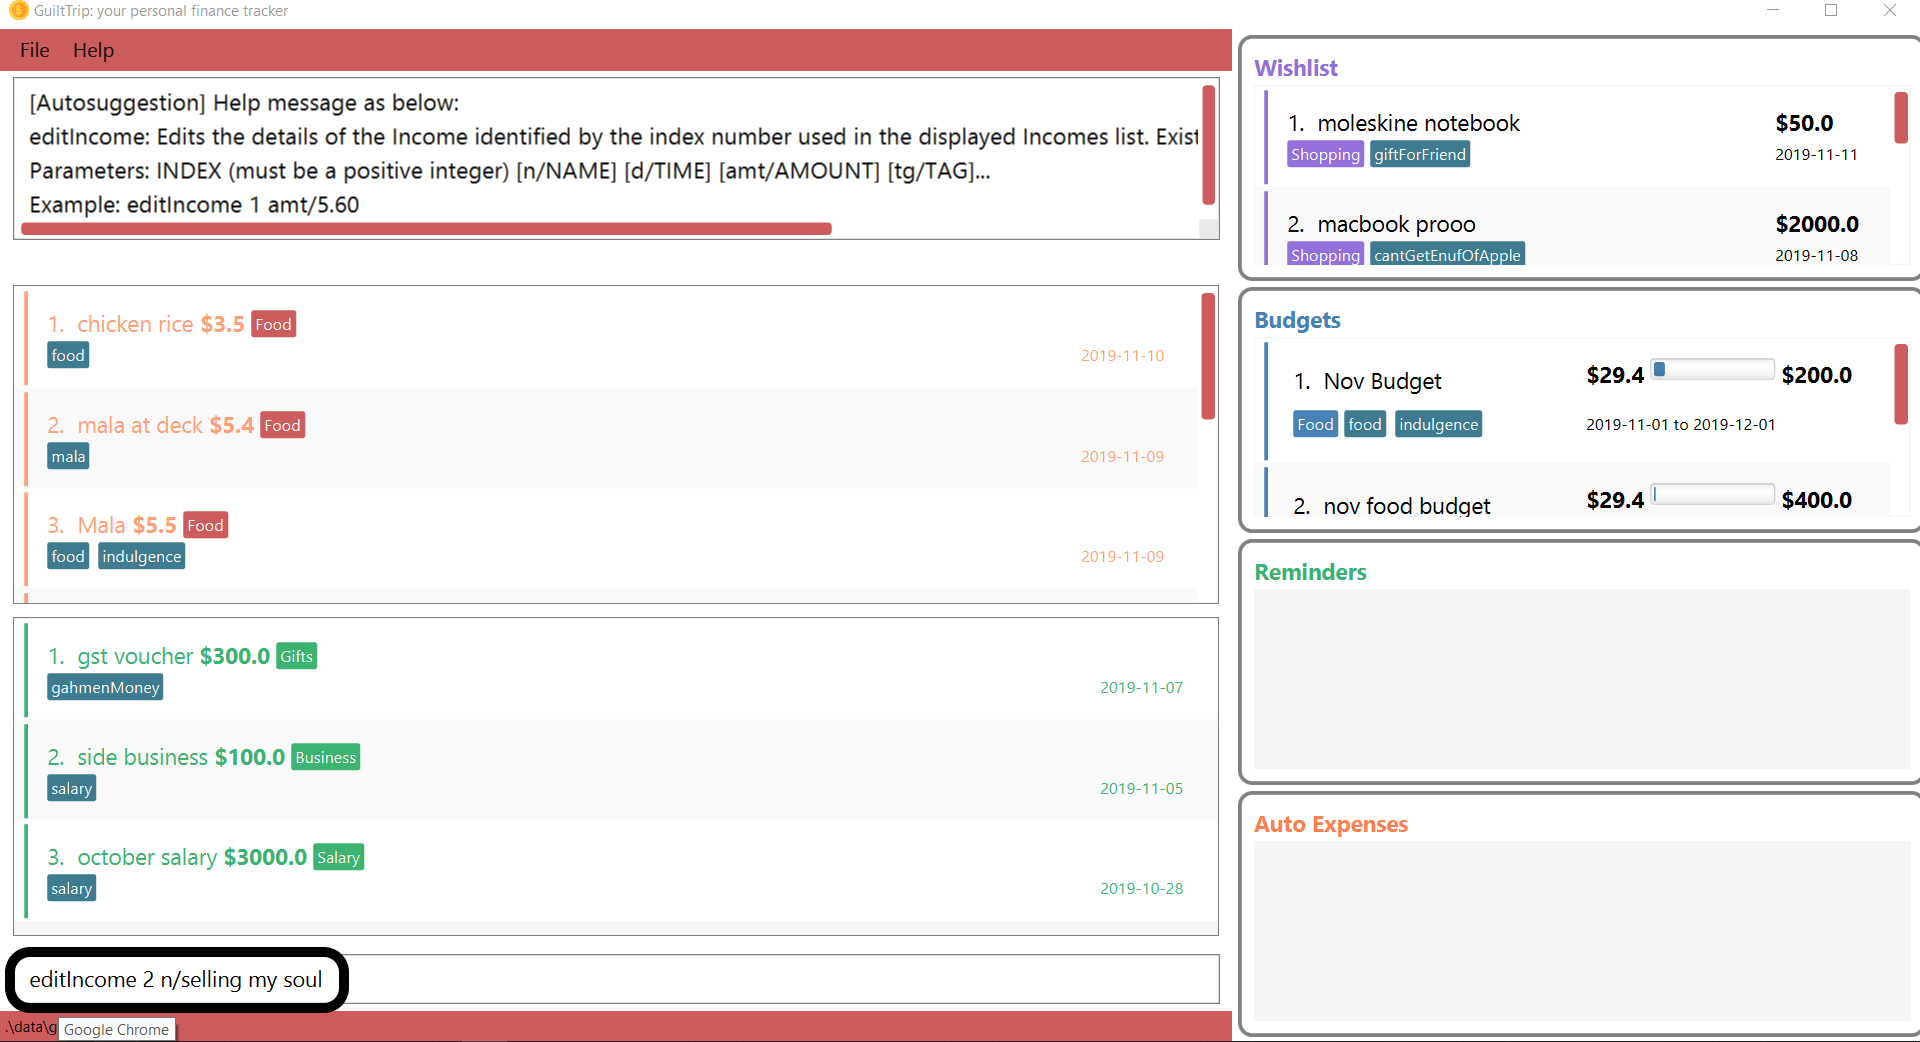
-
You should see that the second Income’s description has successfully changed from
side businesstoselling my soul.
Other examples:
-
editIncome 1 amt/200 -
editIncome 3 tg/wheresmypayraise
3.5.4. Deleting Income: deleteIncome
Deletes an existing Income from the list at the given index.
Format: deleteIncome <index>
-
<index>: Theindexof the Income in the Income list panel. It must be greater than zero and positive.
Example Usage:
-
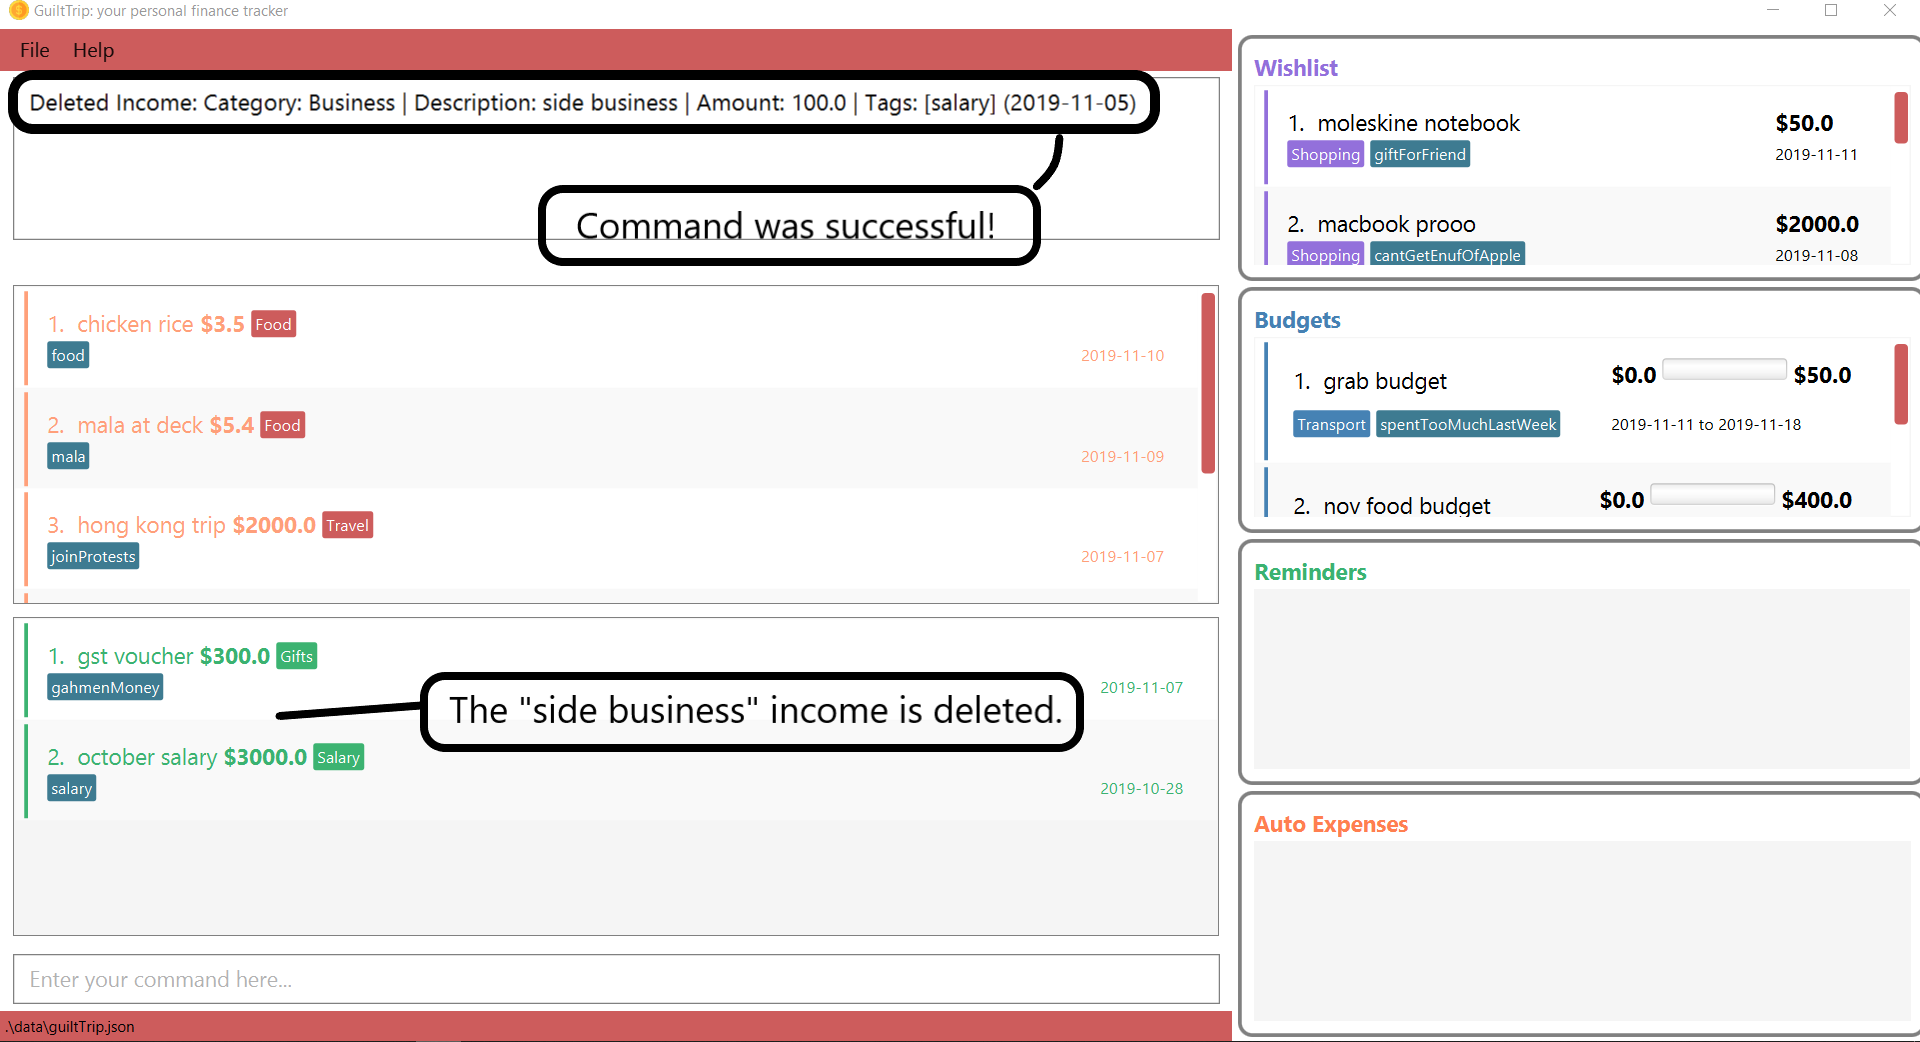
If you would like to delete the Income at index 2, key in the command
deleteIncome 2.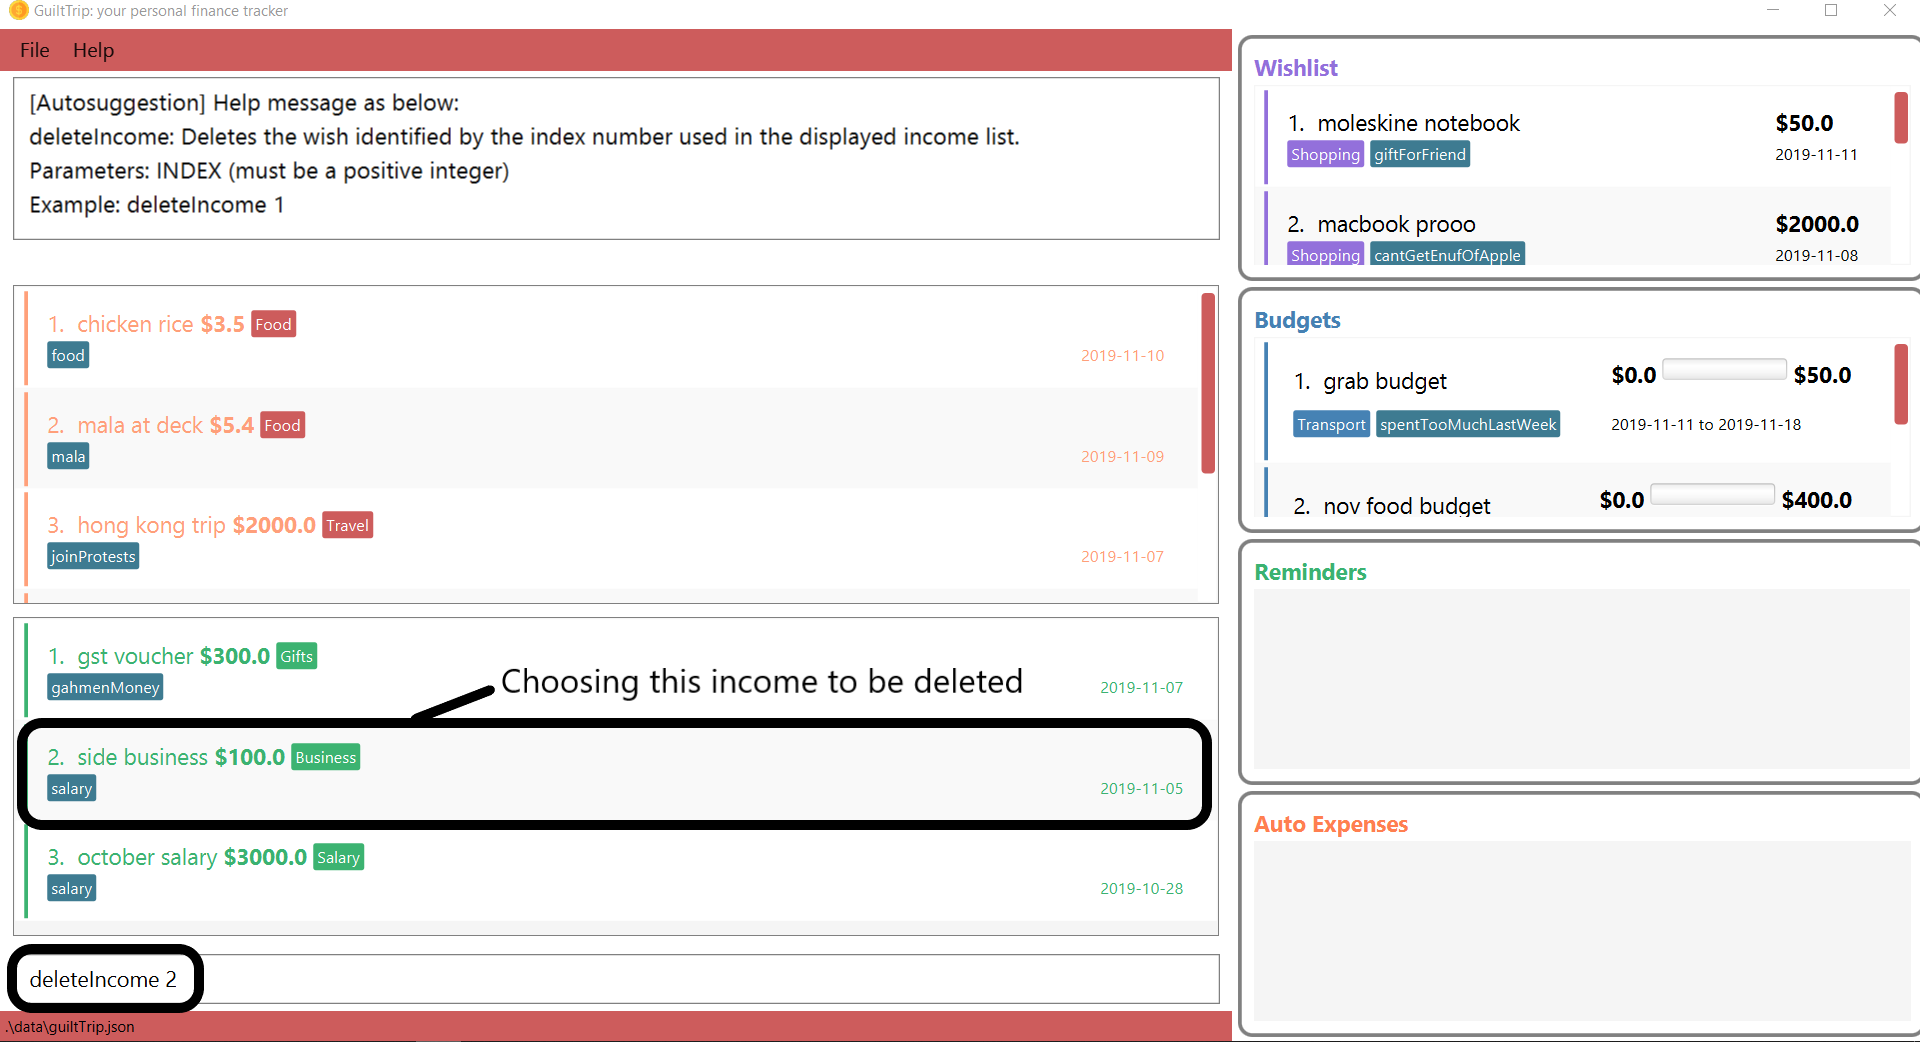
-
You would see that the Income is no longer in the list and the result display box shows the details of the Income that you have just deleted.
Other examples:
-
add cat/Gifts n/Durian amt/200.00 d/2019 09 09 tg/food -
add cat/Business n/business Trip To Mars amt/20000.00 d/2019 09 09
3.6. Budget
3.6.1. Adding Budget : addBudget
Adds a new budget for expenditure. Inputs can be arranged in a different order. Tag may be omitted from the budget record. Category must already exist in the list of categories. Amount must be larger than 0 and positive. Amount should also not be larger than 9999999.99.
Format: addBudget cat/<category name> n/<description> amt/<budget amount> d/<start date> p/<period> [tg/<tag>]
Note: format for inputting period is <number><d/m/y> where d/m/y stands for days / months / years respectively e.g. for a period input of 10 days, use 10d
<category name>: The category that this budget belongs to.
<description>: The name of this budget.
<budget amount>: The amount set for this budget. It can contain at most 2 decimal points.
<start date>: The starting date of this budget.
<period>: The time period for which the budget is valid for. It can be in the form of either days, months, or years. Refer to example given in format.
<tag>: Optional tags for this expense. The tag must not have spaces and most only be alphanumeric.
Example Usage:
-
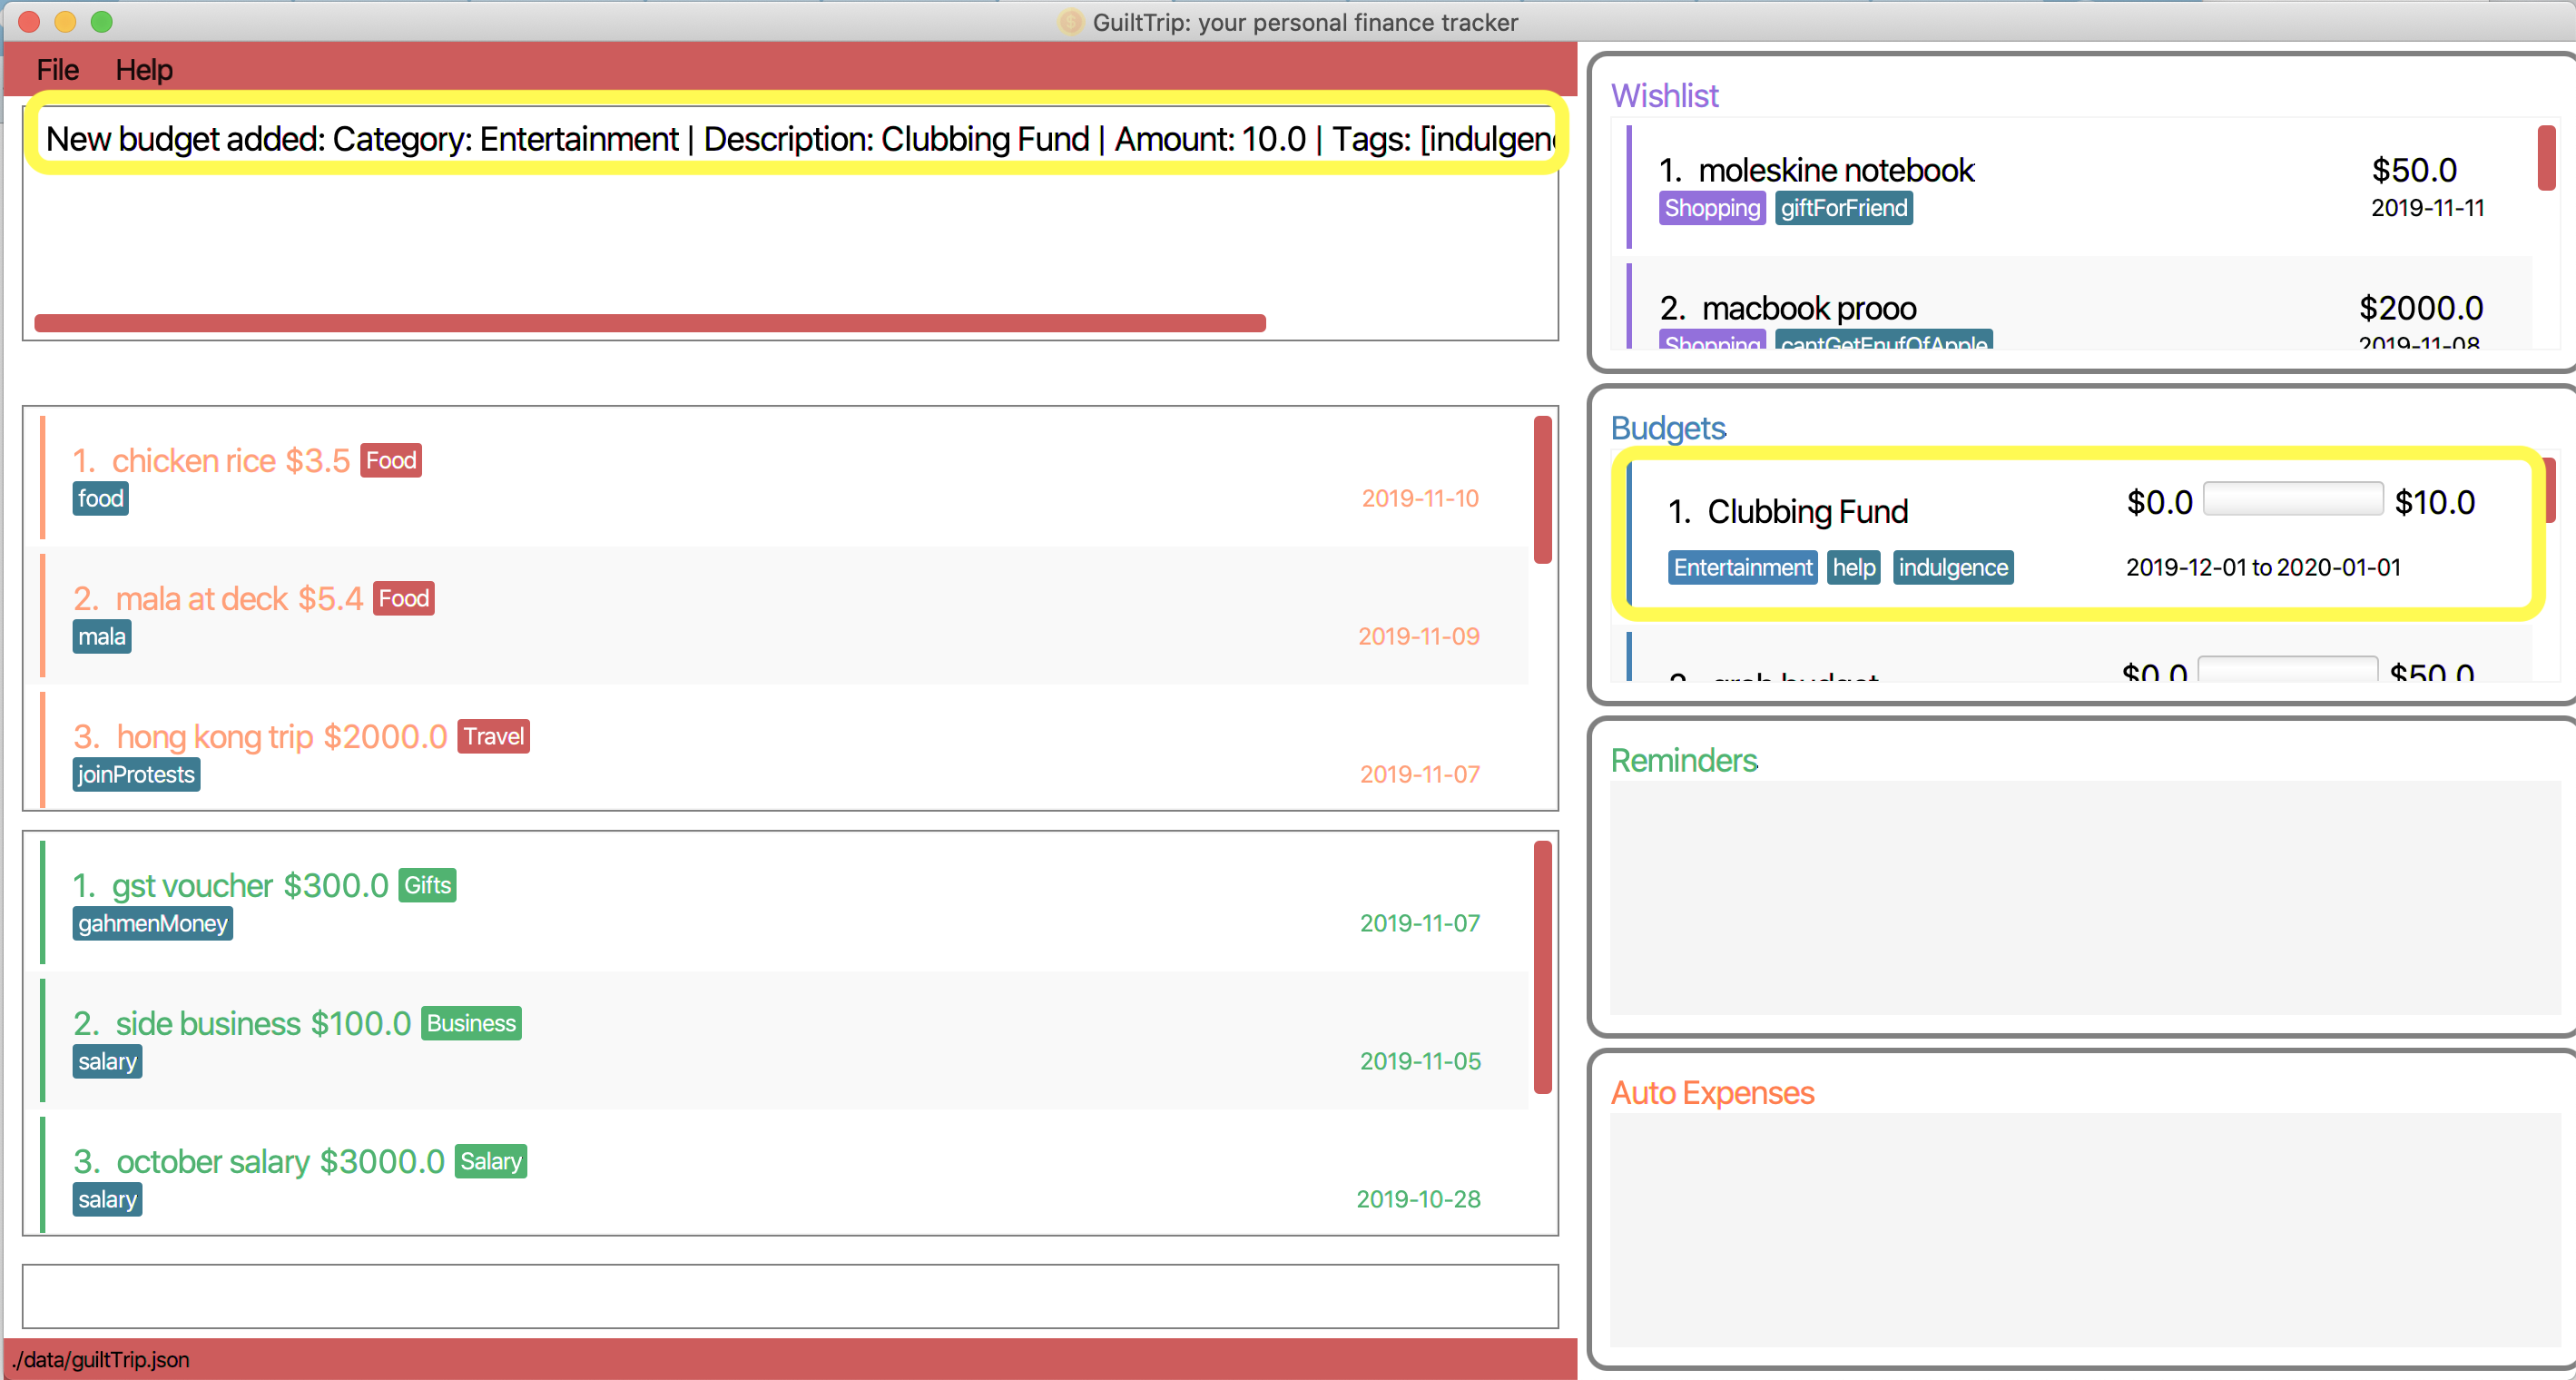
If you would like to add a budget to keep track of the amount you spent on your nightlife, key in the command
addBudget cat/Entertainment n/Clubbing Fund amt/10 d/2019 12 01 tg/indulgence tg/fun.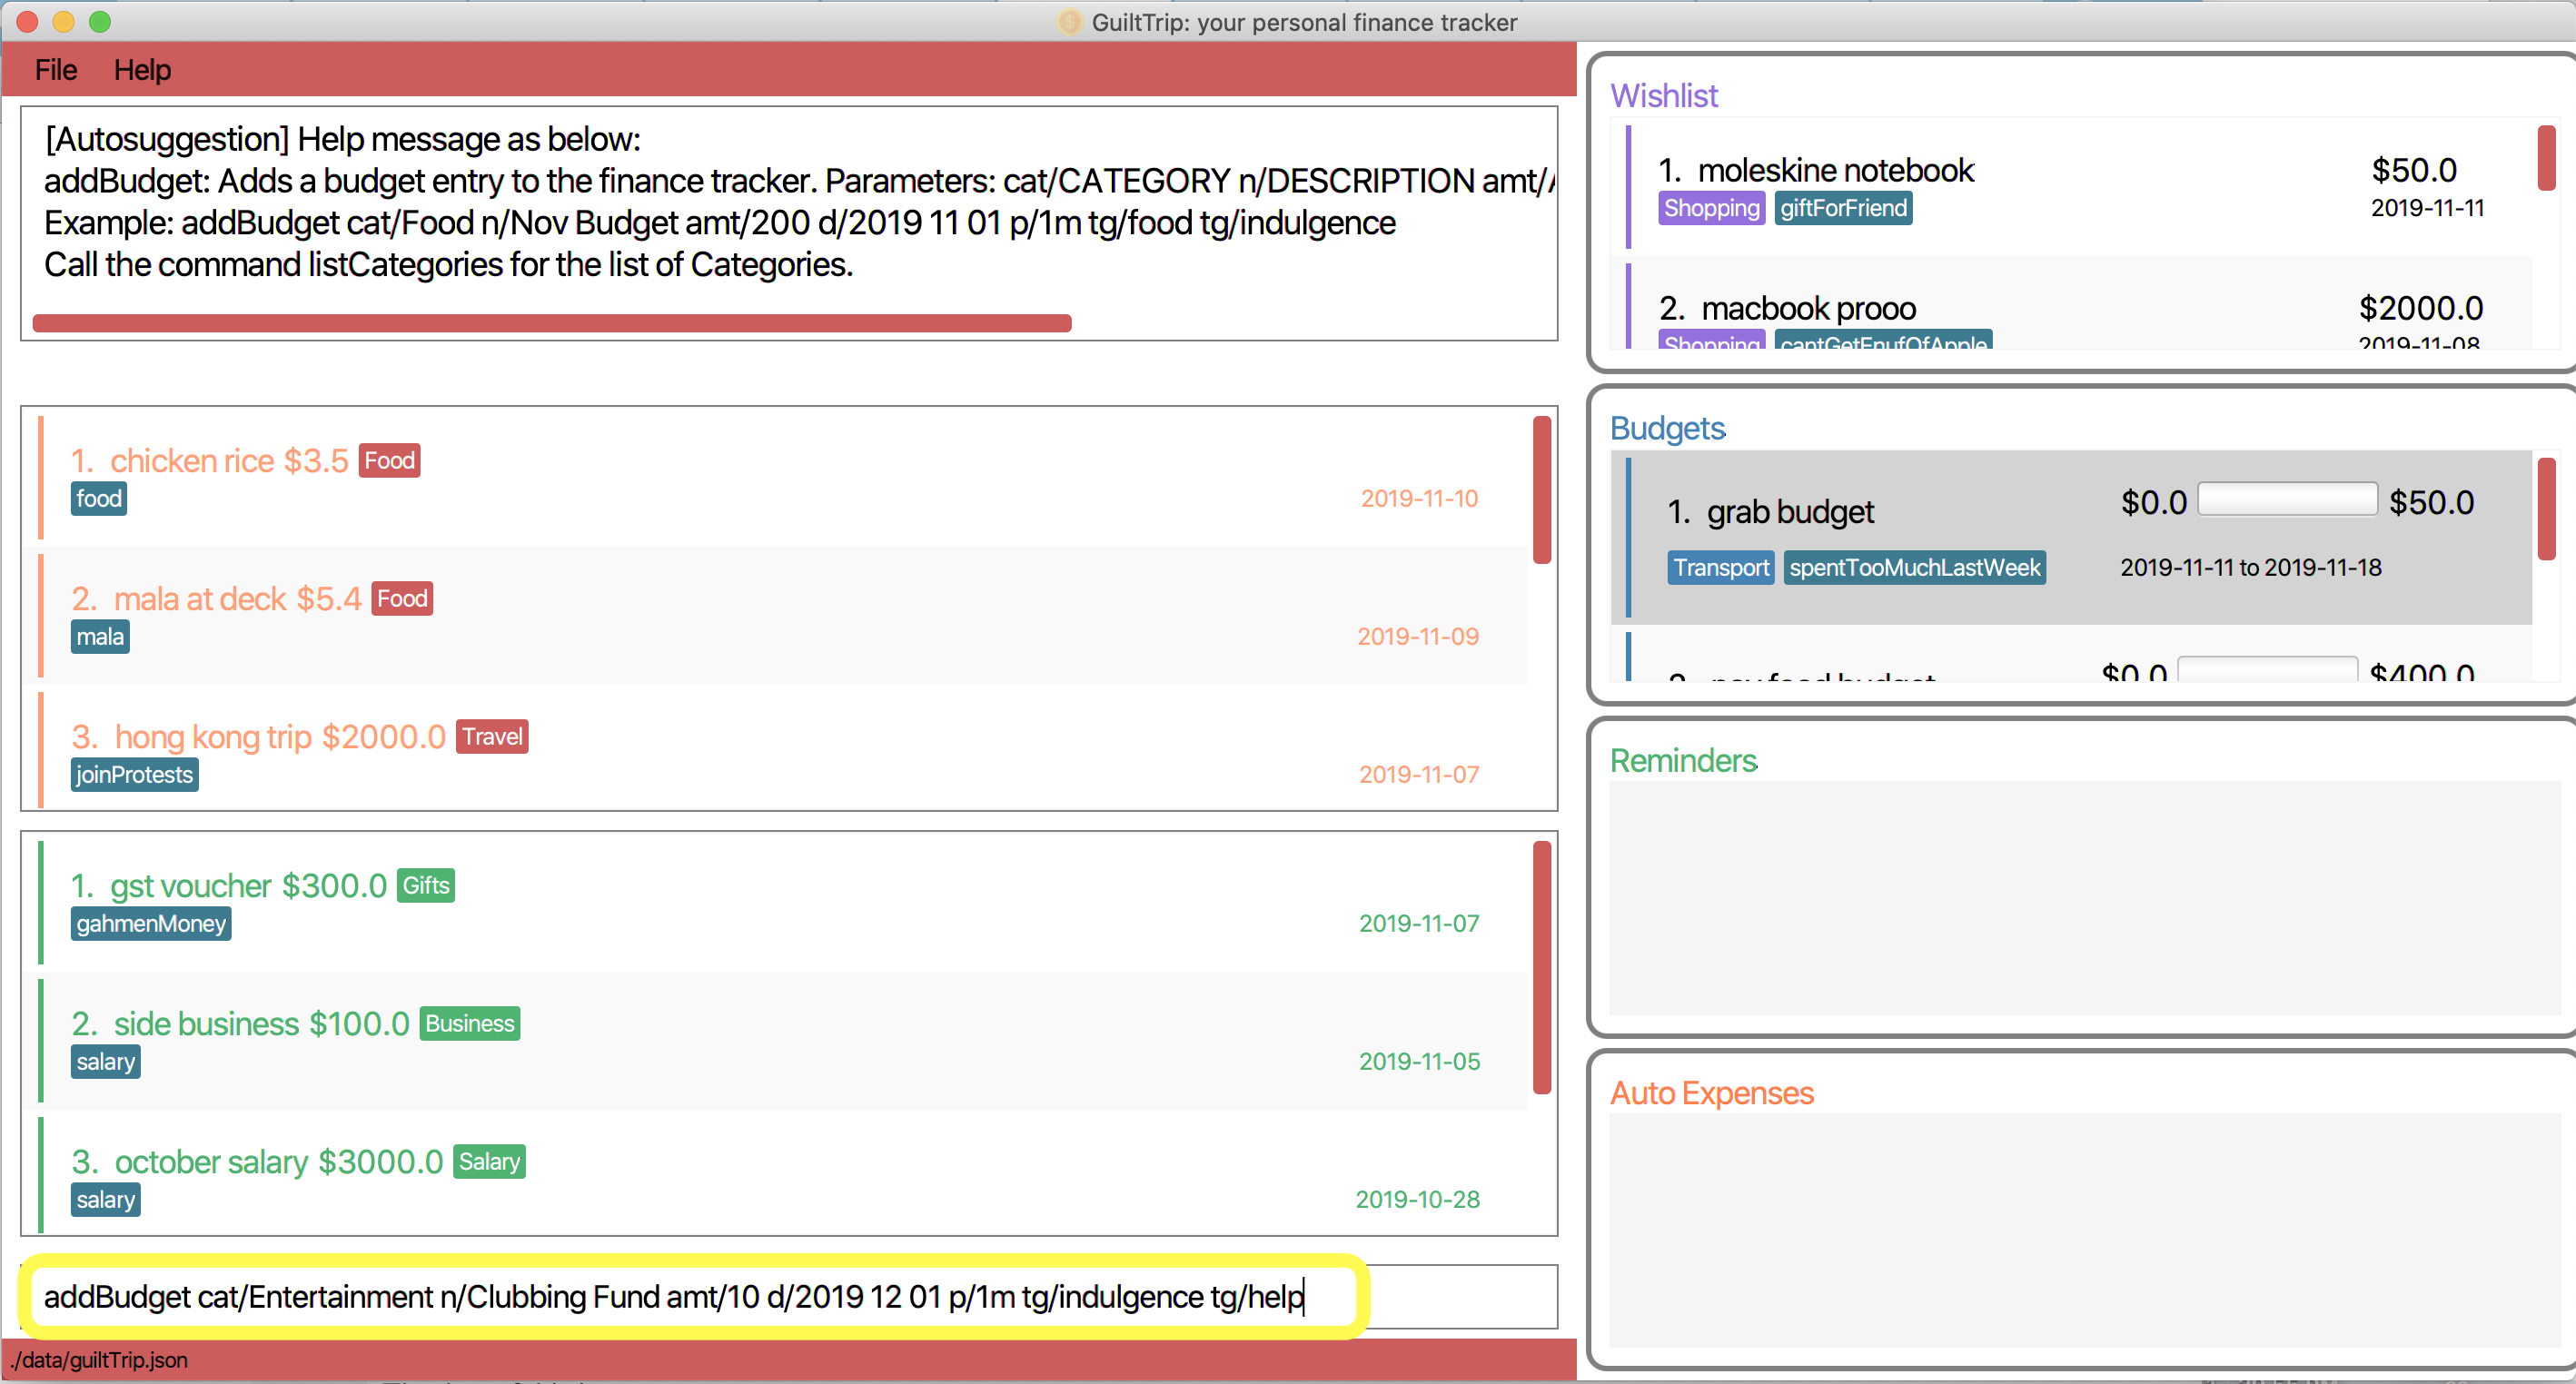
-
You should see the new budget being added into in the list of budget as displayed below.
Other examples:
-
addBudget cat/Entertainment n/Nov Budget amt/500.00 d/2019 11 01 p/1m tg/fun -
addBudget cat/Food n/Mala Budget amt/100.00 d/2019 09 10 p/50d
3.6.2. Listing Budget : listBudget
Lists all the current budgets the user has.
Format: listBudget
Example Usage:
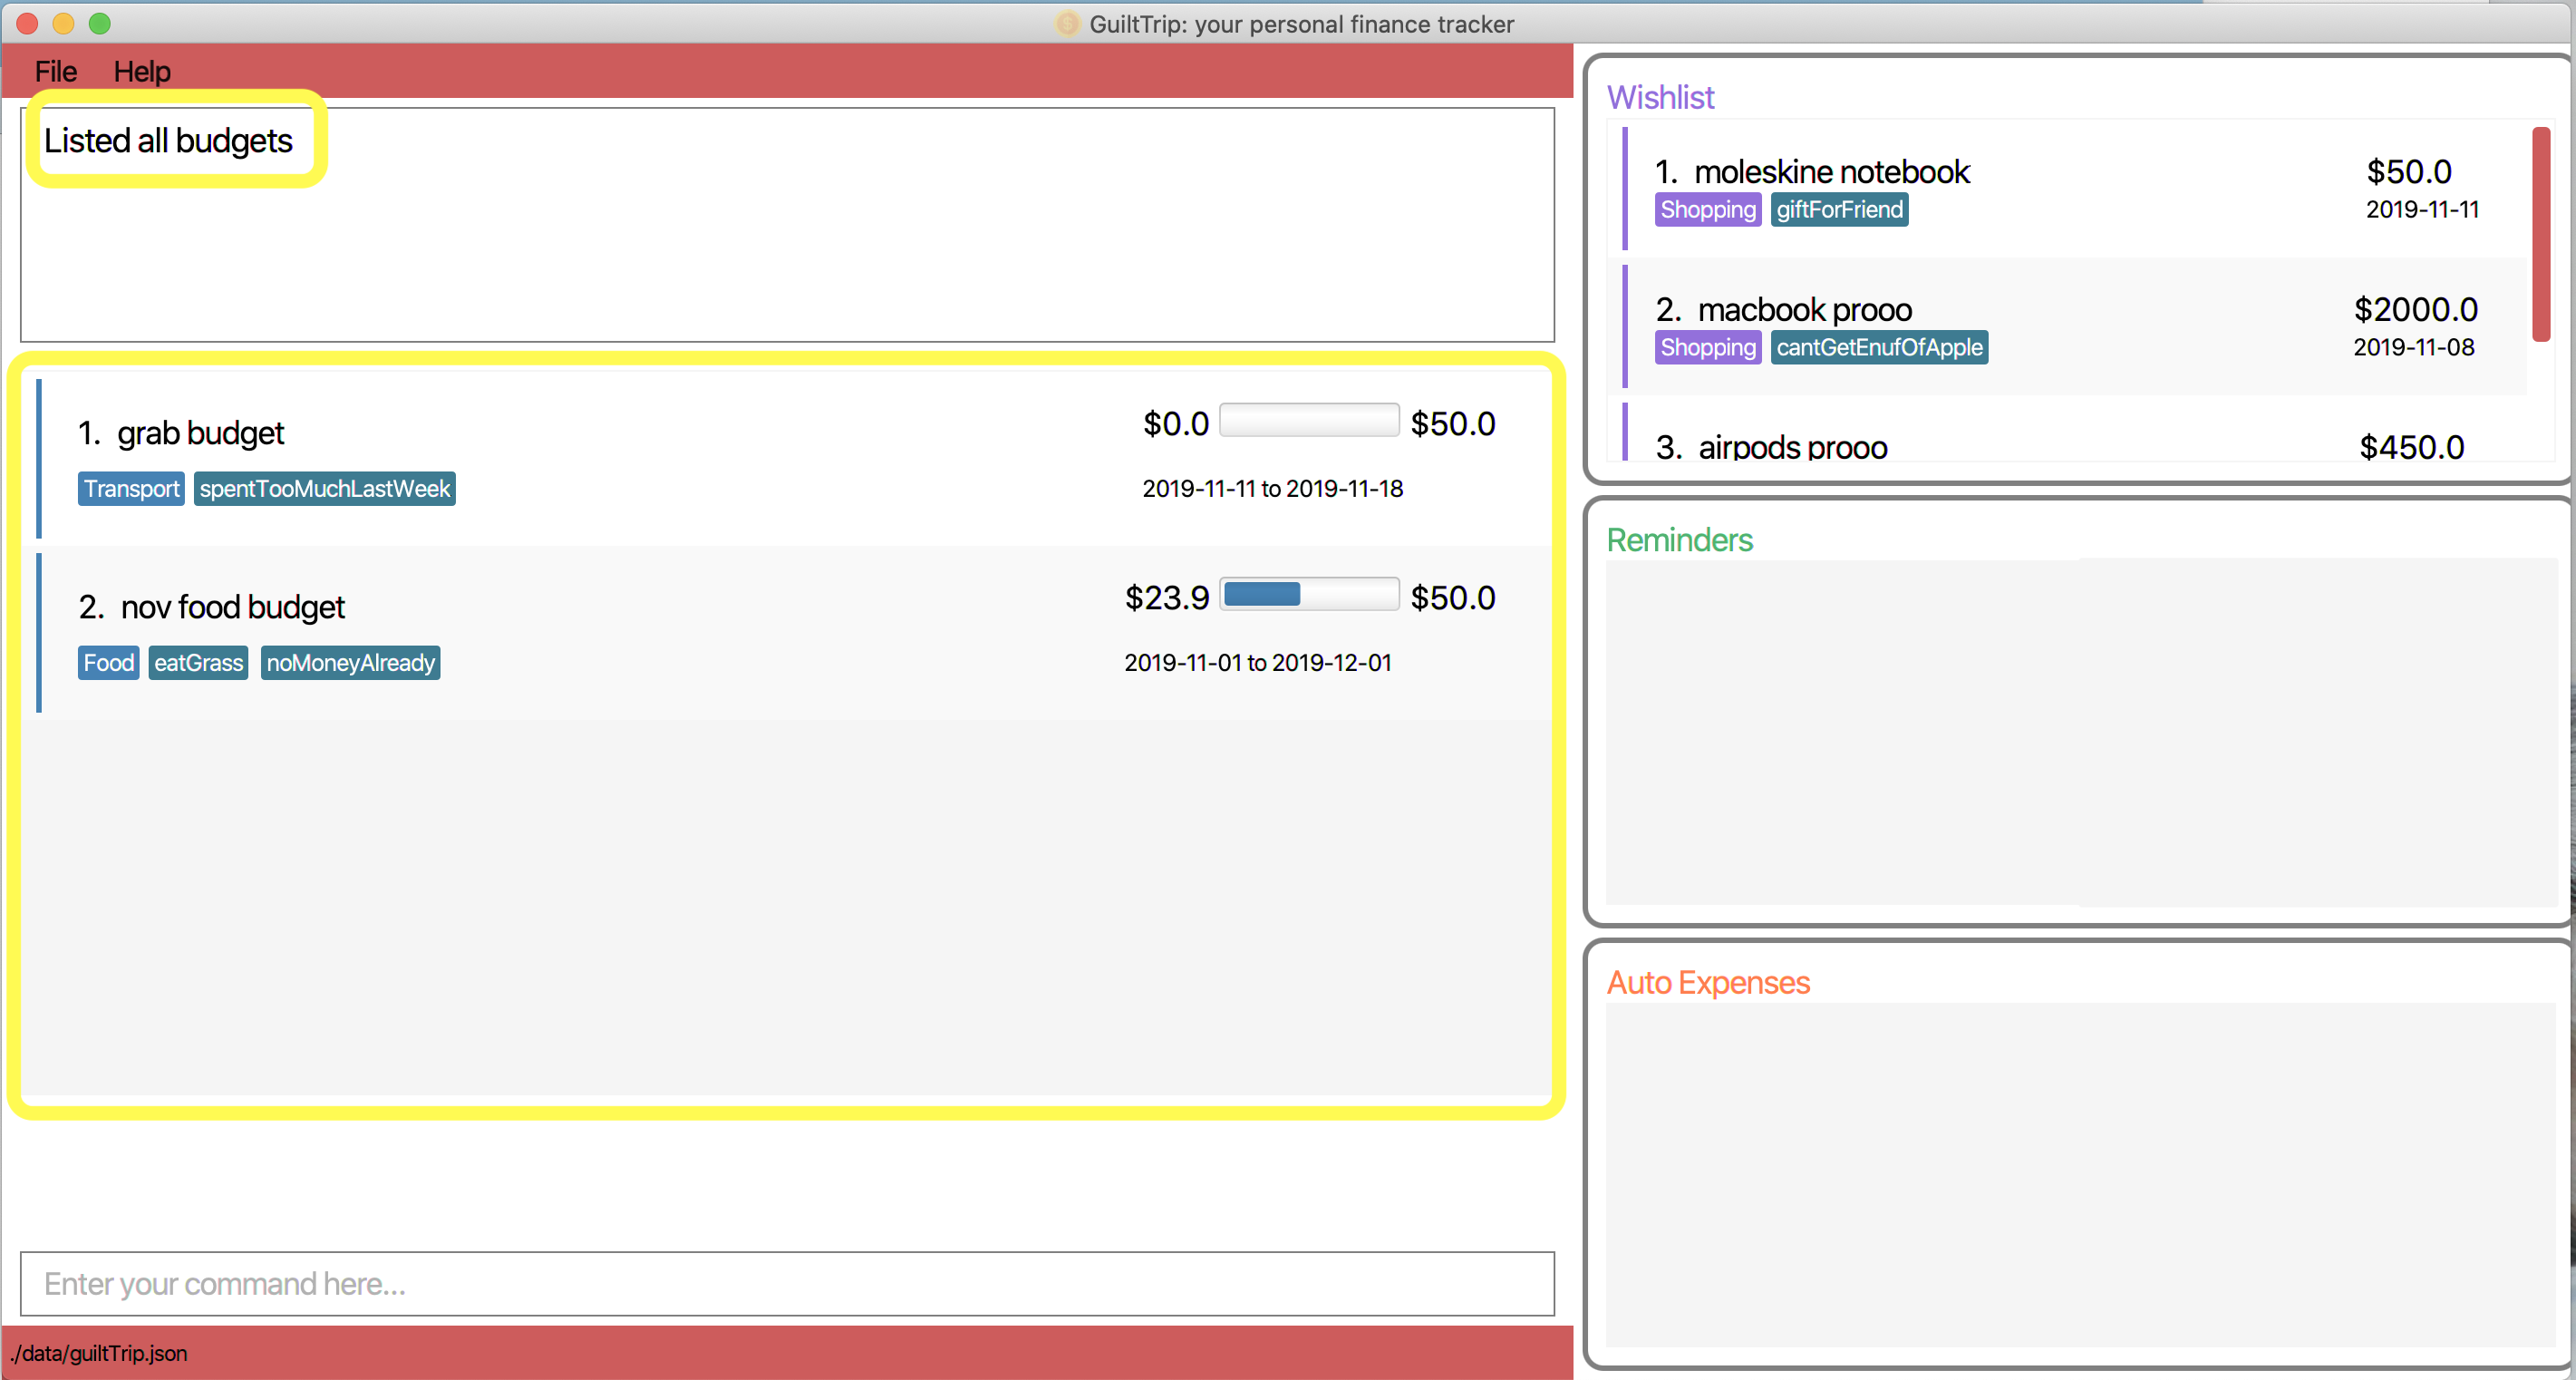
-
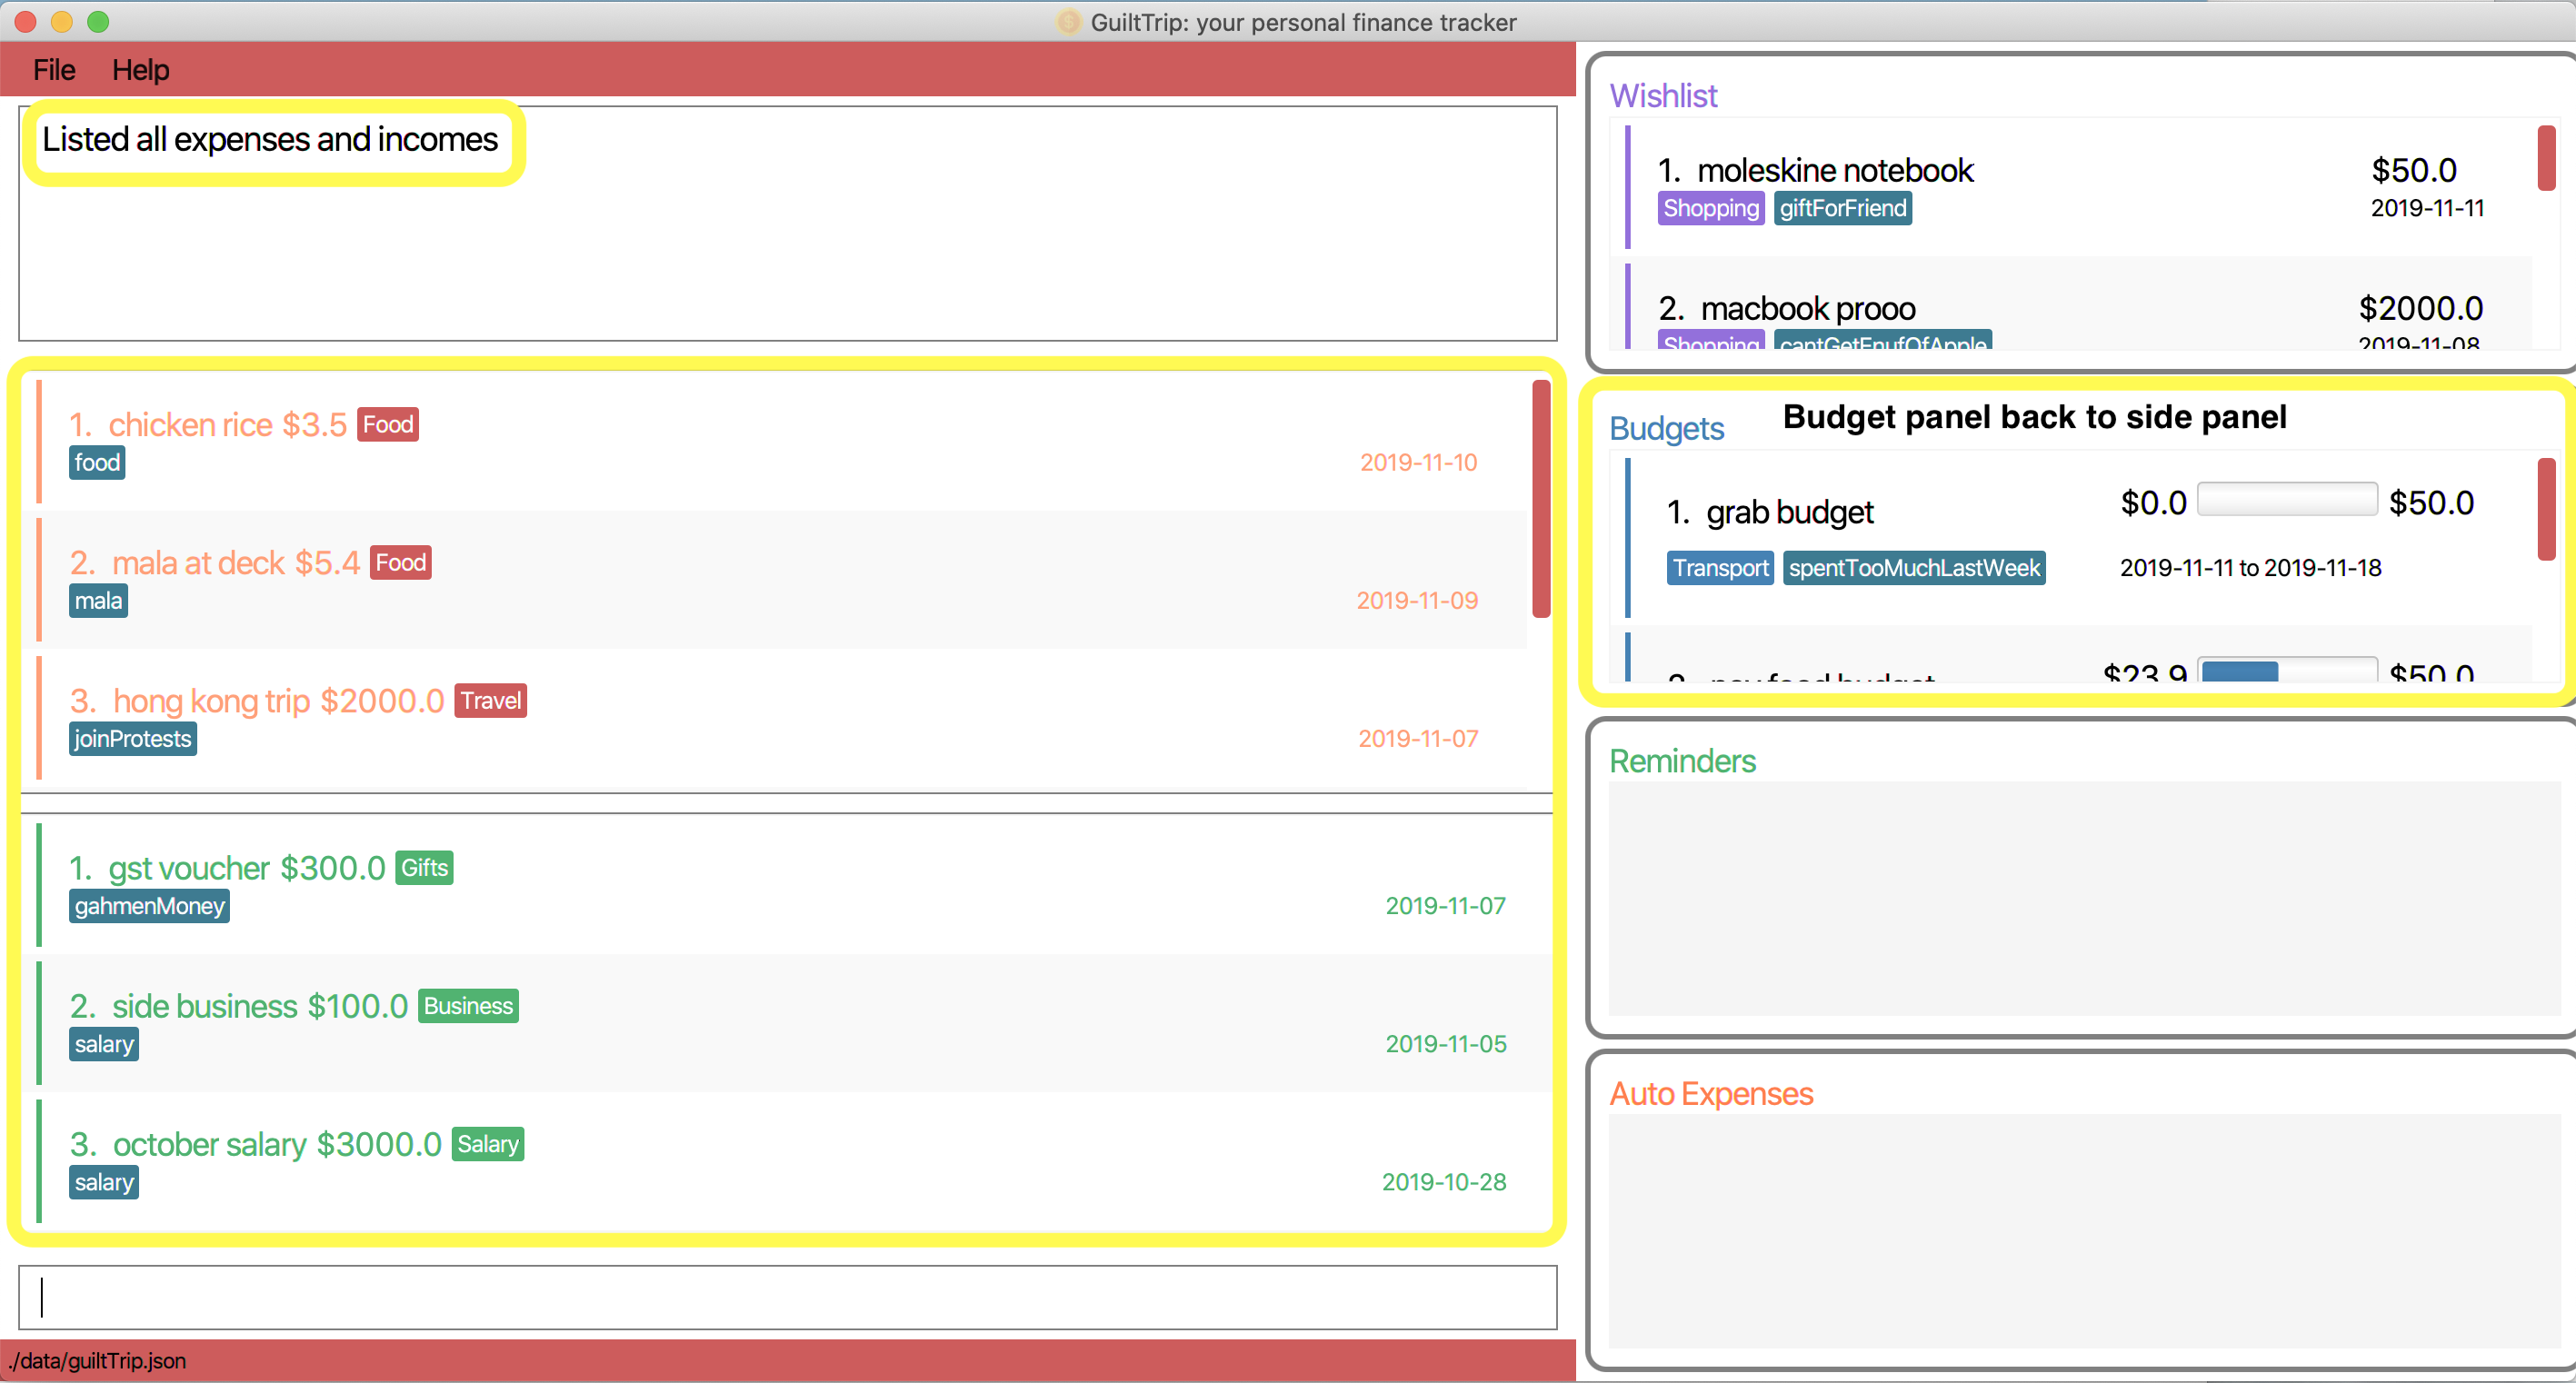
If you would like to display the list of budgets in the main panel, key in the command
listBudget.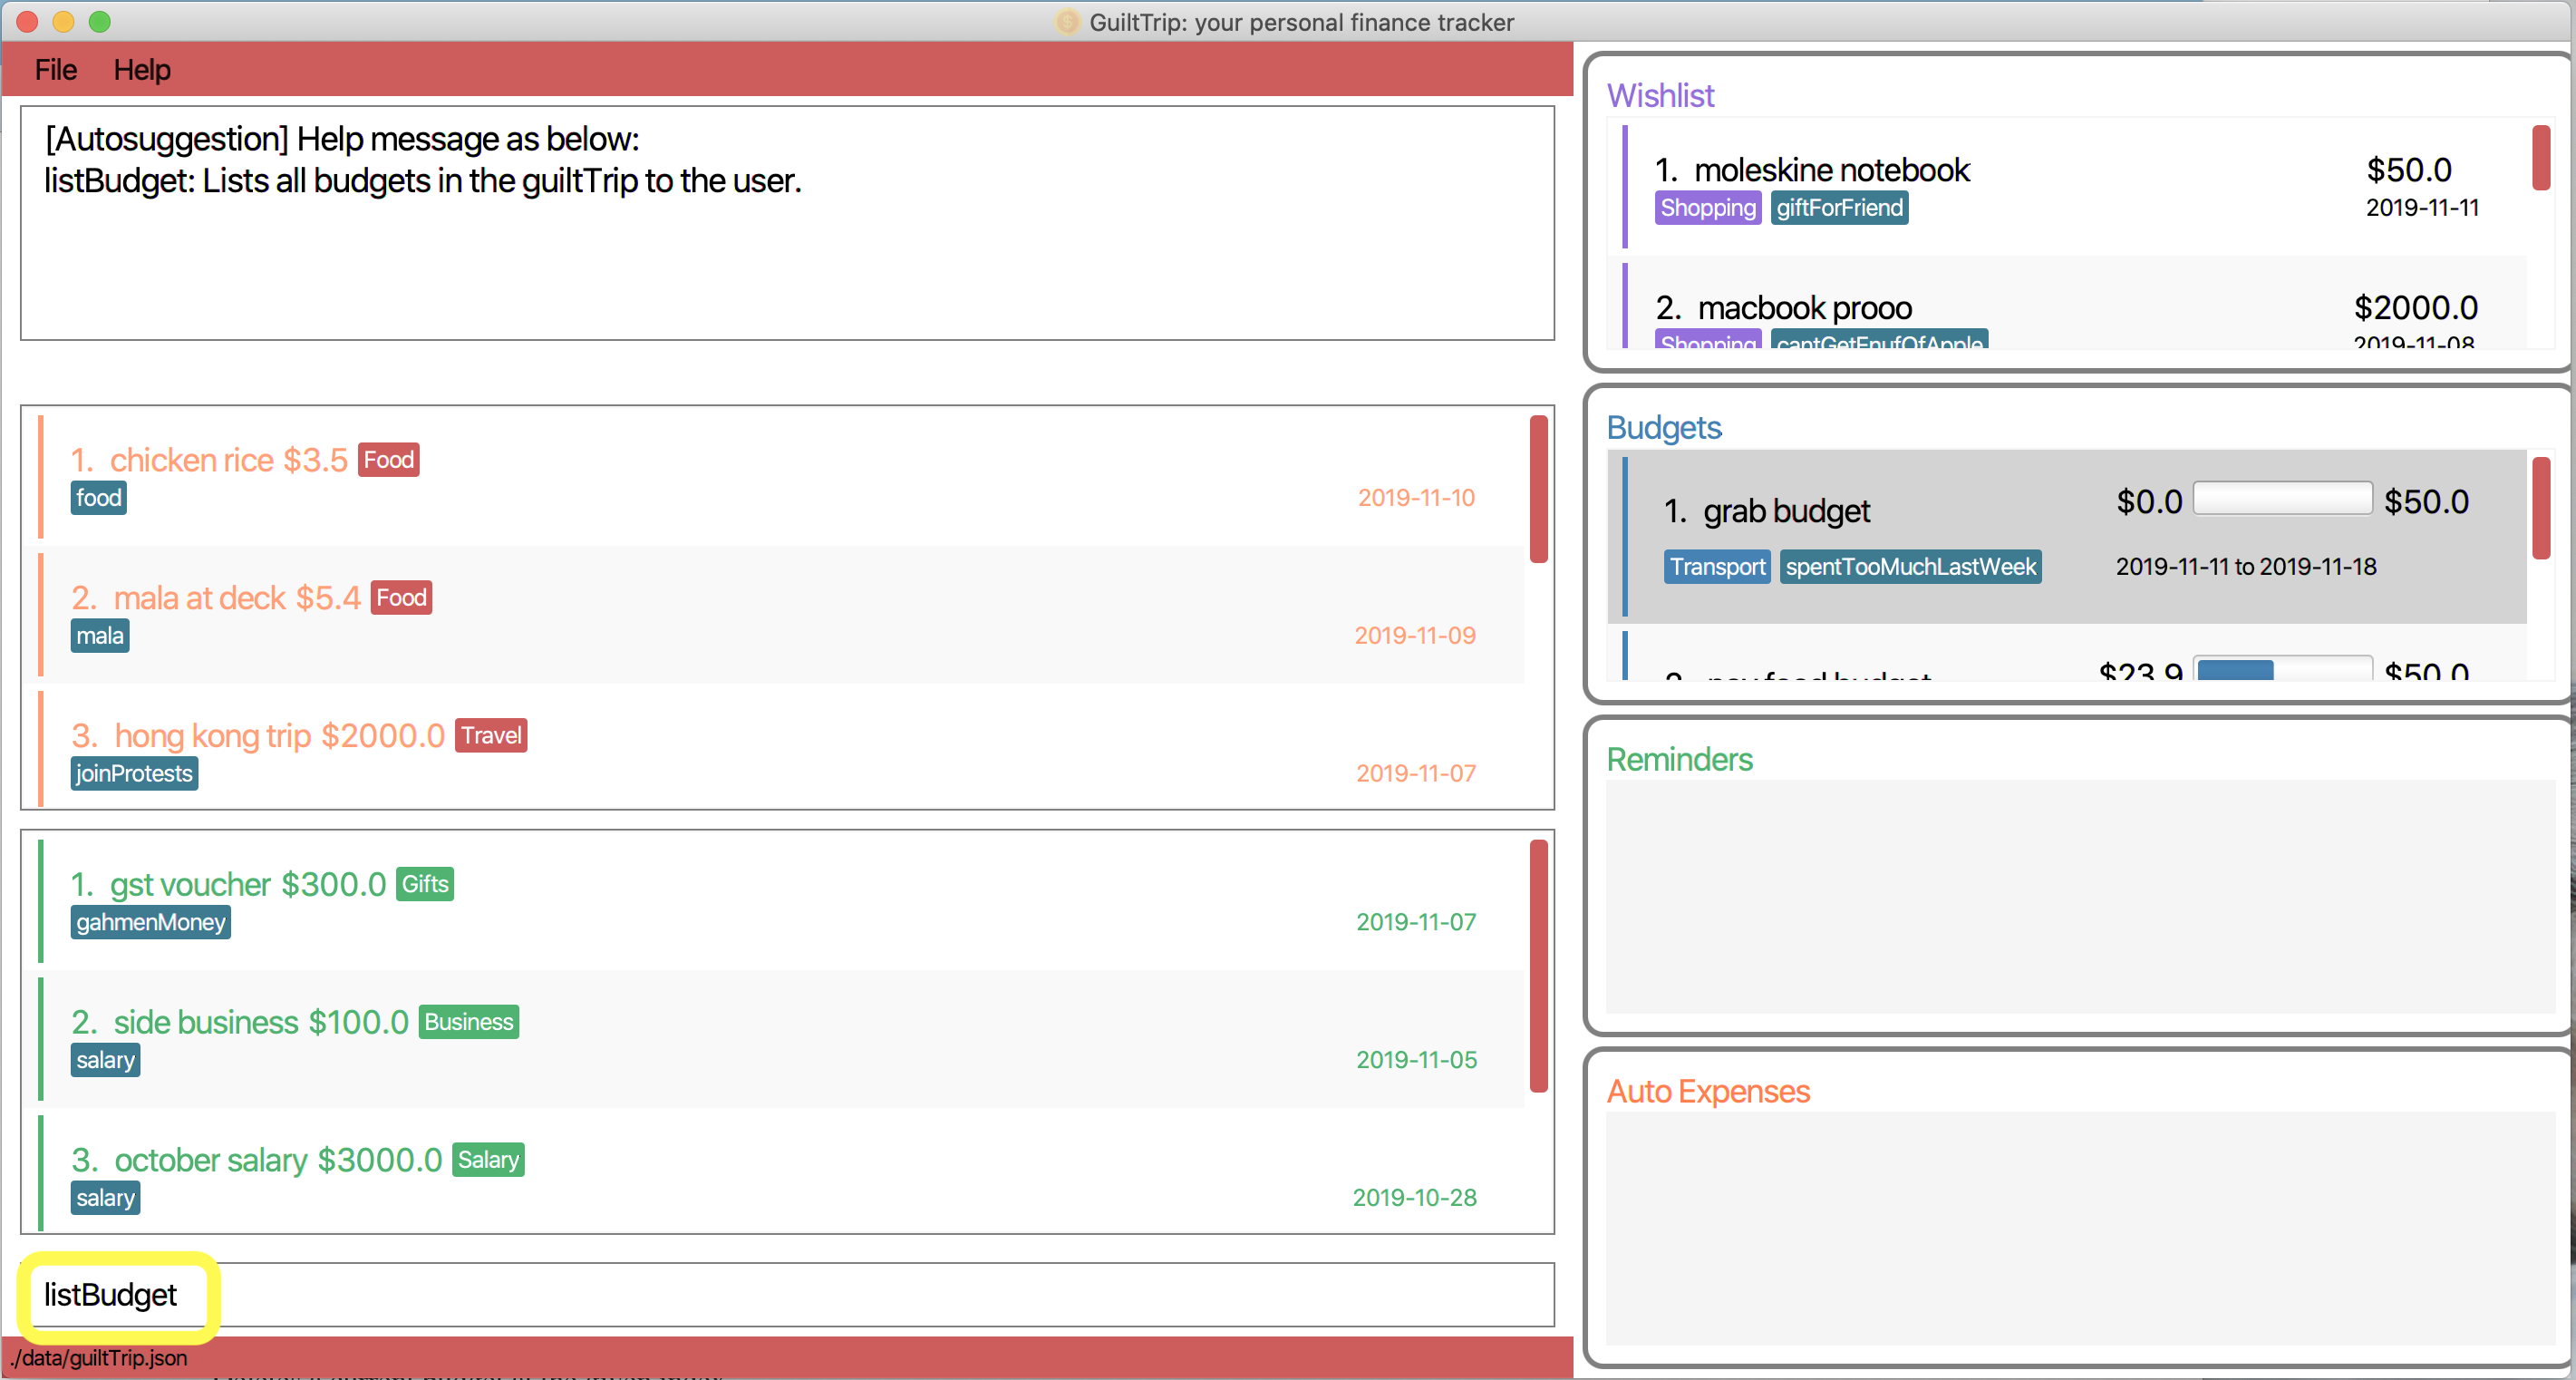
-
You should see that the income and expense lists in the main panel are now replaced with the list of budgets, and that the side budget panel has been toggled away.
-
If you would like to return the panel display to its original state, key in the command
list.
-
You should see that the income, expense, and budget panels are now back to their original positions.
3.6.3. Editing Budget : editBudget
Edits a current budget with the given index number. You may edit one or more fields, but the category must already exist in the list of categories in the Expense Category.
Format: editBudget <index> [cat/<category name>] [n/<description>] [d/<start date>] [amt/<budget amount>] [p/<period>] [tg/<tag>]
-
<index>: Theindexof the budget in the budget panel. Additionally the index must be greater than zero and positive. -
You can update any of the fields of the budget. But you must at least edit one field.
Example Usage:
-
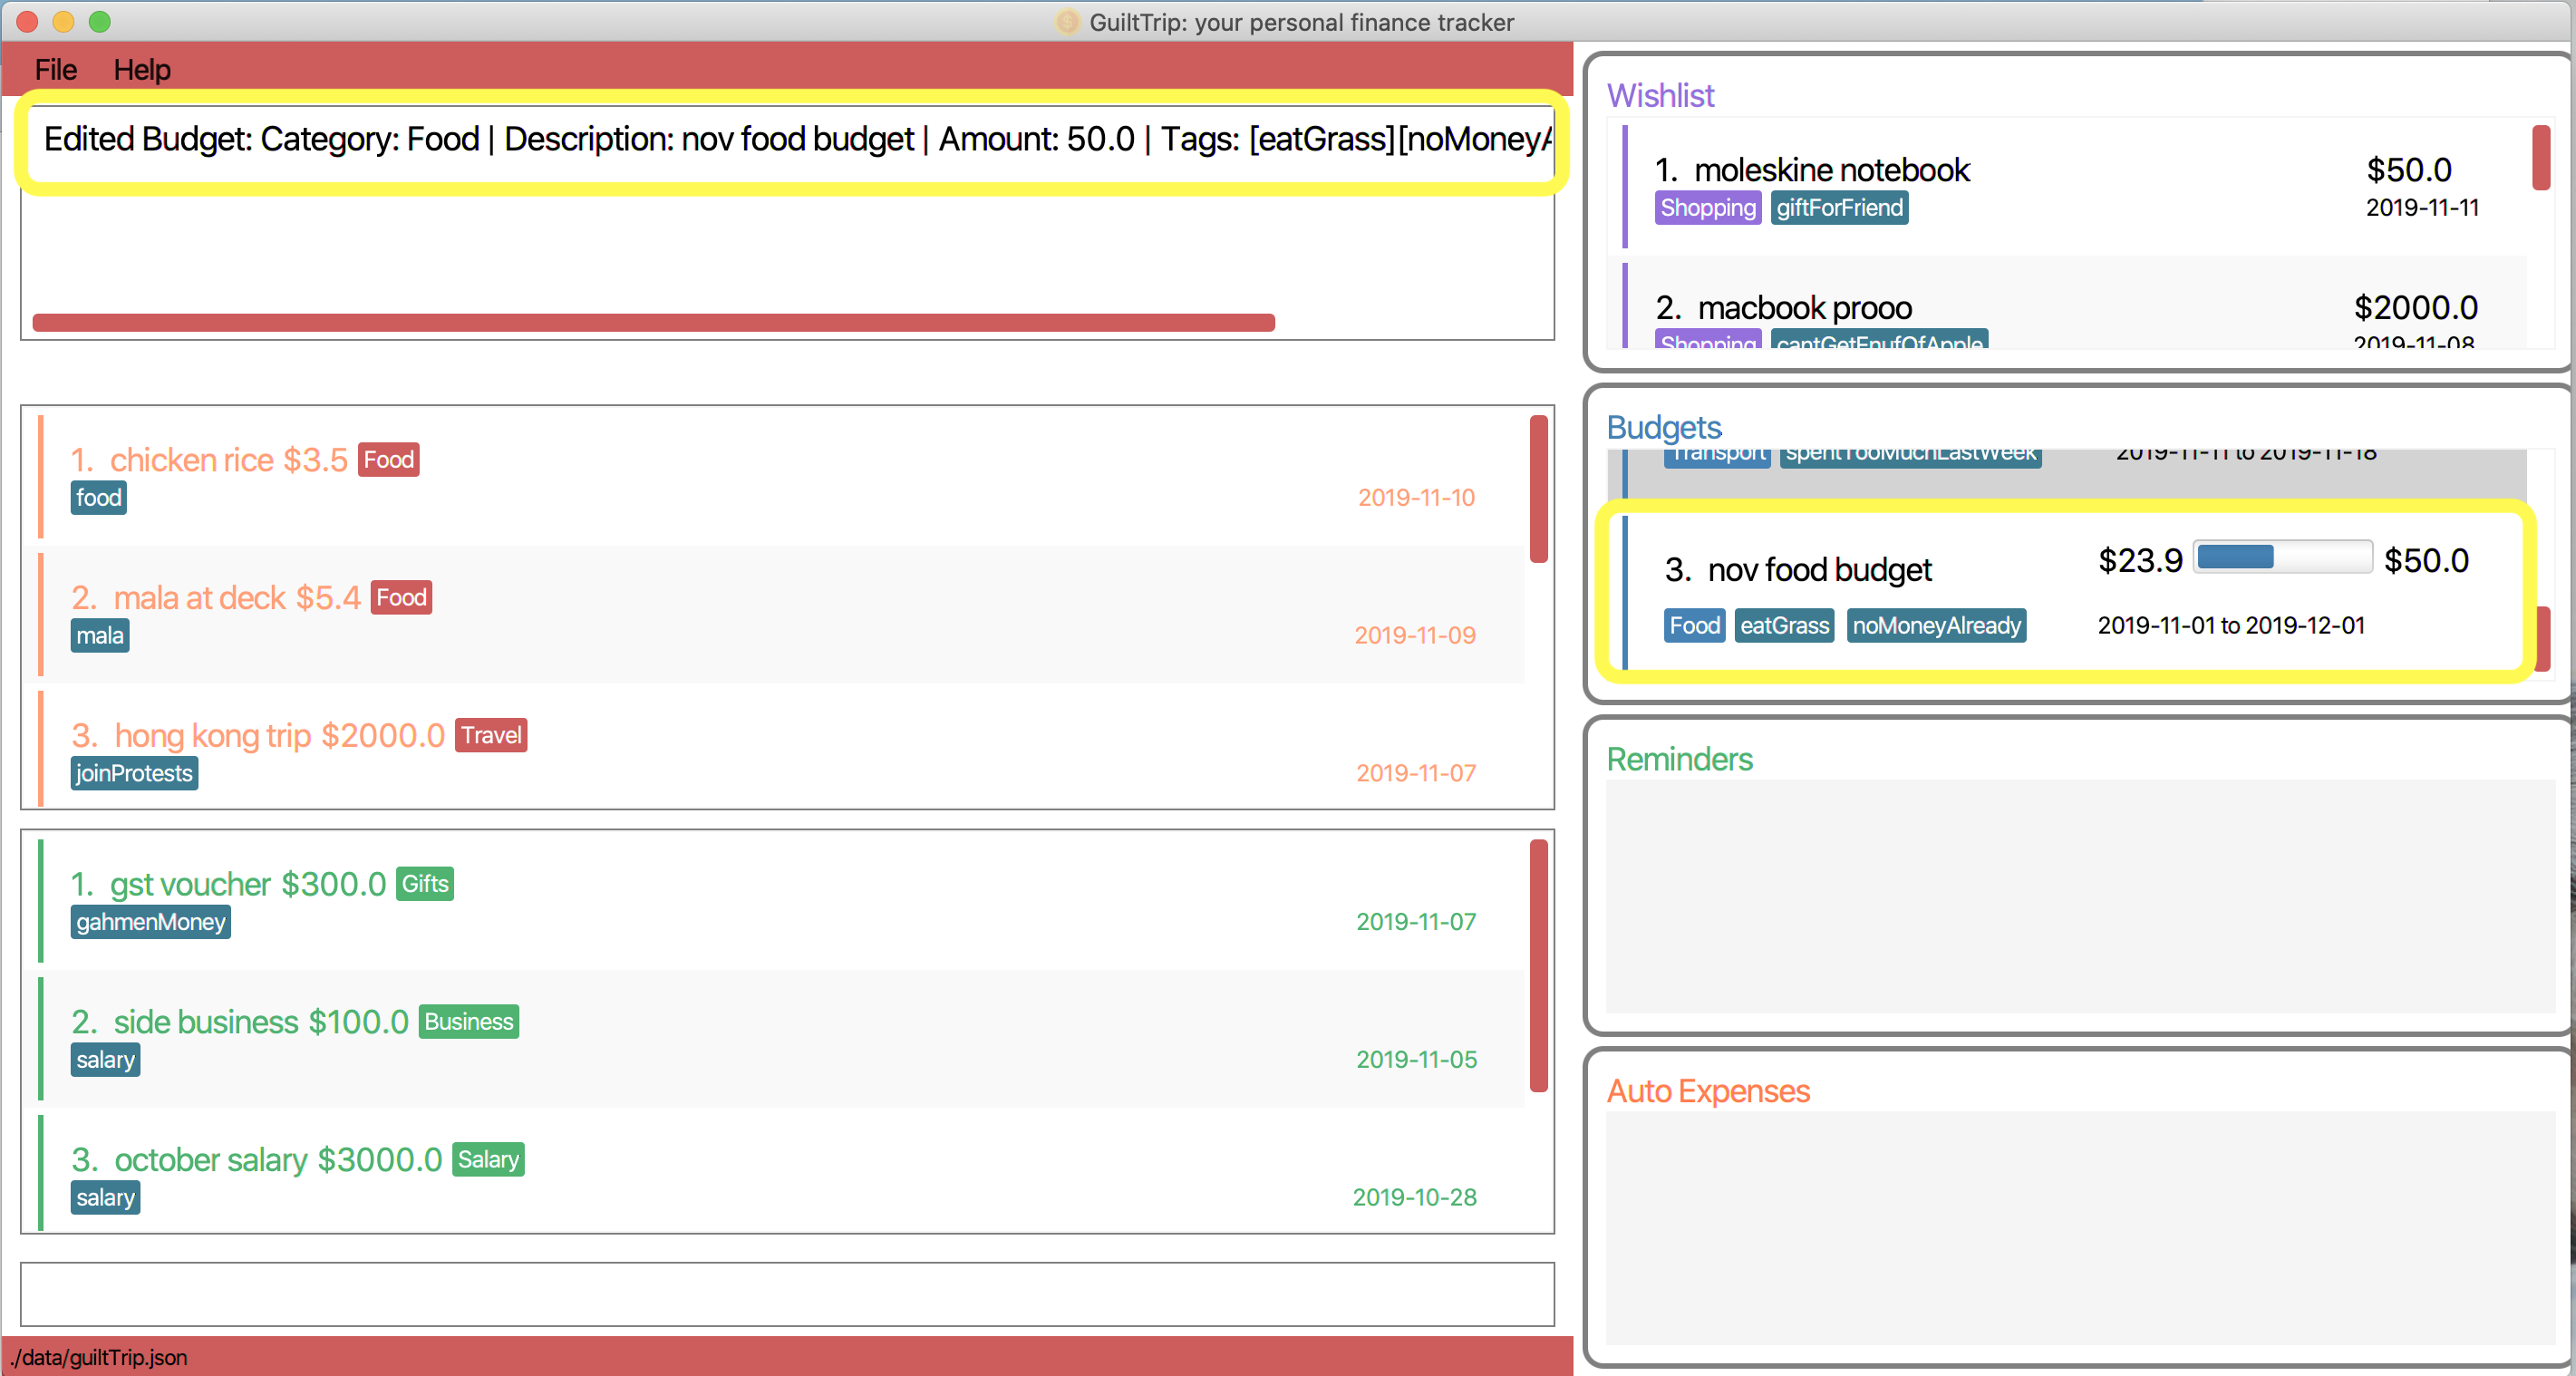
If you would like to edit a recent Budget’s tags and budget amount, whereby the budget is located at index 3 as shown below, key in the command
editBudget 3 amt/50 tg/noMoneyAlready tg/eatGrass.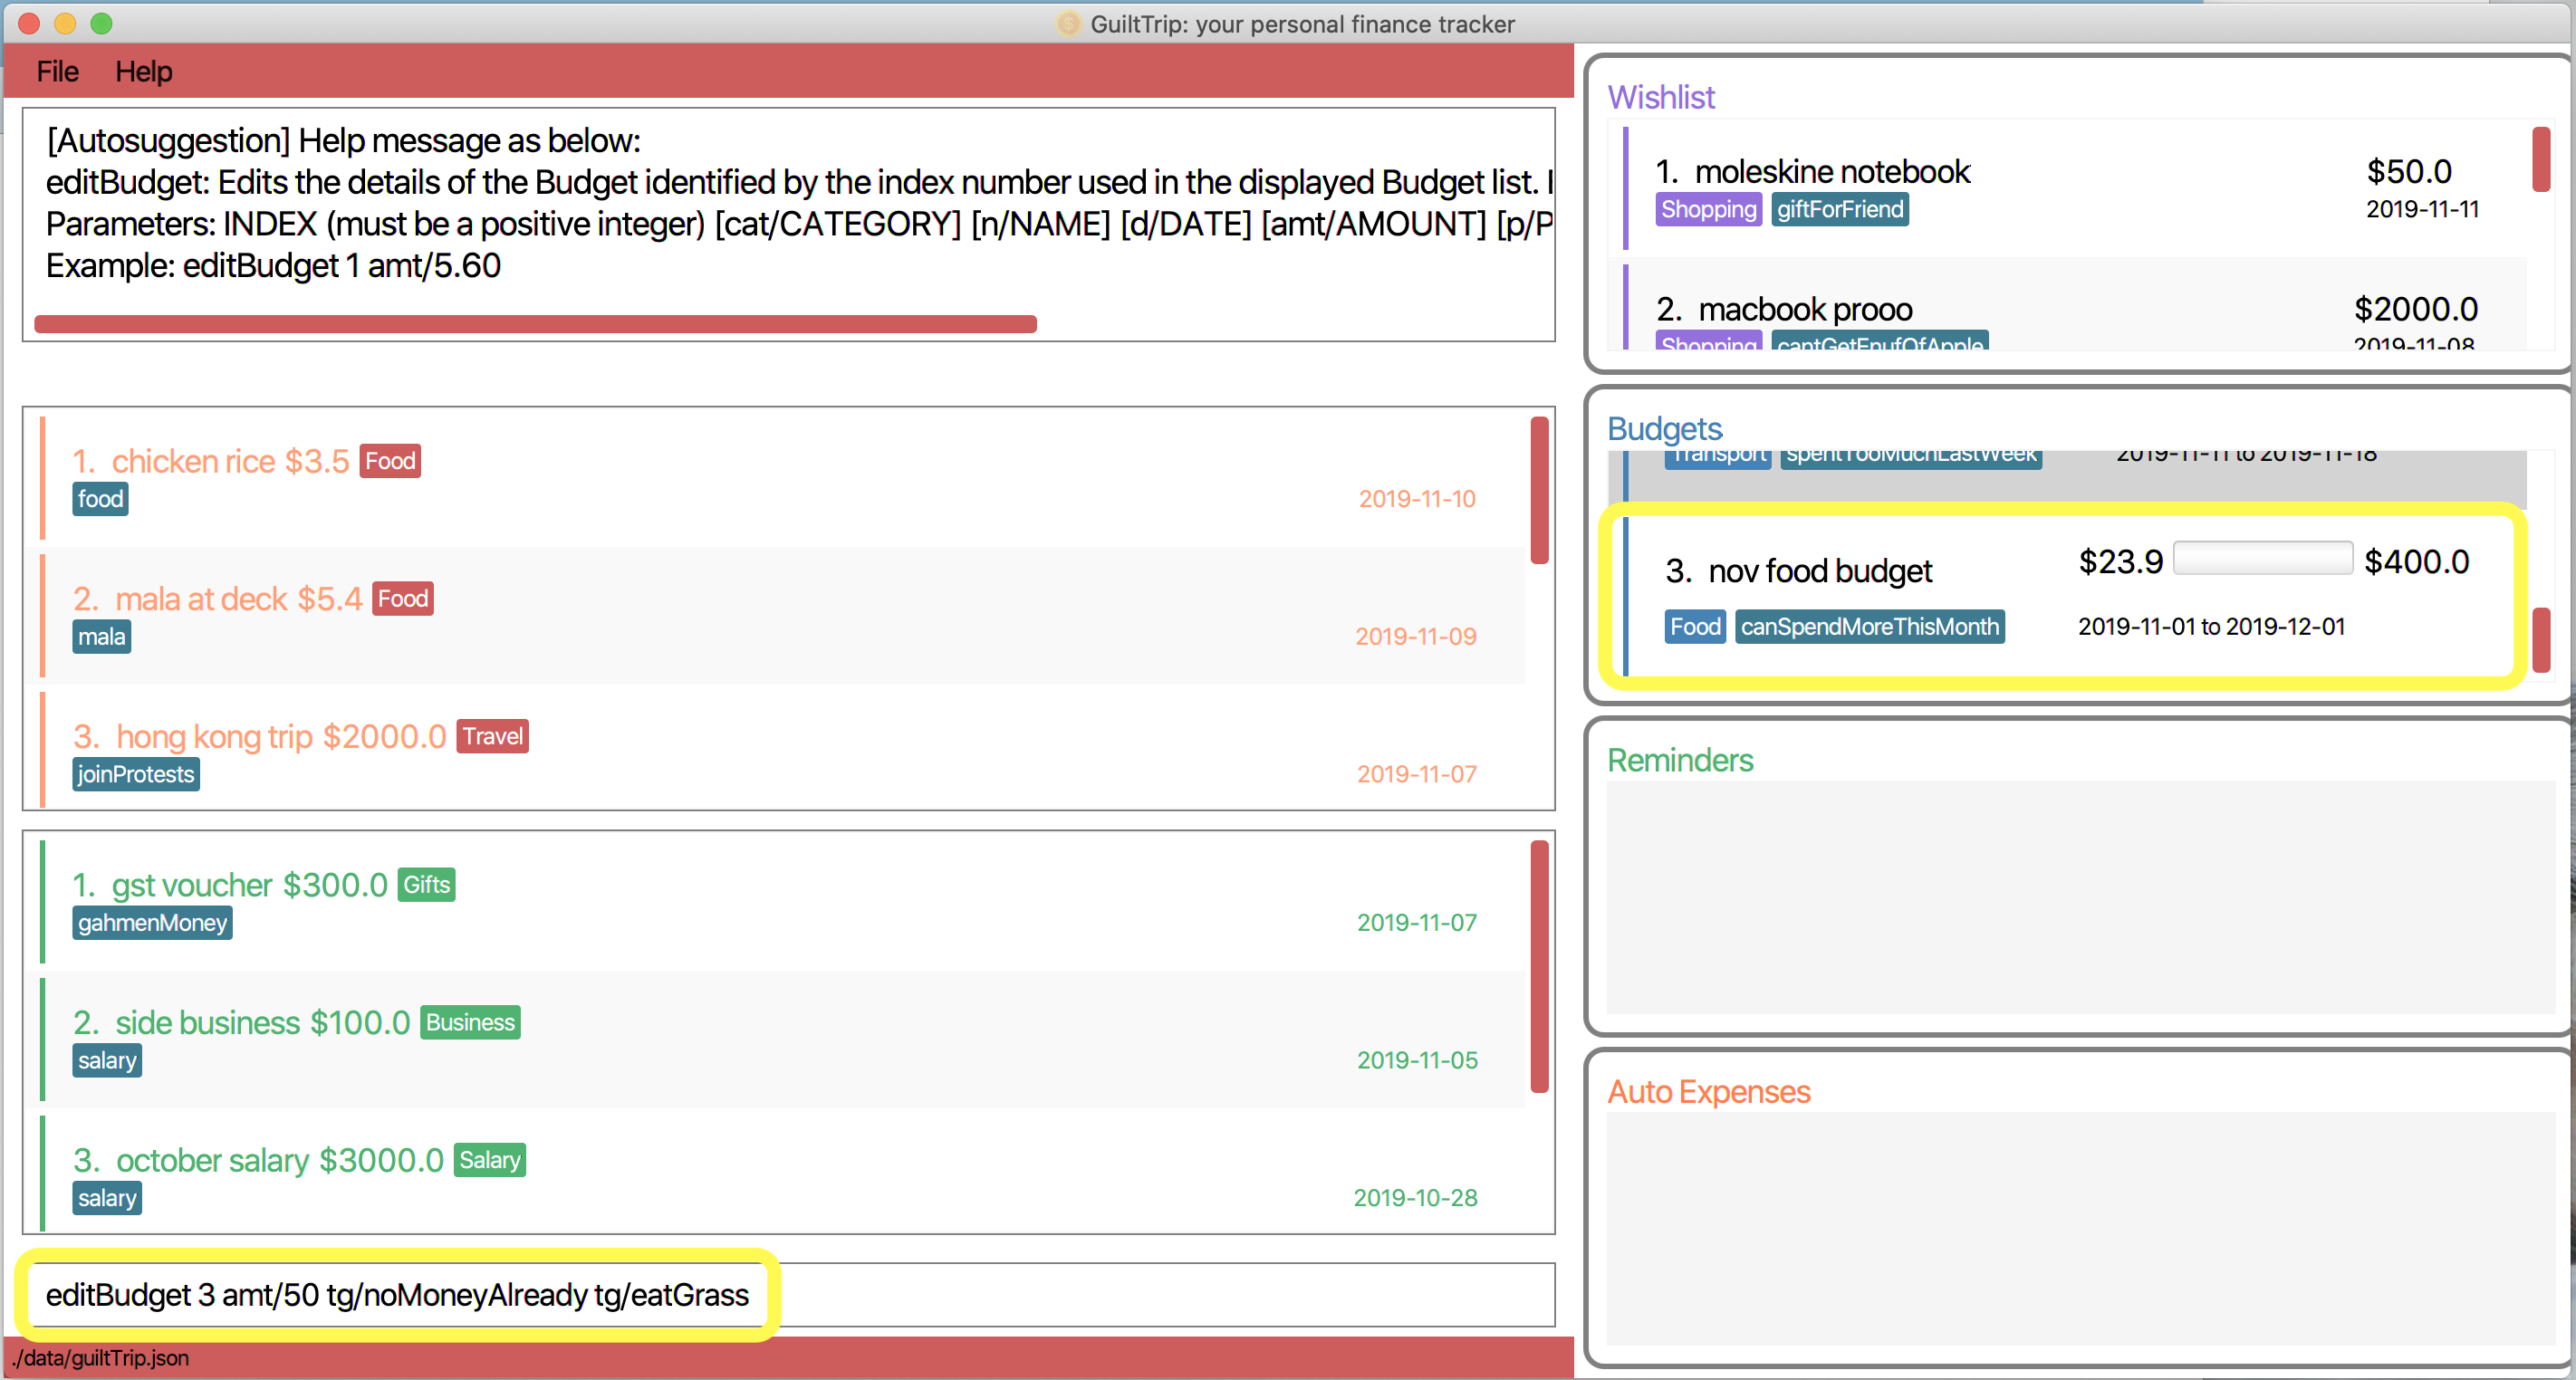
-
You should see the new budget being edited in the list of budgets as displayed below.
Other Examples:
-
editBudget 1 cat/Food n/fooooood budget -
editBudget 2 n/lunch budget amt/150 -
editBudget 2 tg/fun
3.6.4. Deleting Budget : deleteBudget
Deletes the budget at the given index number.
Format: deleteBudget <index>
-
<index>: Theindexof the budget in the budget panel. Additionally the index must be greater than zero and positive.
Example Usage:
-
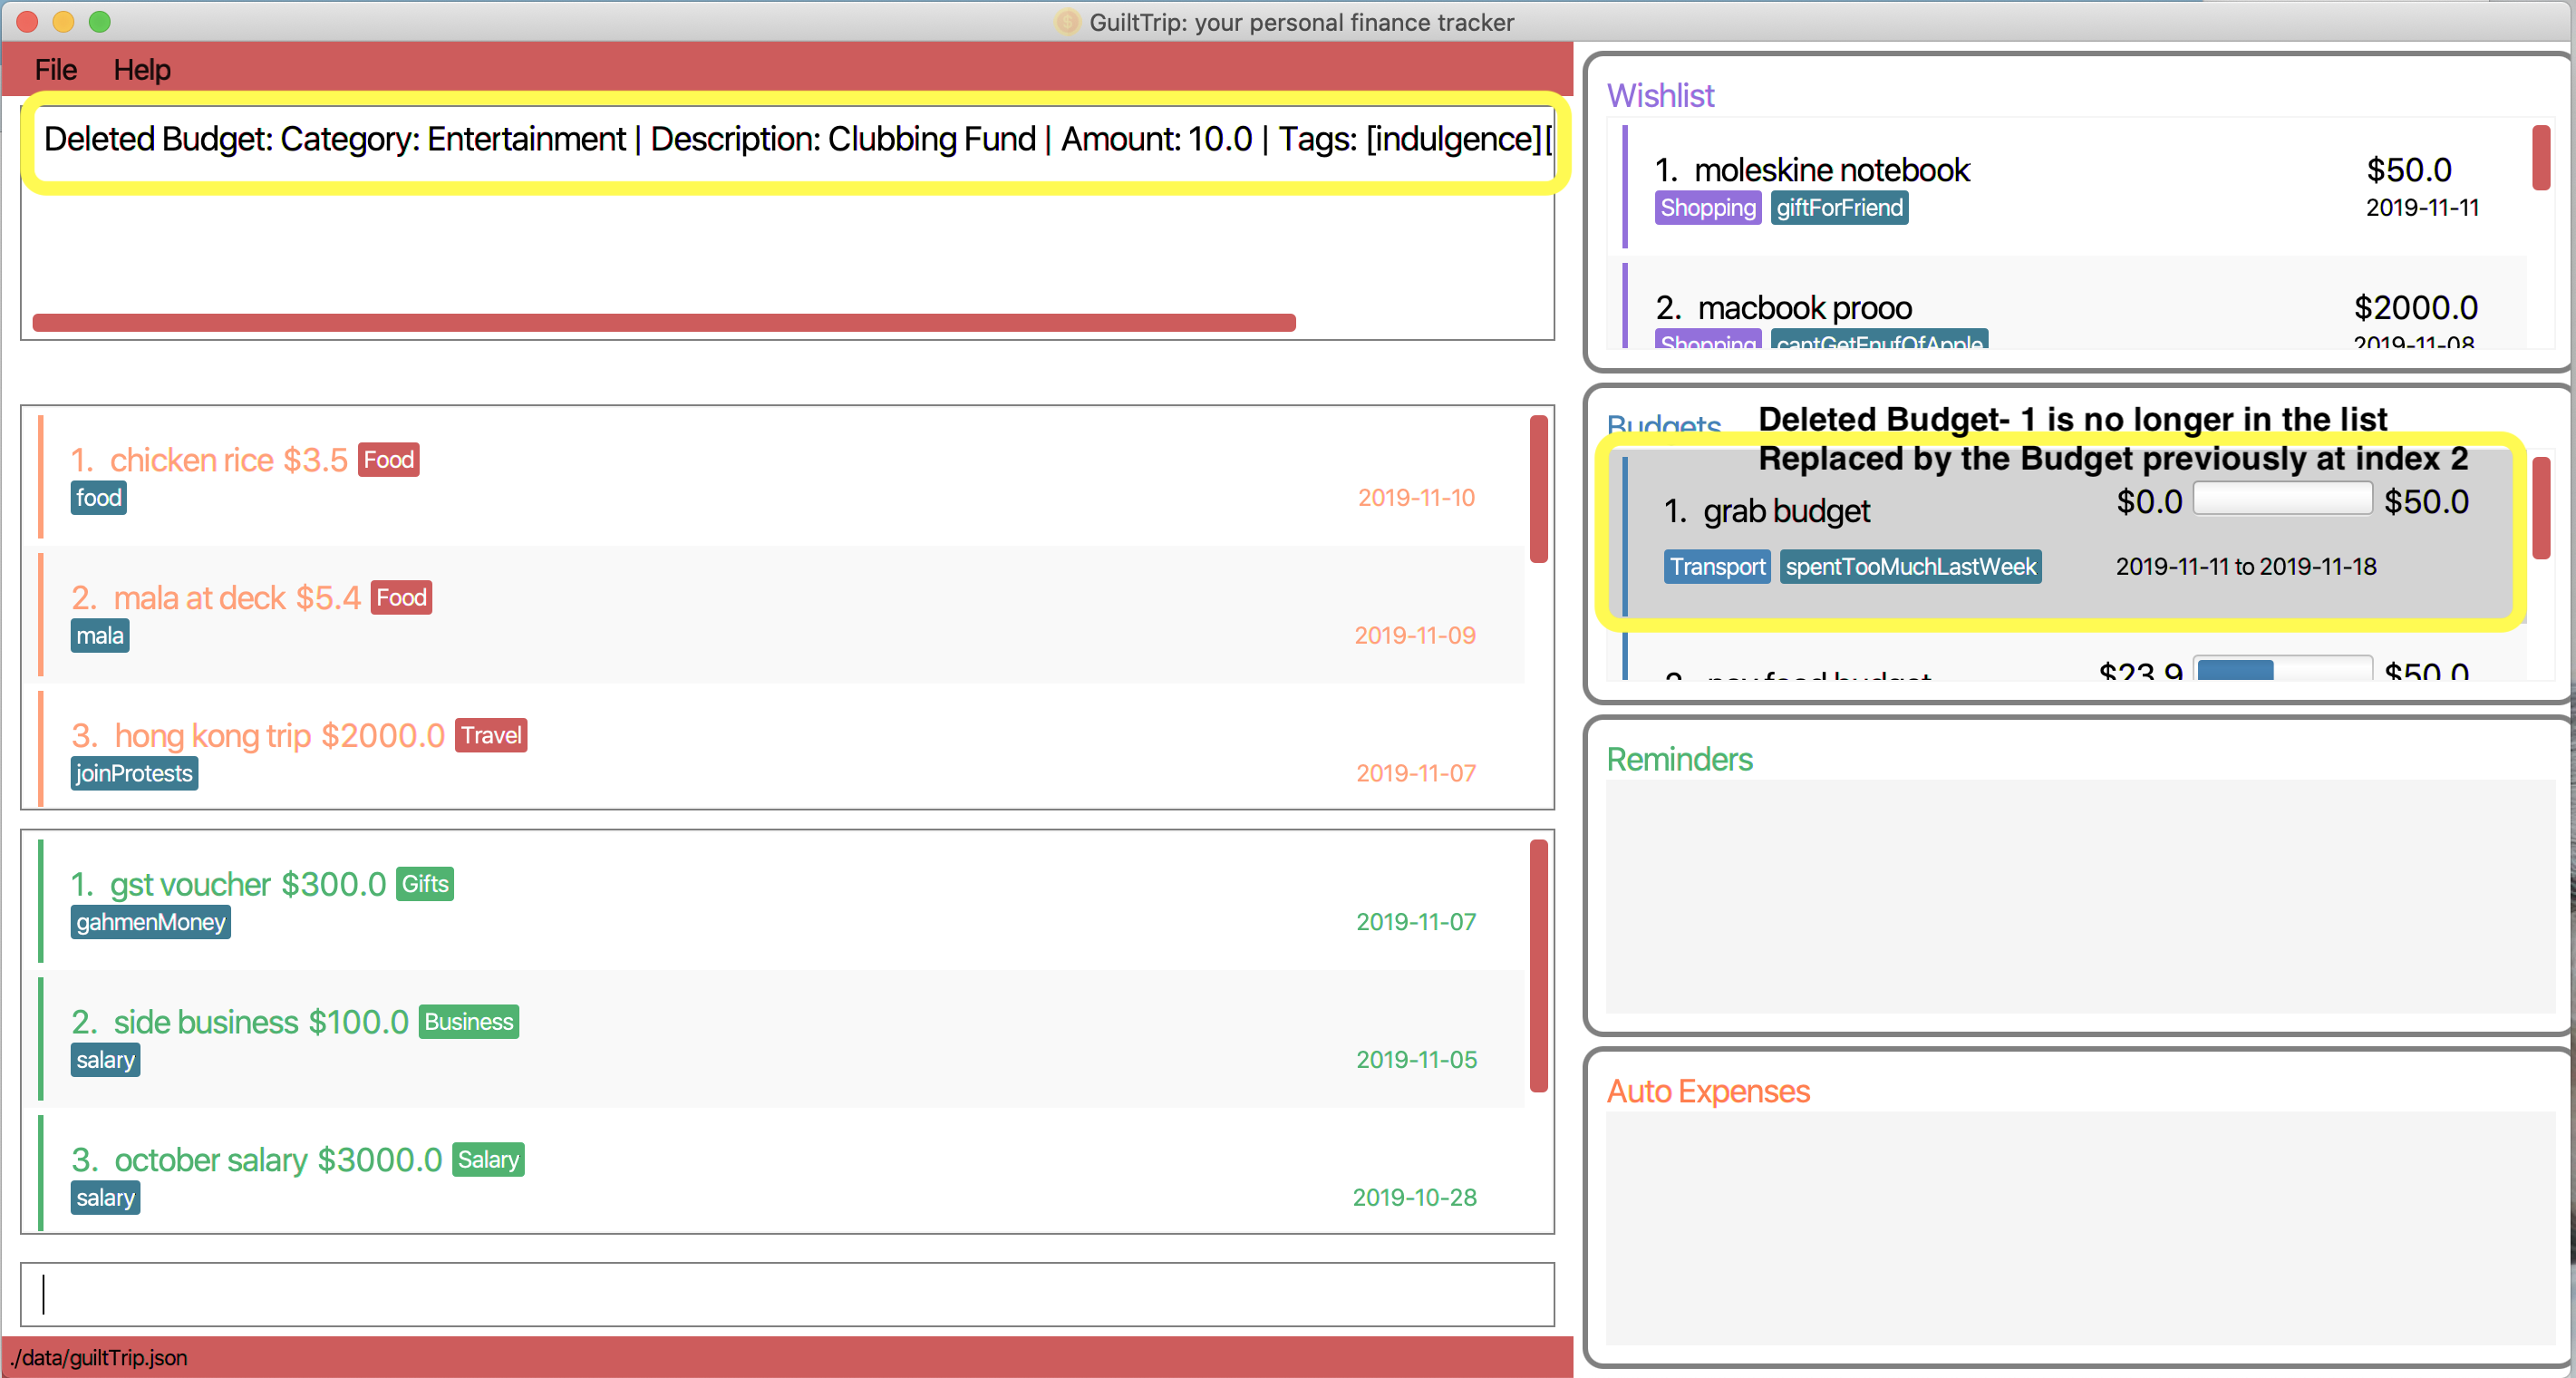
If you would like to delete a budget, whereby the budget is located at index 1 as shown below, key in the command
deleteBudget 1.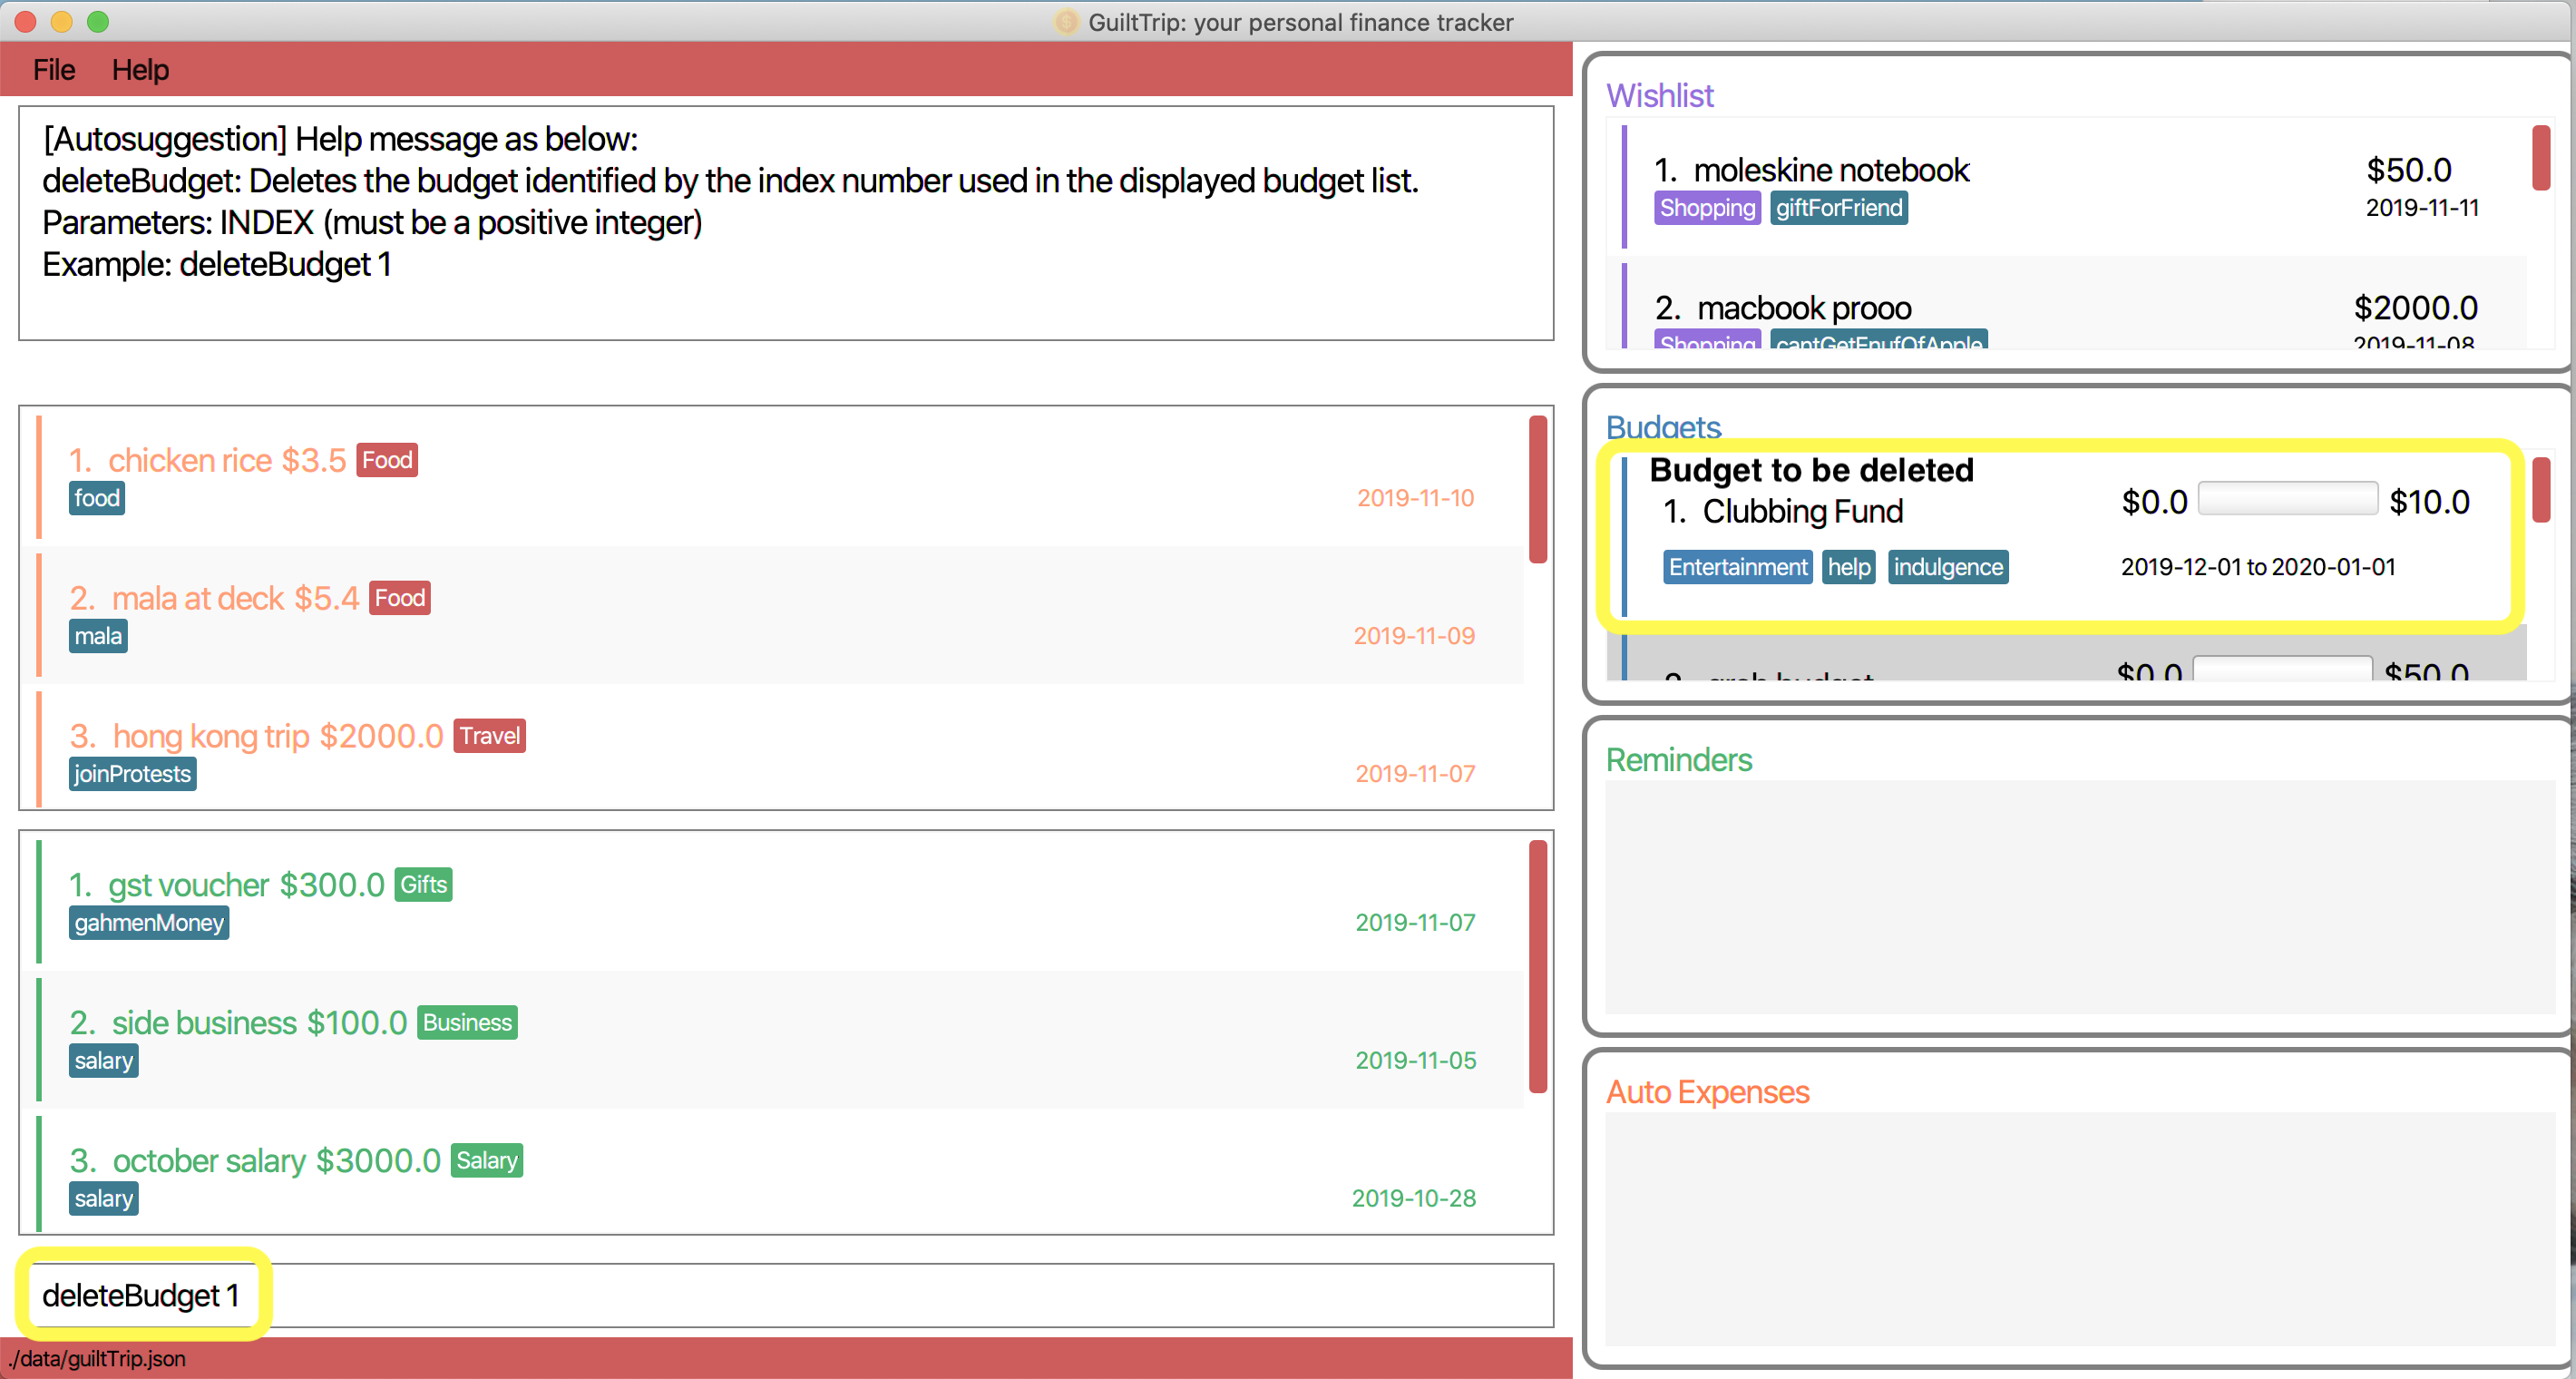
-
You should see the budget being deleted in the list of budgets as displayed below.
Other Examples:
-
deleteBudget 2 -
deleteBudget 4
3.7. WishList
3.7.1. Add Wish : addWishlist
Adds a new item to your current wishlist
Format: addWish n/<Description> cat/<Category> amt/<Price> d/<Date>
Examples:
-
add typ/Wish n/deck mala cat/food amt/5.60 d/2019 10 28 -
add typ/Wish n/deck mala cat/food amt/5.60 d/01/01/2020
3.7.3. Edit Wish : editWish
edit the description, date, or tags of your wishes.
Format: editWishlist <index> [n/<Description>] [cat/<Category>] [amt/<Price>] [d/<Date>] [tag/<Tag>]
Examples:
-
editWishlist 1 n/1 try the chinatown ri ri hong mala! -
editWishlist 1 amt/20 tag/mala tag/expensive
3.7.4. Delete Wish : deleteWish
Deletes the item at the stated index from your current wishlist
Format: deleteWish <index>
Examples:
-
deleteWishlist 3
3.8. Loan [coming in v2.0]
3.8.1. Adding a Loan : addLoan [coming in v2.0]
Adds a new loan with the given description, amount and interest (in percentage) and calculates the total outstanding amount based on the interest.
Format: addLoan n/<description> amt/<loan amount> i/<interest>
Example:
-
addLoan n/student loan amt/30000 i/4.5
3.8.2. Listing a loan : listLoan [coming in v2.0]
Lists all the loans that the user has.
Format: listLoan
Example: listLoan
3.8.3. Editing a loan : editLoan [coming in v2.0]
Edits a current loan’s description, loan amount, or both.
Format: editLoan <index> [n/<description>] [amt/<loan amount>] [i/<interest>]
Example:
-
editLoan 1 n/nus tuition loan T.T -
editLoan 1 amt/25000 i/4.45%
3.8.4. Deleting a loan : deleteLoan [coming in v2.0]
Deletes a current loan at the given index.
Format: deleteLoan <index>
Example: deleteLoan 1
3.8.5. Paying a loan : payLoan [coming in v2.0]
Reduces the loan amount for the loan at the given index after user pays for part of the loan.
Format: payLoan <index> amt/<amountPaid>
Example: payLoan 1 amt/4000
3.9. Statistics
3.9.1. Switching to Statistics Table View : viewTable
Switches to the statistics table view. By default, viewTable will show the current month statistics.
Typing only the month in format [yyyy-mm] will show the breakdown of statistics by the specified month.
Carrying out any other Adding, Editing, Or Deleting Expense or Income command in the Statistics Table
screen will reset the Table to show the month of statistics that reflects the command carried out.
Format: viewTable [p/<RangeOfMonths>]
-
<RangeOfMonths>: The dates that you would like to display the statistics by. If you are interested in a range of months, you have to make sure that the startMonth and endMonth is separated by a comma,,. If you’re only interested in one month, specify the month in the formatyyyy/MM
Example Usage:
-
Let’s say you want to view the Statistics in table form for period 2018/01 to 2019/12. You then type in the command
viewTable p/2018-01,2019-12.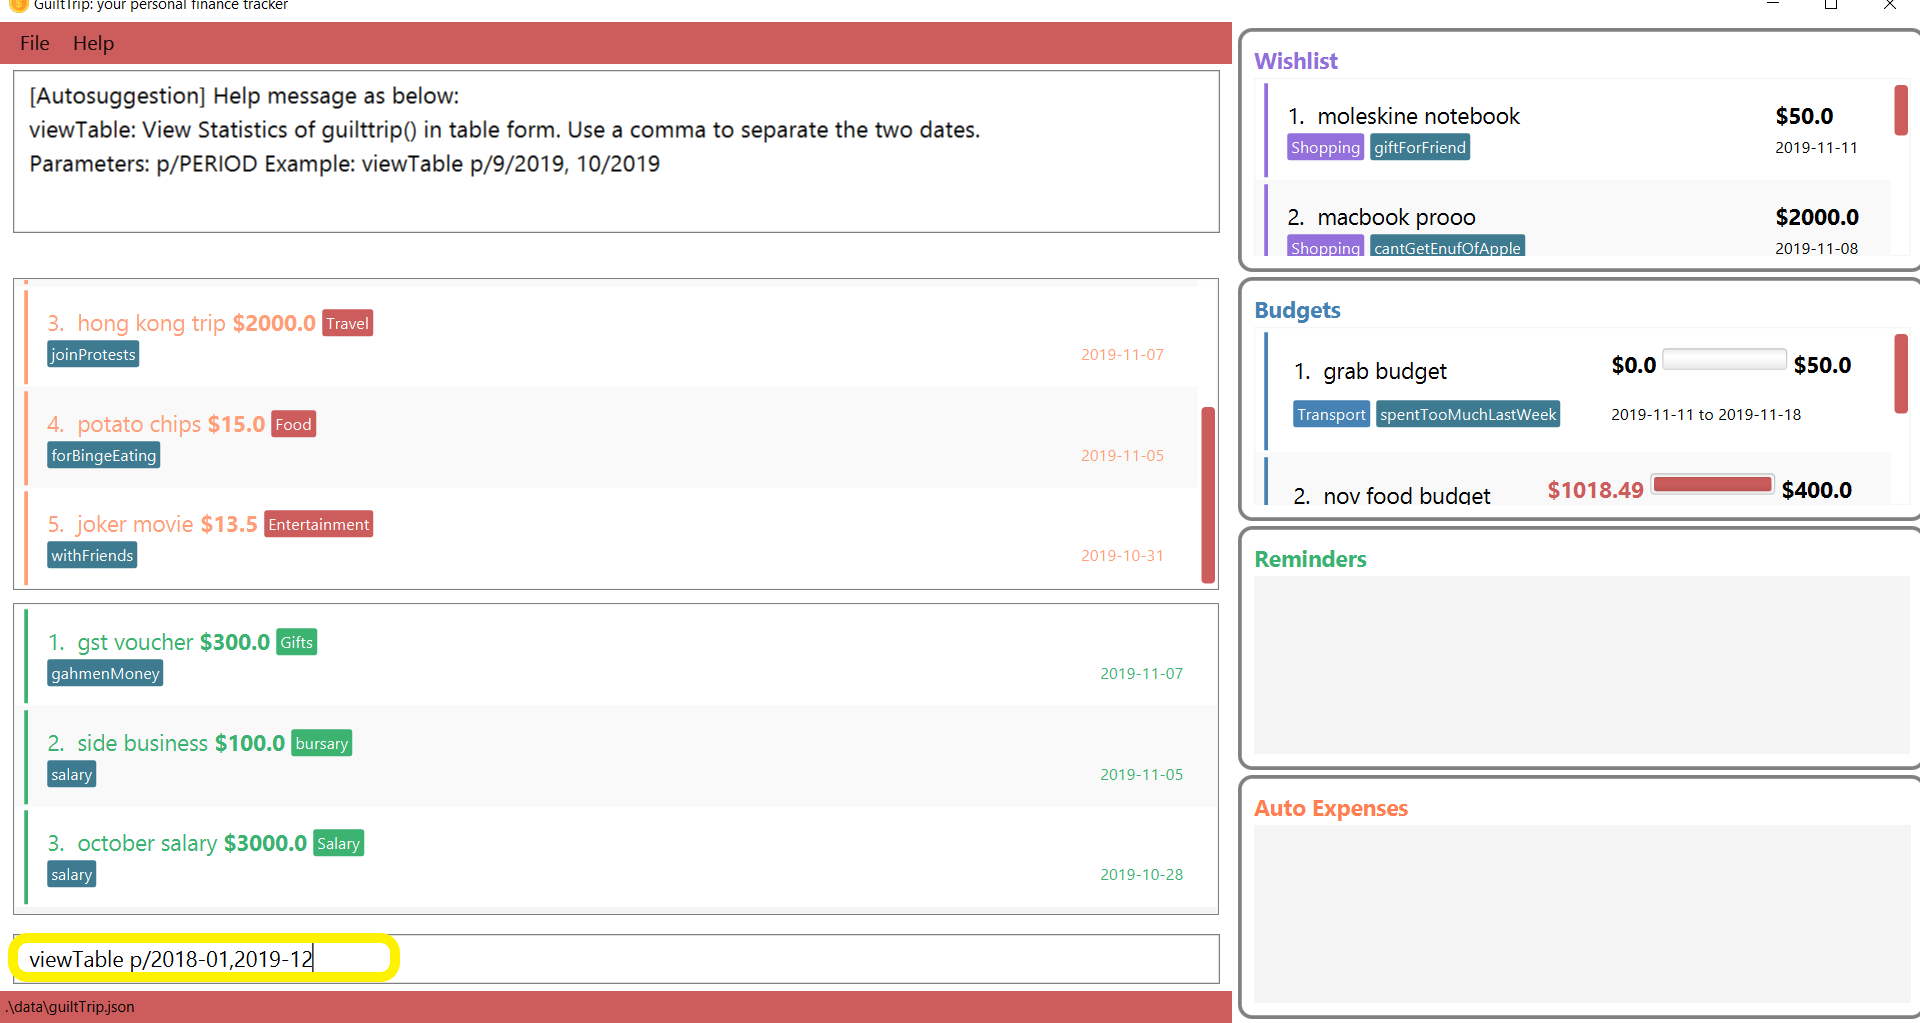
-
GuiltTrip will display to you the statistics for this period of time broken down in table form as shown below.

Other Examples:
-
viewTable p/2018-09 -
viewTable
3.9.2. Switching to Statistics Pie Chart View : viewPie
Switches to the statistics table view. By default, viewPie will show the current month statistics.
Typing only the month in format [yyyy-mm] will show the breakdown of statistics by the specified month.
Carrying out any other Adding, Editing, Or Deleting Expense or Income command in the Statistics Table
screen will reset the Table to show the month of statistics that reflects the command carried out.
The statistics by percentage will be rounded to the nearest 1 decimal place so as not to clutter the UI.
Format: viewPie [p/<RangeOfMonths>]
-
<RangeOfMonths>: The dates that you would like to display the statistics by. If you are interested in a range of months, you have to make sure that the startMonth and endMonth is separated by a comma,,.
Example Usage:
-
Let’s say you want to view the Statistics in pie chart form for period 2018/01 to 2019/12. You then type in the command
viewPie p/2018-01,2019-12.
-
GuiltTrip will display to you the statistics for this period of time broken down in pie chart form as shown below.
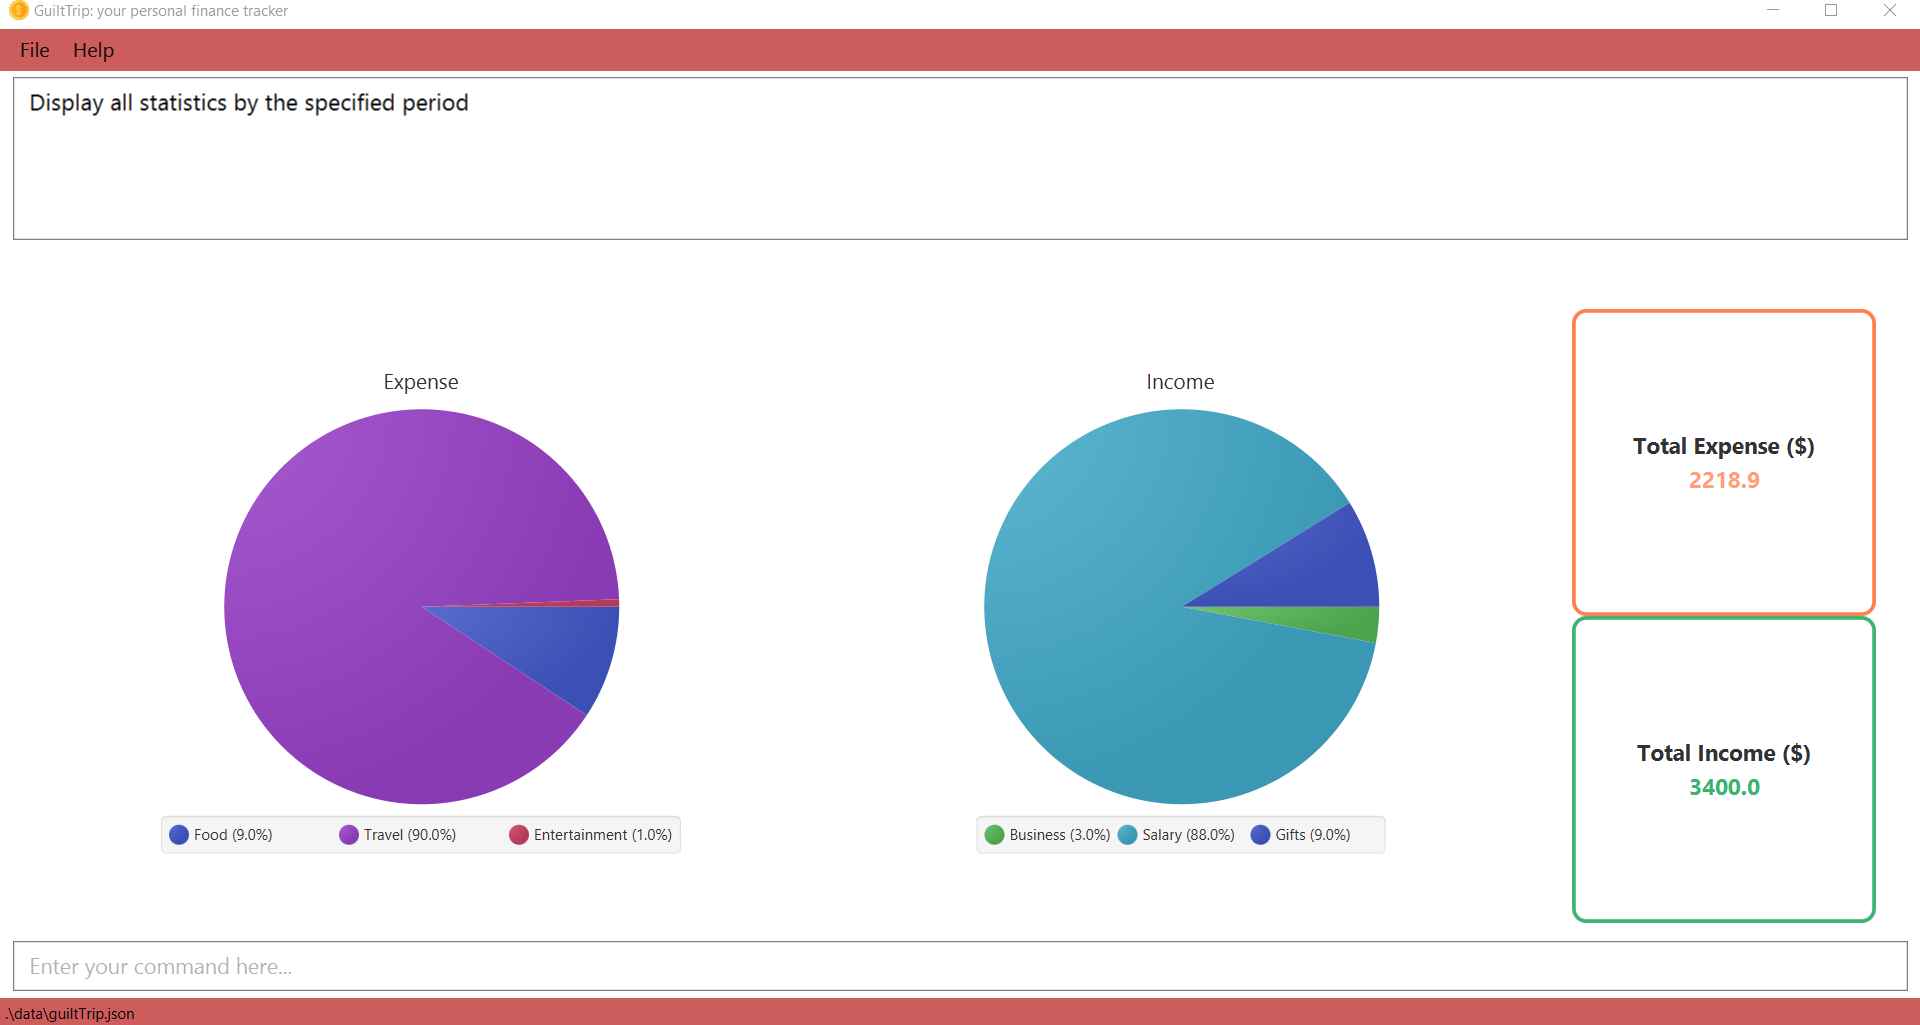
| If the data category percentage is too small, it could be rounded off to 0.0% and there is a likelihood that it’ll be hard to see the portion of that category in the pie chart. |
Other Examples:
-
viewPie p/2018-09 -
viewPie
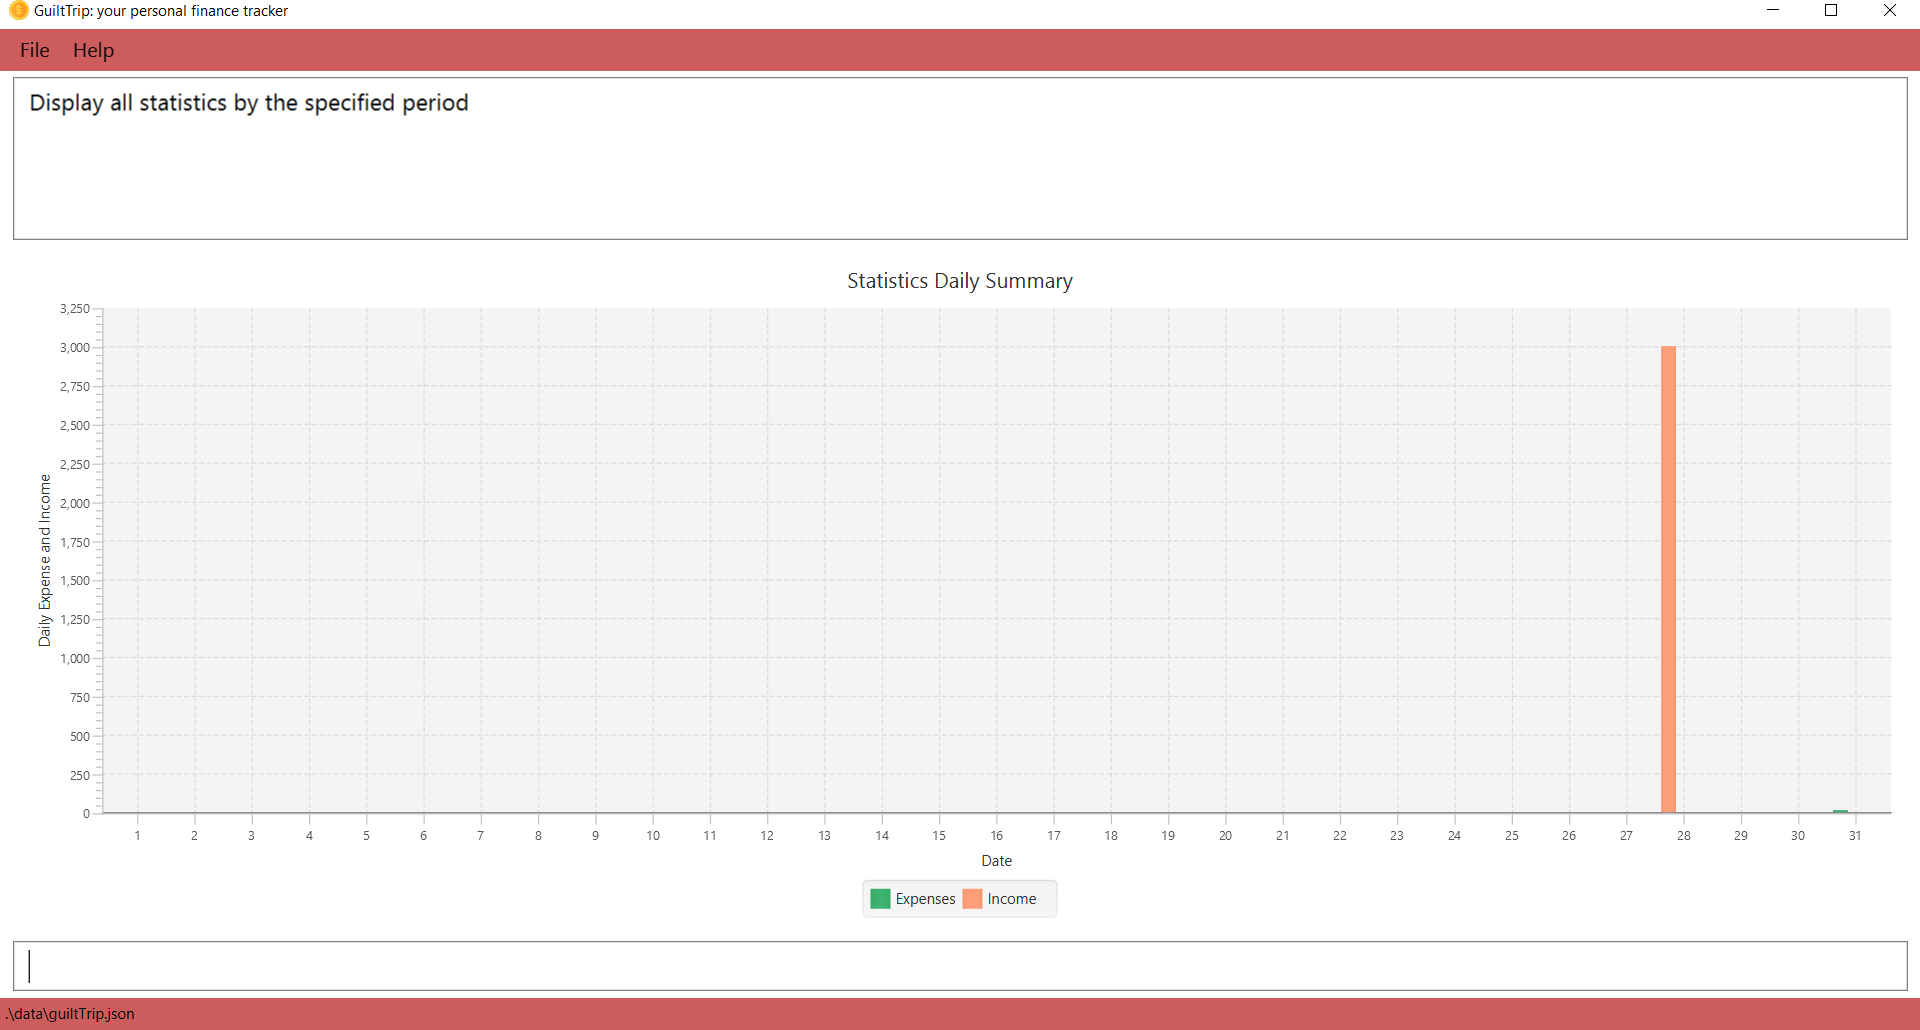
3.9.3. Switching to Statistics Bar Chart View : viewBar
Switches to the statistics table view. By default, viewBar will show the current month statistics.
Typing only the month in format [yyyy-mm] will show the breakdown of statistics by day by the specified month.
Carrying out any other command in the Statistics Bar Chart screen will reset the Bar Chart to show the current month
statistics for convenience of the user.
| As the bar chart is auto scaling to reflect the accuracy of the y-axis , if there is too large an expense for one day, it will be hard to see the amounts for other days. |
Format: viewBar [p/<SpecifiedMonth>]
-
<SpecifiedMonth>: The month and year in which you want to display the data by. It must be in the format[yyyy mm]with no dates and does not allow a range of months.
Example Usage:
-
Let’s say you want to view the Statistics in bar chart form for period 2019/10. You then type in the command
viewBar p/2019-10.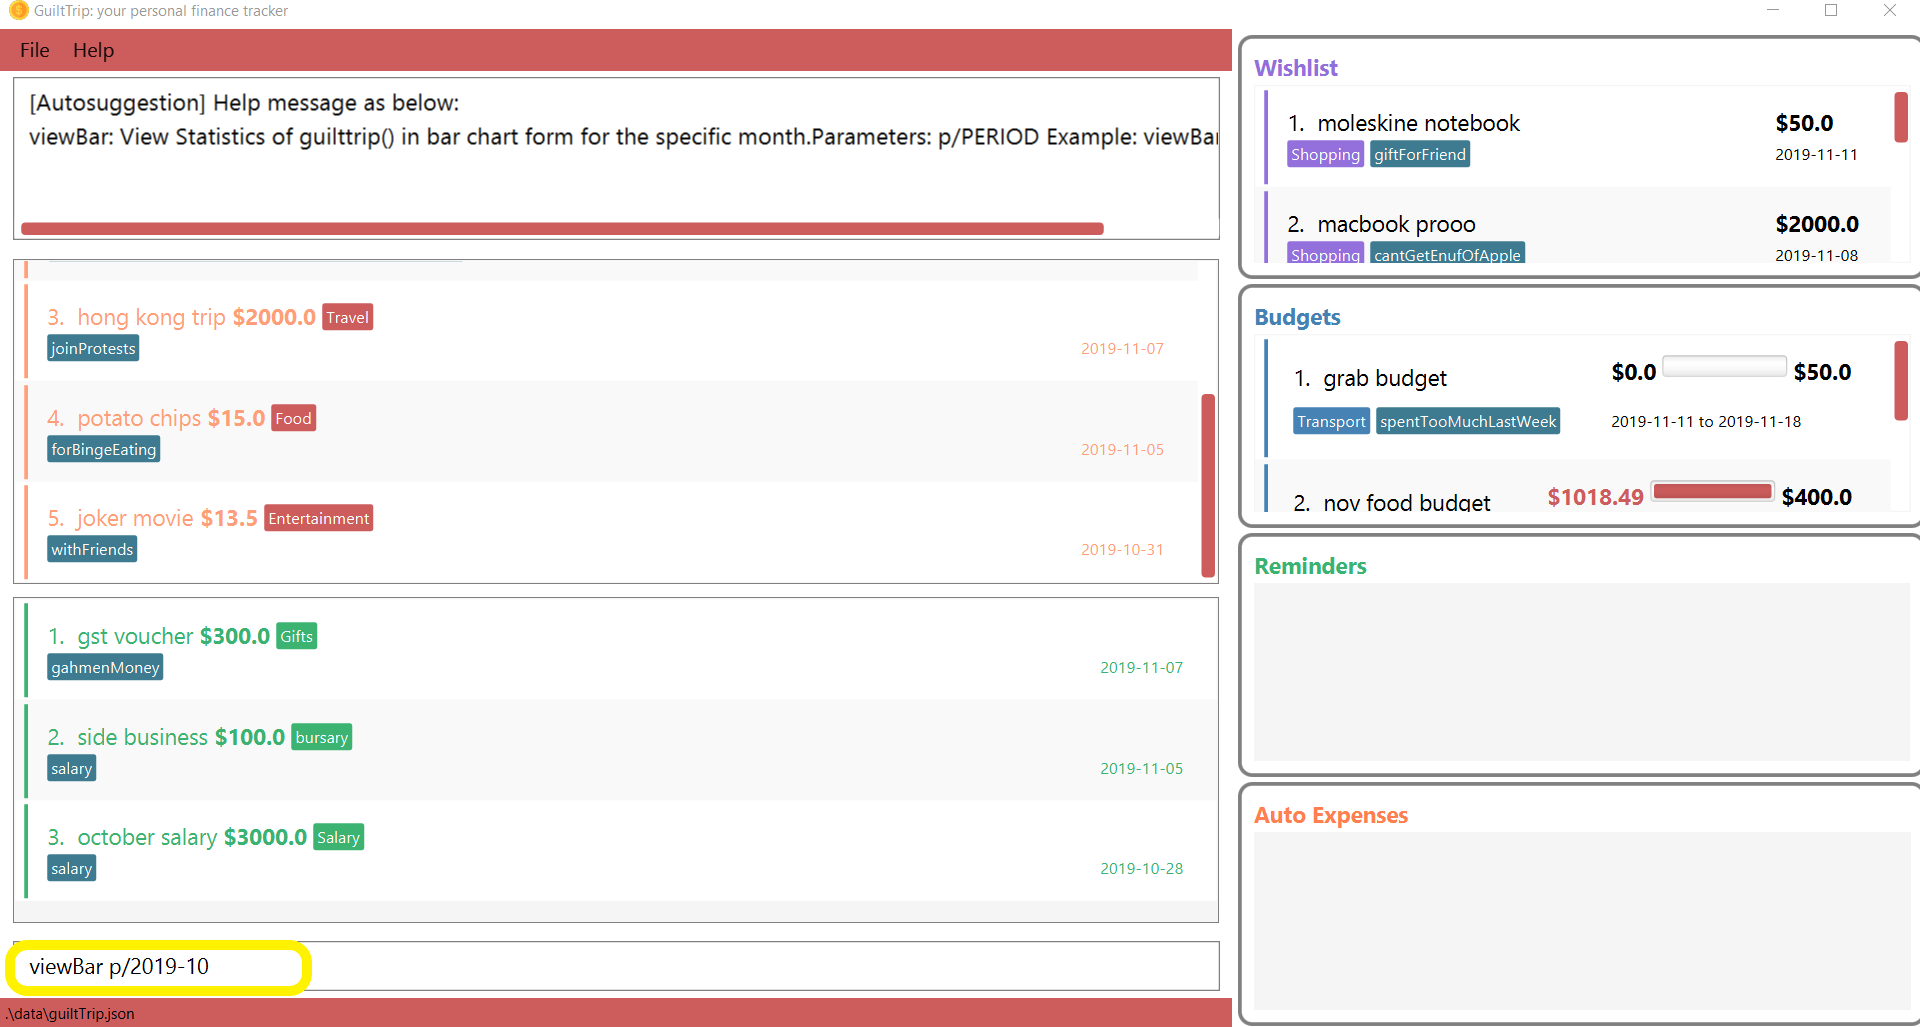
-
GuiltTrip will display to you the statistics for this period of time broken down in table form as shown below.
Other Examples:
-
viewBar p/2018-09 -
viewBar
3.9.4. Switching to Entry View : viewEntry
Switches back to the default view which contains the list of entries.
Format: viewEntry
Example Usage:
-
viewEntry
3.10. Sorting : sortExpense, sortIncome, sortBudget, sortWish, sortAutoExp
Sorts the aforementioned list currently displayed according to sort type which can be amount, time, description,
tags and category, and sort sequence which can be in ascending, descending order.
| Sorting of Budget by Amount refers to the original Budget Total Amount. |
Format: sortExpense typ/<sort type> s/<sort sequence>
-
<sort type>: The type to sort the entries by. The default order or sorting is bytime, followed byamount,description,categoryand finallytags. -
<sort sequence>: The type of sequence to sort the entries by.
Example Usage:
-
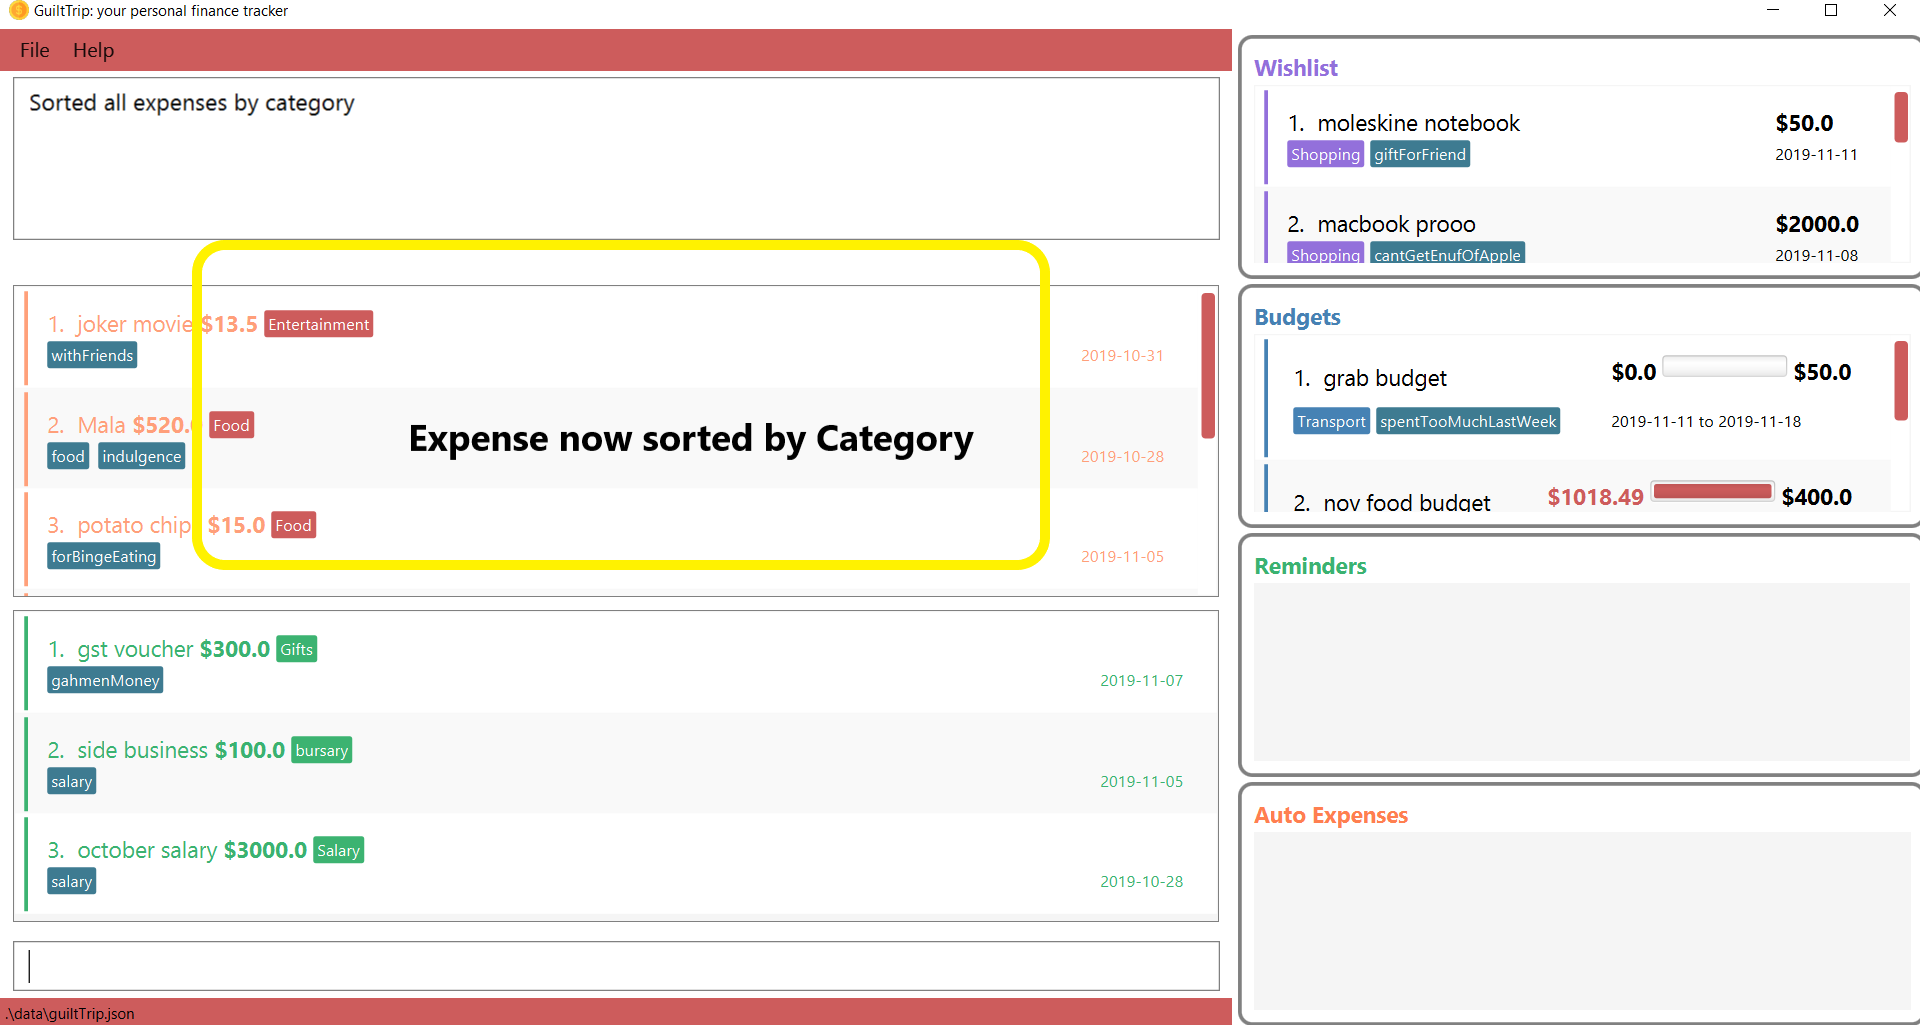
Let’s say you want to view the entries sorted by Category in ascending order. You then type
sortExpense typ/Category s/ascending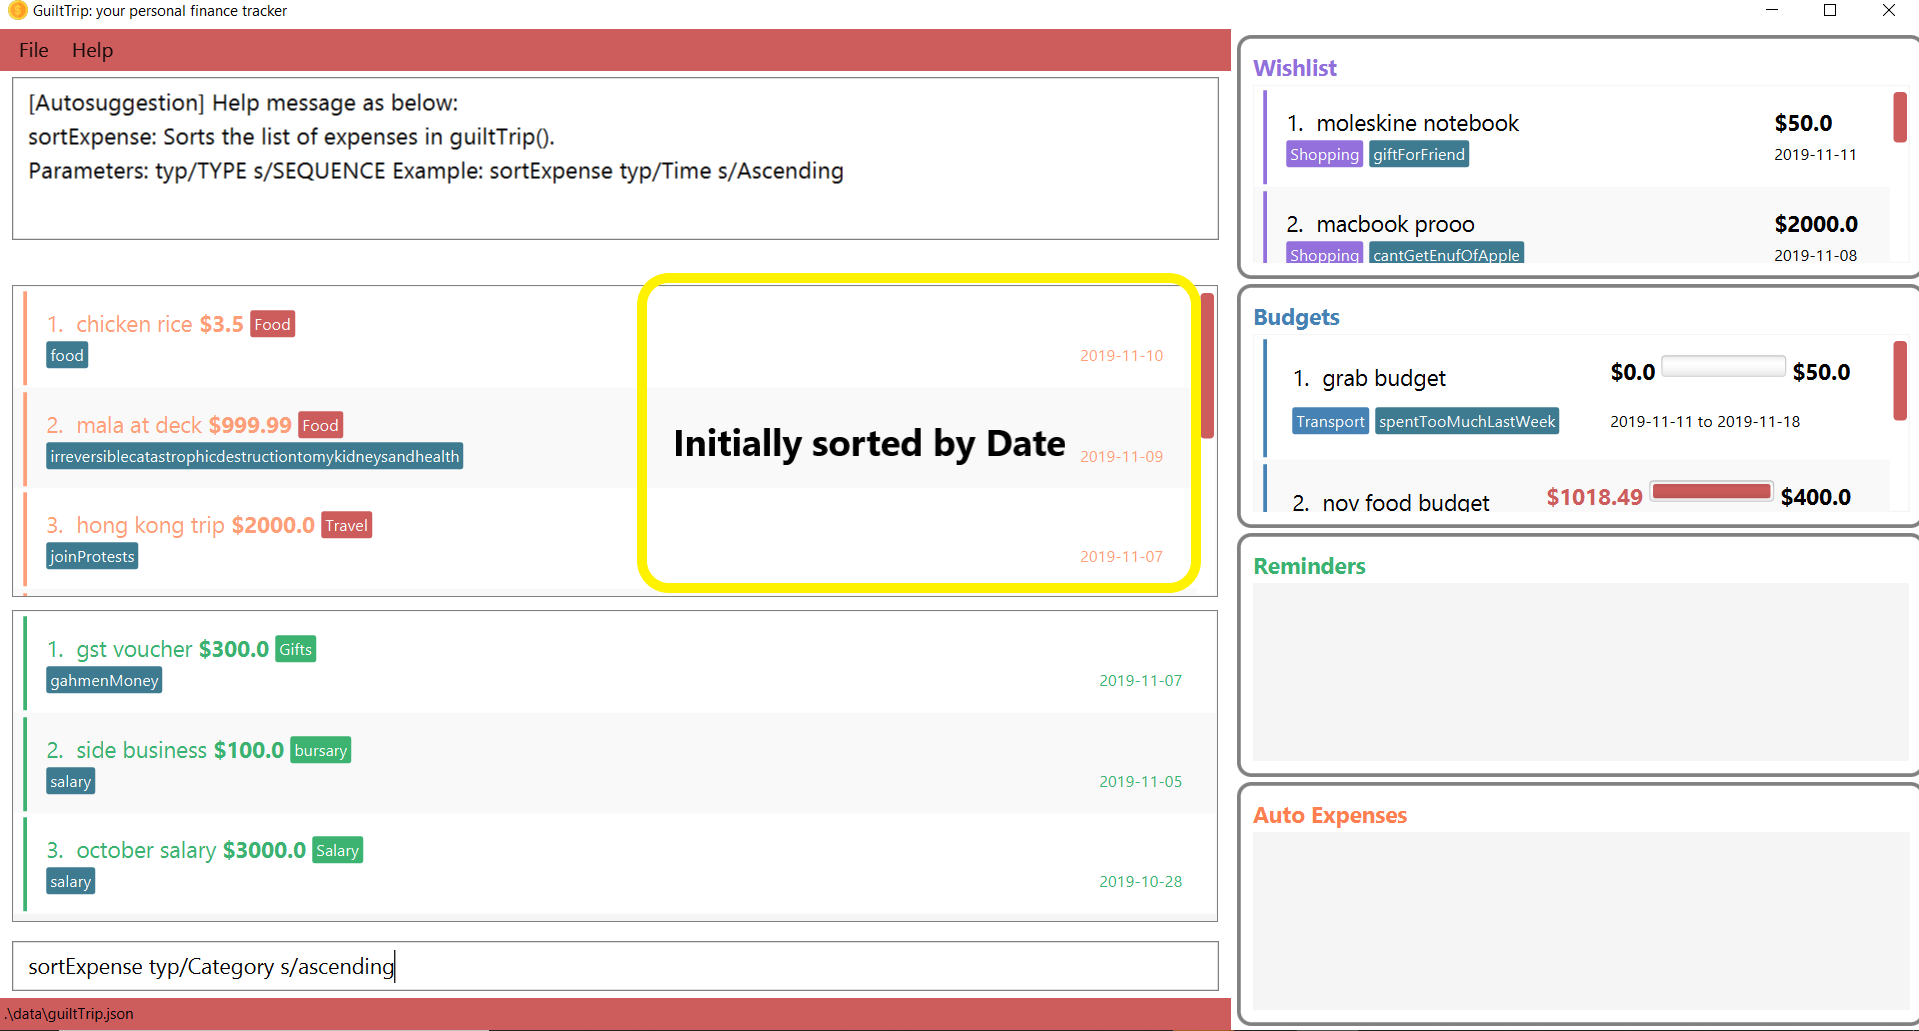
-
GuiltTrip will display to you the entries sorted by Category in the proper order as shown below.
Other Examples:
-
sortExpense typ/amount s/ascending -
sortExpense typ/category s/descending -
sortIncome typ/category s/ascending
3.11. Find : findExpense, findIncome, findWish, findBudget, findAutoExp
Find income/expenditure by Category, Description, Amount, Date or Tags. There must be at least one find parameter.
Finding by Amount will show the entries that are above a certain amount. Budget’s Amount refers to the total amount allocated for the Budget.
|
Finding by Description will show all entries which have some parts of the description keyword in them. For example,
finding mala food will show entries with either mala or food or both in their Description.
|
Finding by Tag will show all entries with all the tags in them. For example, finding by tg/eat tg/entertainment will show entries with only
both tags. The reason for this is that tags should be more specific that entry Description.
|
Format: findExpense [cat/<category>] [n/<description>] [amt/<amount>] [d/<date>] [tg/<tag>]
-
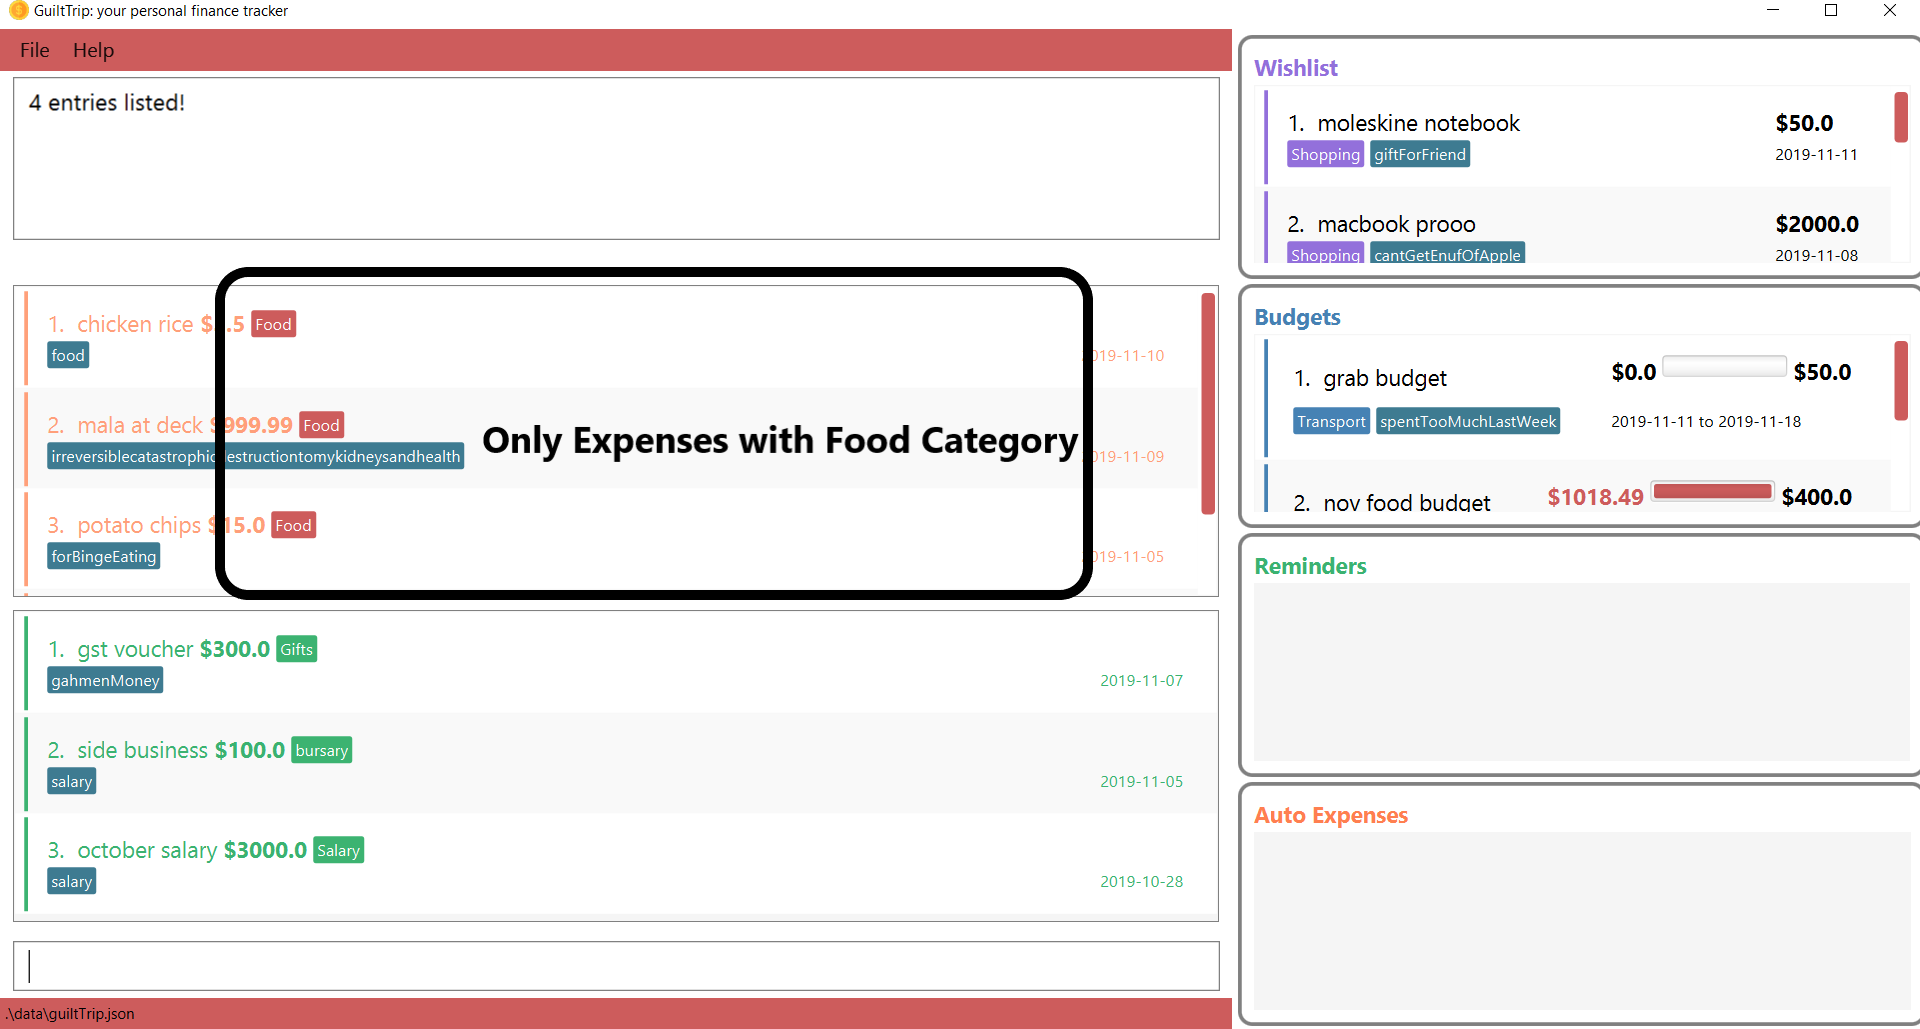
Let’s say you want to find all the expenses with Category name food. You then type
findExpense cat/Food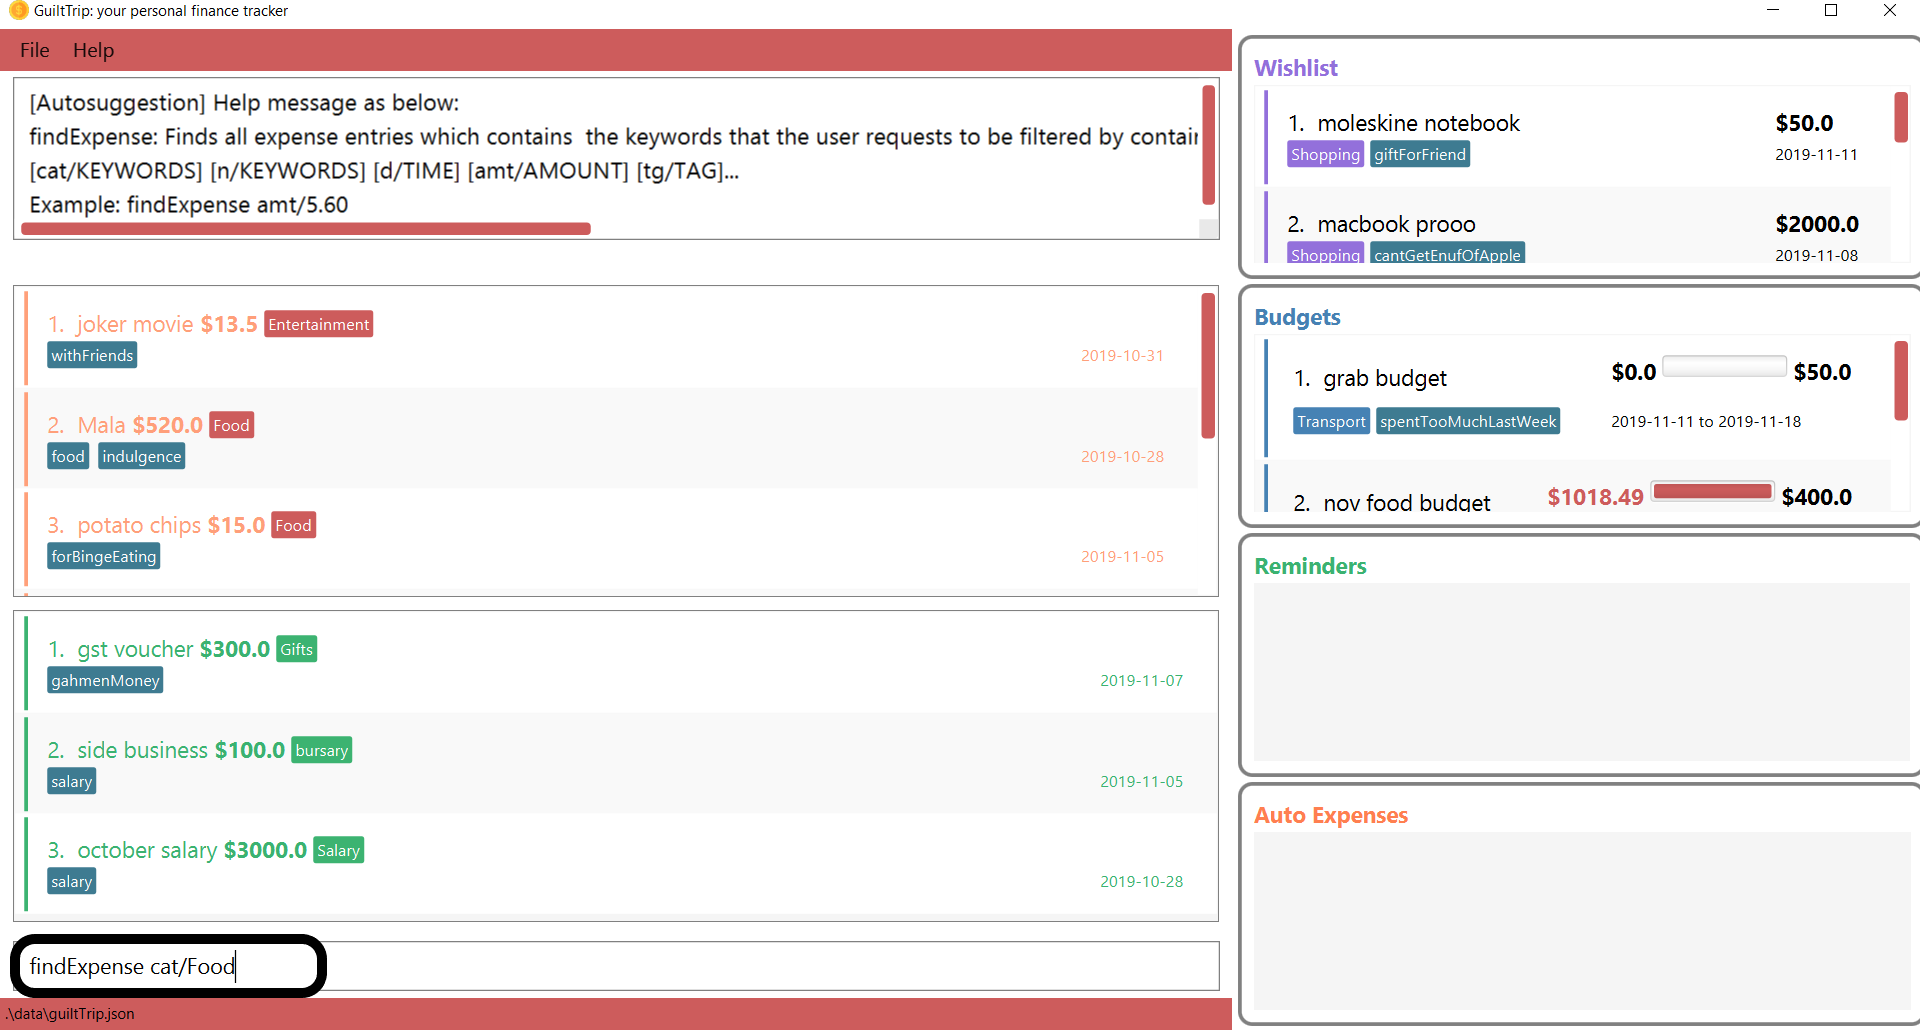
-
GuiltTrip will display to you the expenses with the Category Name as shown below.
Other Examples:
-
findExpense cat/food n/mala: lists each entry in expenditure and income with title containing keyword “mala” and category of Food. -
findIncome cat/business d/2019-09-09: lists each entry in expenditure and income with date of "2019-09-09" and category of business. -
findWish d/2019-09-09 tg/a tg/b: lists each entry in expenditure and income with date of "2019-09-09" and tags of a and b.
3.12. Reminders
3.12.1. Add Reminder: addReminder
Adds new GeneralReminder.
Format: addReminder n/<Message> [typ/<EntryType>] [l.b/<LowerBound>] [u.b/<UpperBound>] [start/<Start Date>] [end/<End Date>] [tg/<tags>]
Examples:
-
`addReminder n/Don’t be broke. l.b/10 u.b/20 start/2019/01/01 end/2019/12/30'
3.12.2. Set Reminder: setReminder
Sets new EntryReminder for selected Entry specified by the type and index in the corresponding list. Format: `setReminder <Reminder Index> n/<Message> p/<Period> f/<frequency>
Examples:
-
` setReminder 1 typ/expense n/Mala p/1d f/daily '
3.12.3. List all active Reminders (reminders currently set to display) : listReminders
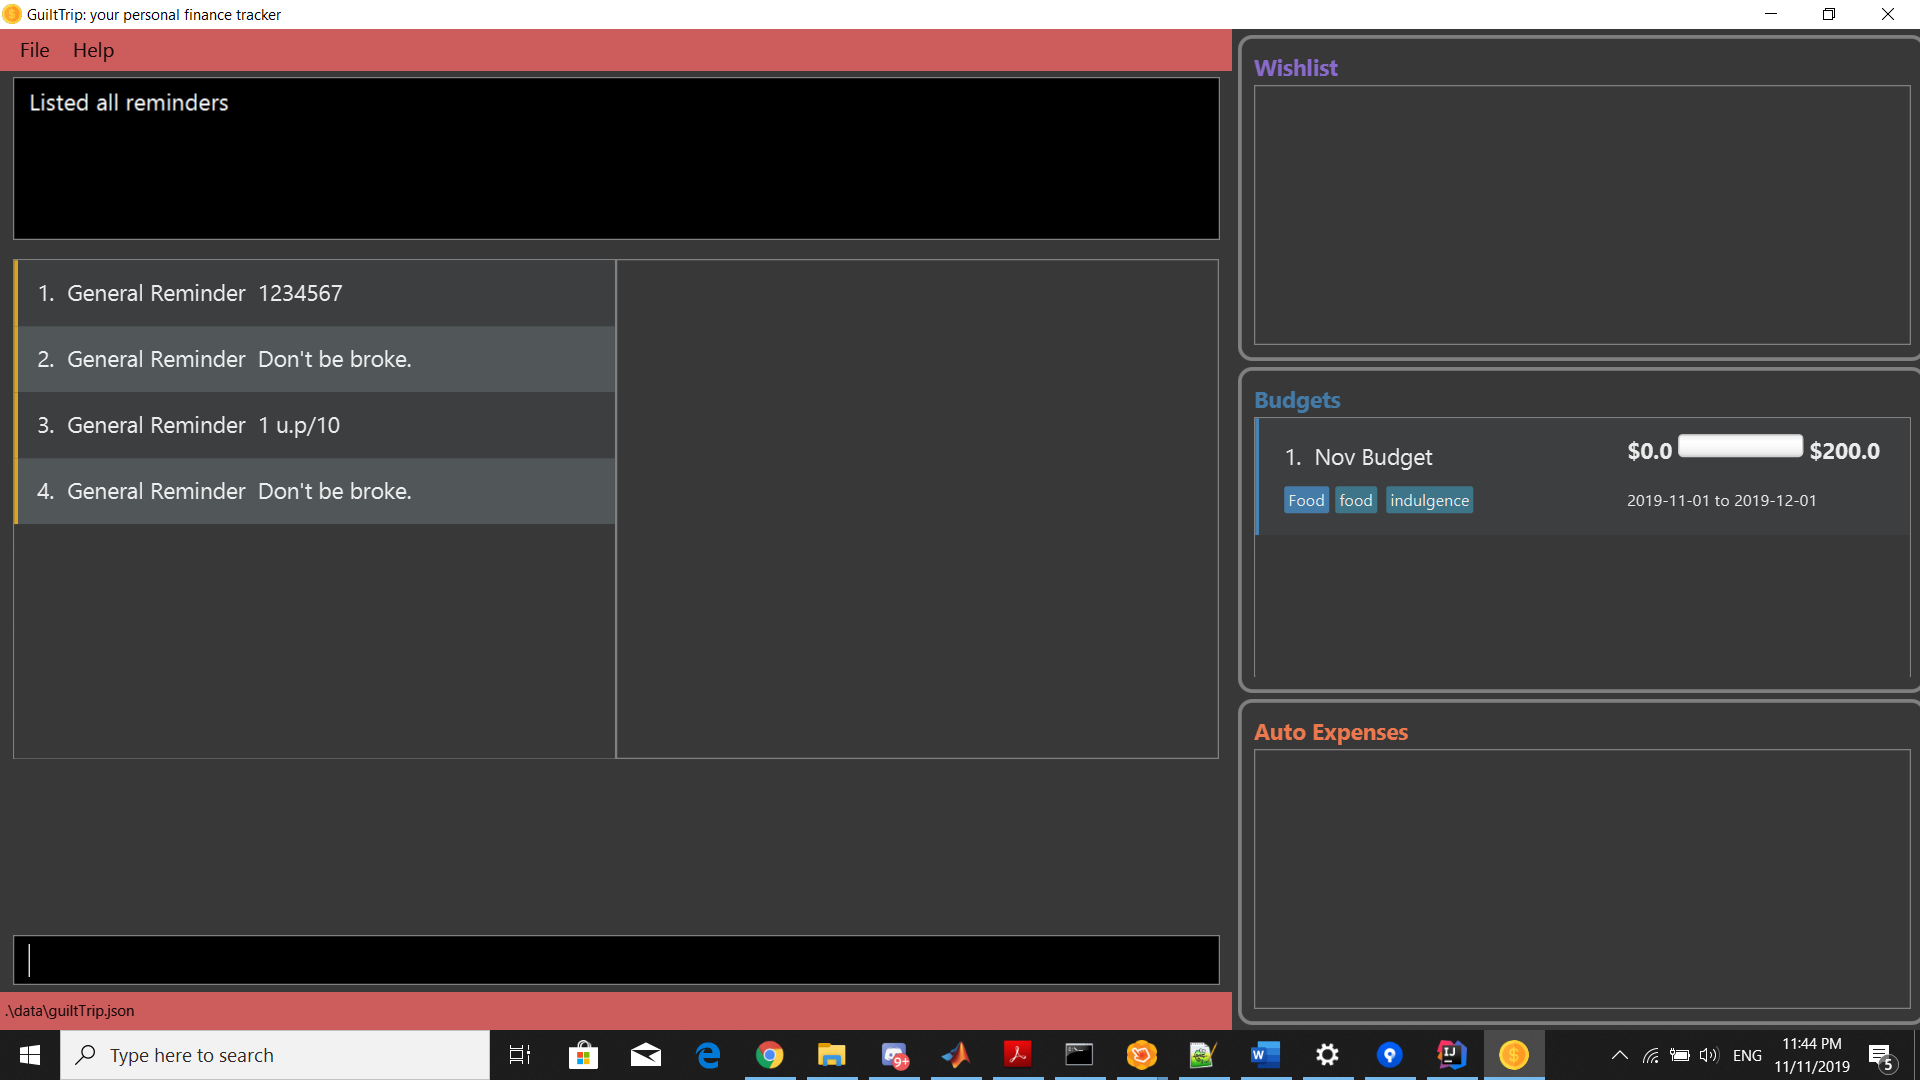
Shows reminder panel.
Format: listReminders
3.12.4. Select Reminders : selectReminder
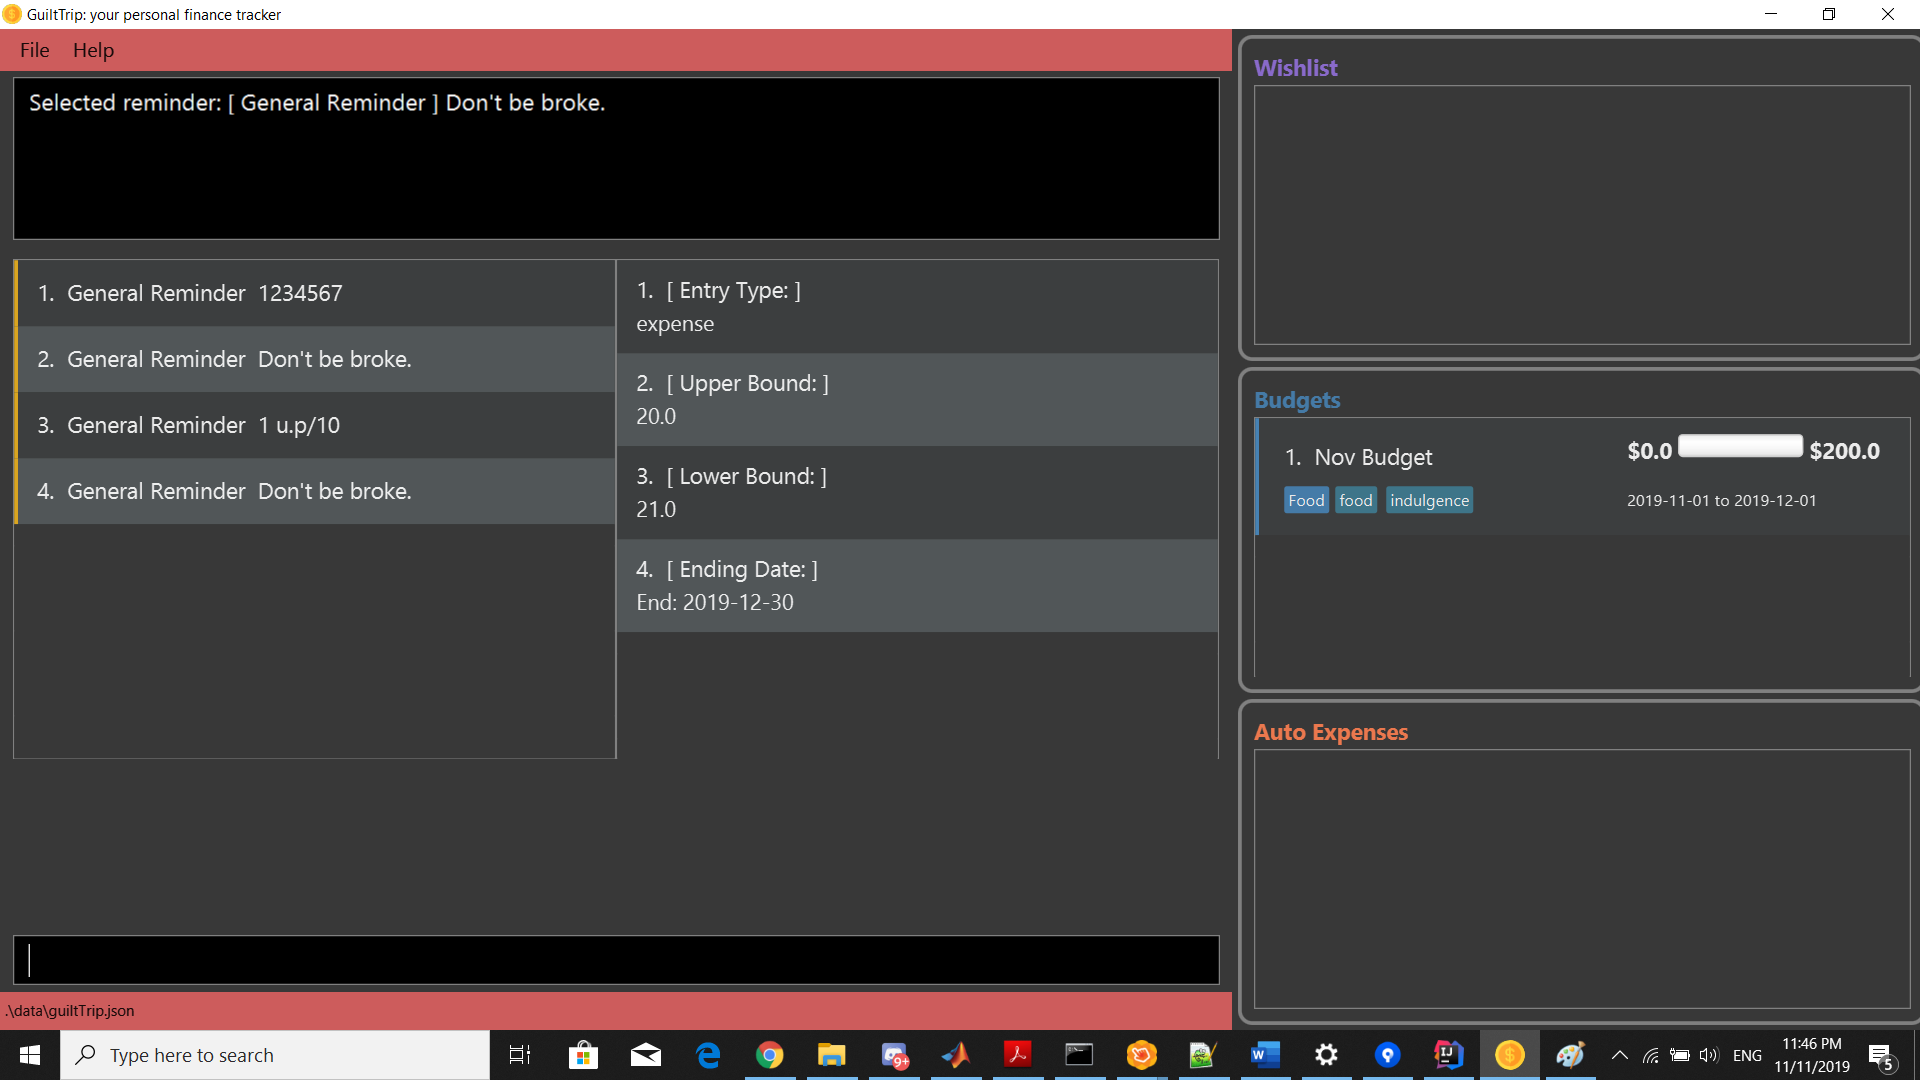
select reminder to edit.
Format: selectReminder <Reminder Index>
Example:
-
selectReminder 1
3.12.5. Edit Reminder : editReminder
Edits conditions of a GeneralReminder or period/ frequency of an EntryReminder selected.
User must first select a reminder to modify before he can edit said reminder.
Note that the entry type of the General reminder is not edited as the developers feel the user is more likely to create a new reminder instead of completely modifying the nature of the reminder.
Format: editReminder [n/<Message>] [l.b/<LowerBound>] [u.b/<UpperBound>] [start/<Start Date>] [end/<End Date>] [tg/<tags>]
editReminder [n/<Message>] [p/<period>] [f/<frequency>]
Example:
-
editReminder n/Don’t be broke. -
`editReminder l.b/5 u.b/10 `
-
editReminder f/monthly
3.12.6. Remove Condition from Reminder : 'removeCondition`
Removes condition from GeneralReminder.
User must first select a reminder to modify before he can edit said reminder. Note that the entry type of the General reminder cannot be removed.
Format: removeCondition <Reminder Index>
Example:
-
removeCondition 1
3.12.7. Delete Reminder : deleteReminder
Deletes the selected Reminder.
Format: deleteReminder
=== Undo/Redo
==== Undo previous command : undo
Restores the finance tracker to the state before the previous undoable command was executed or
before the specified number of undoable commands were executed.
Format: undo undo <step>
-
<step>: The number of commands to undo. Additionally the step must be greater than zero and positive. -
undo <step>is only executed if the number of undoable commands is more than or equal to<step>. -
[NOTE]
undo 1has the same function asundo.
Example Usage:
-
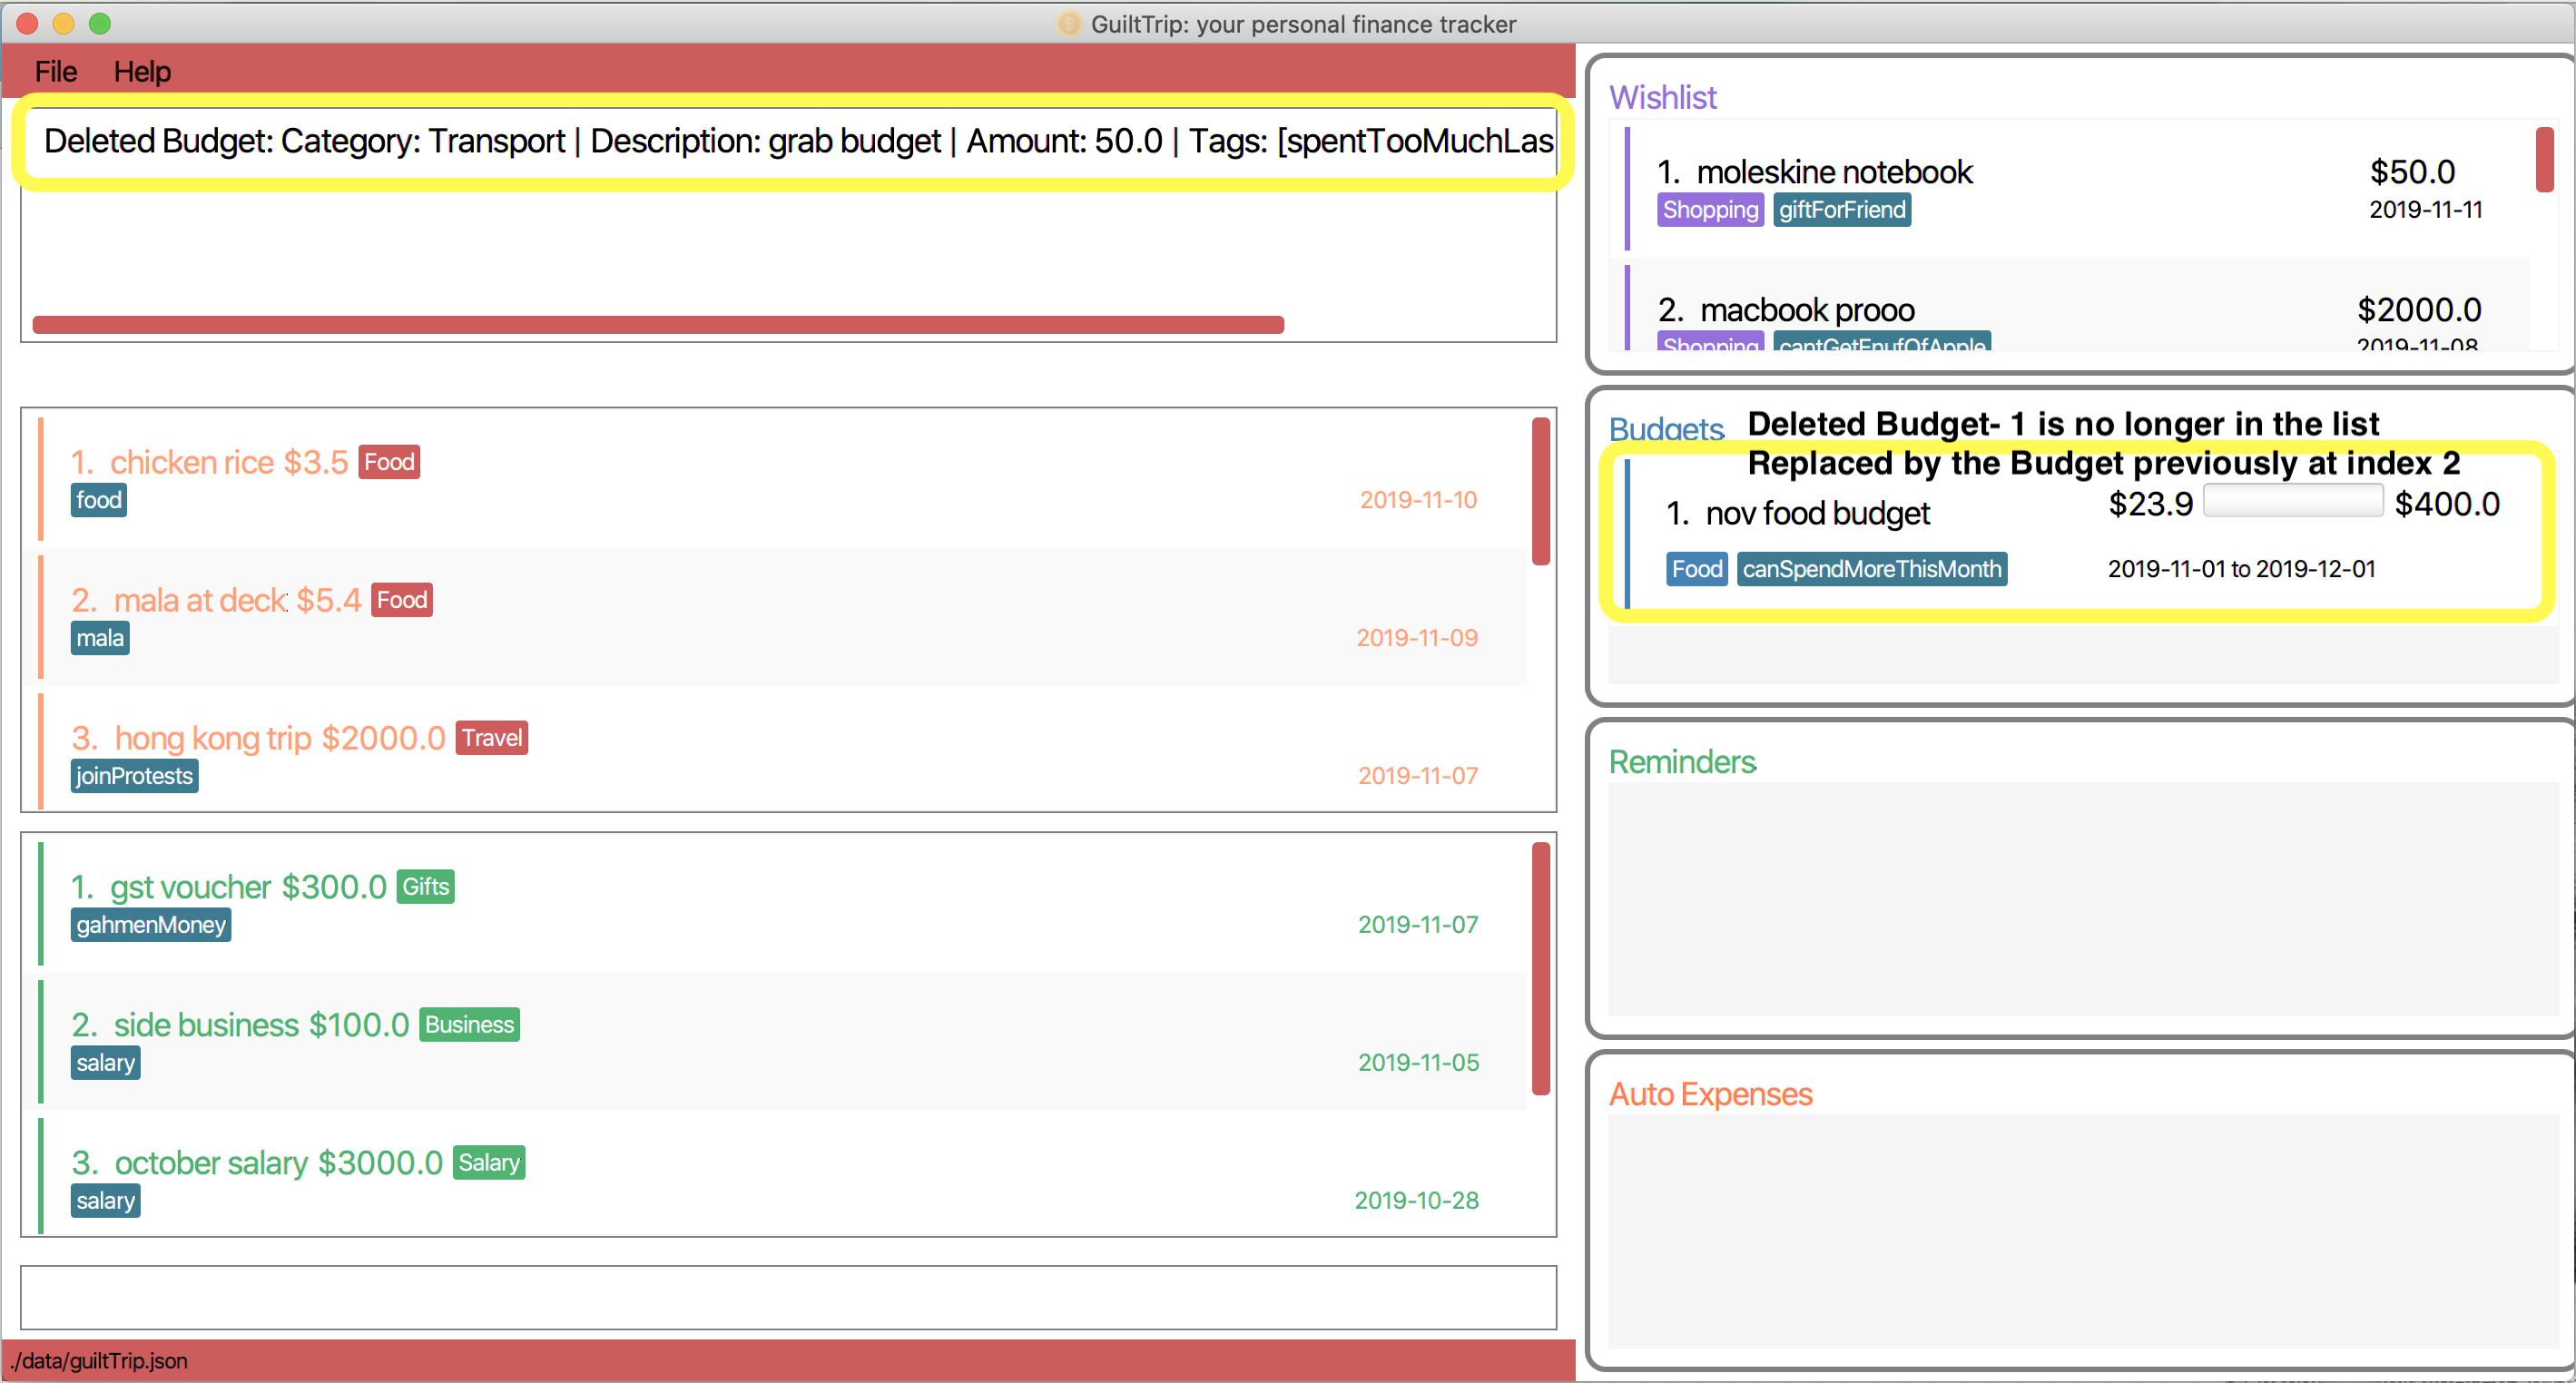
If you would like to delete a budget, whereby the budget is located at index 1 as shown below, key in the command
deleteBudget 1.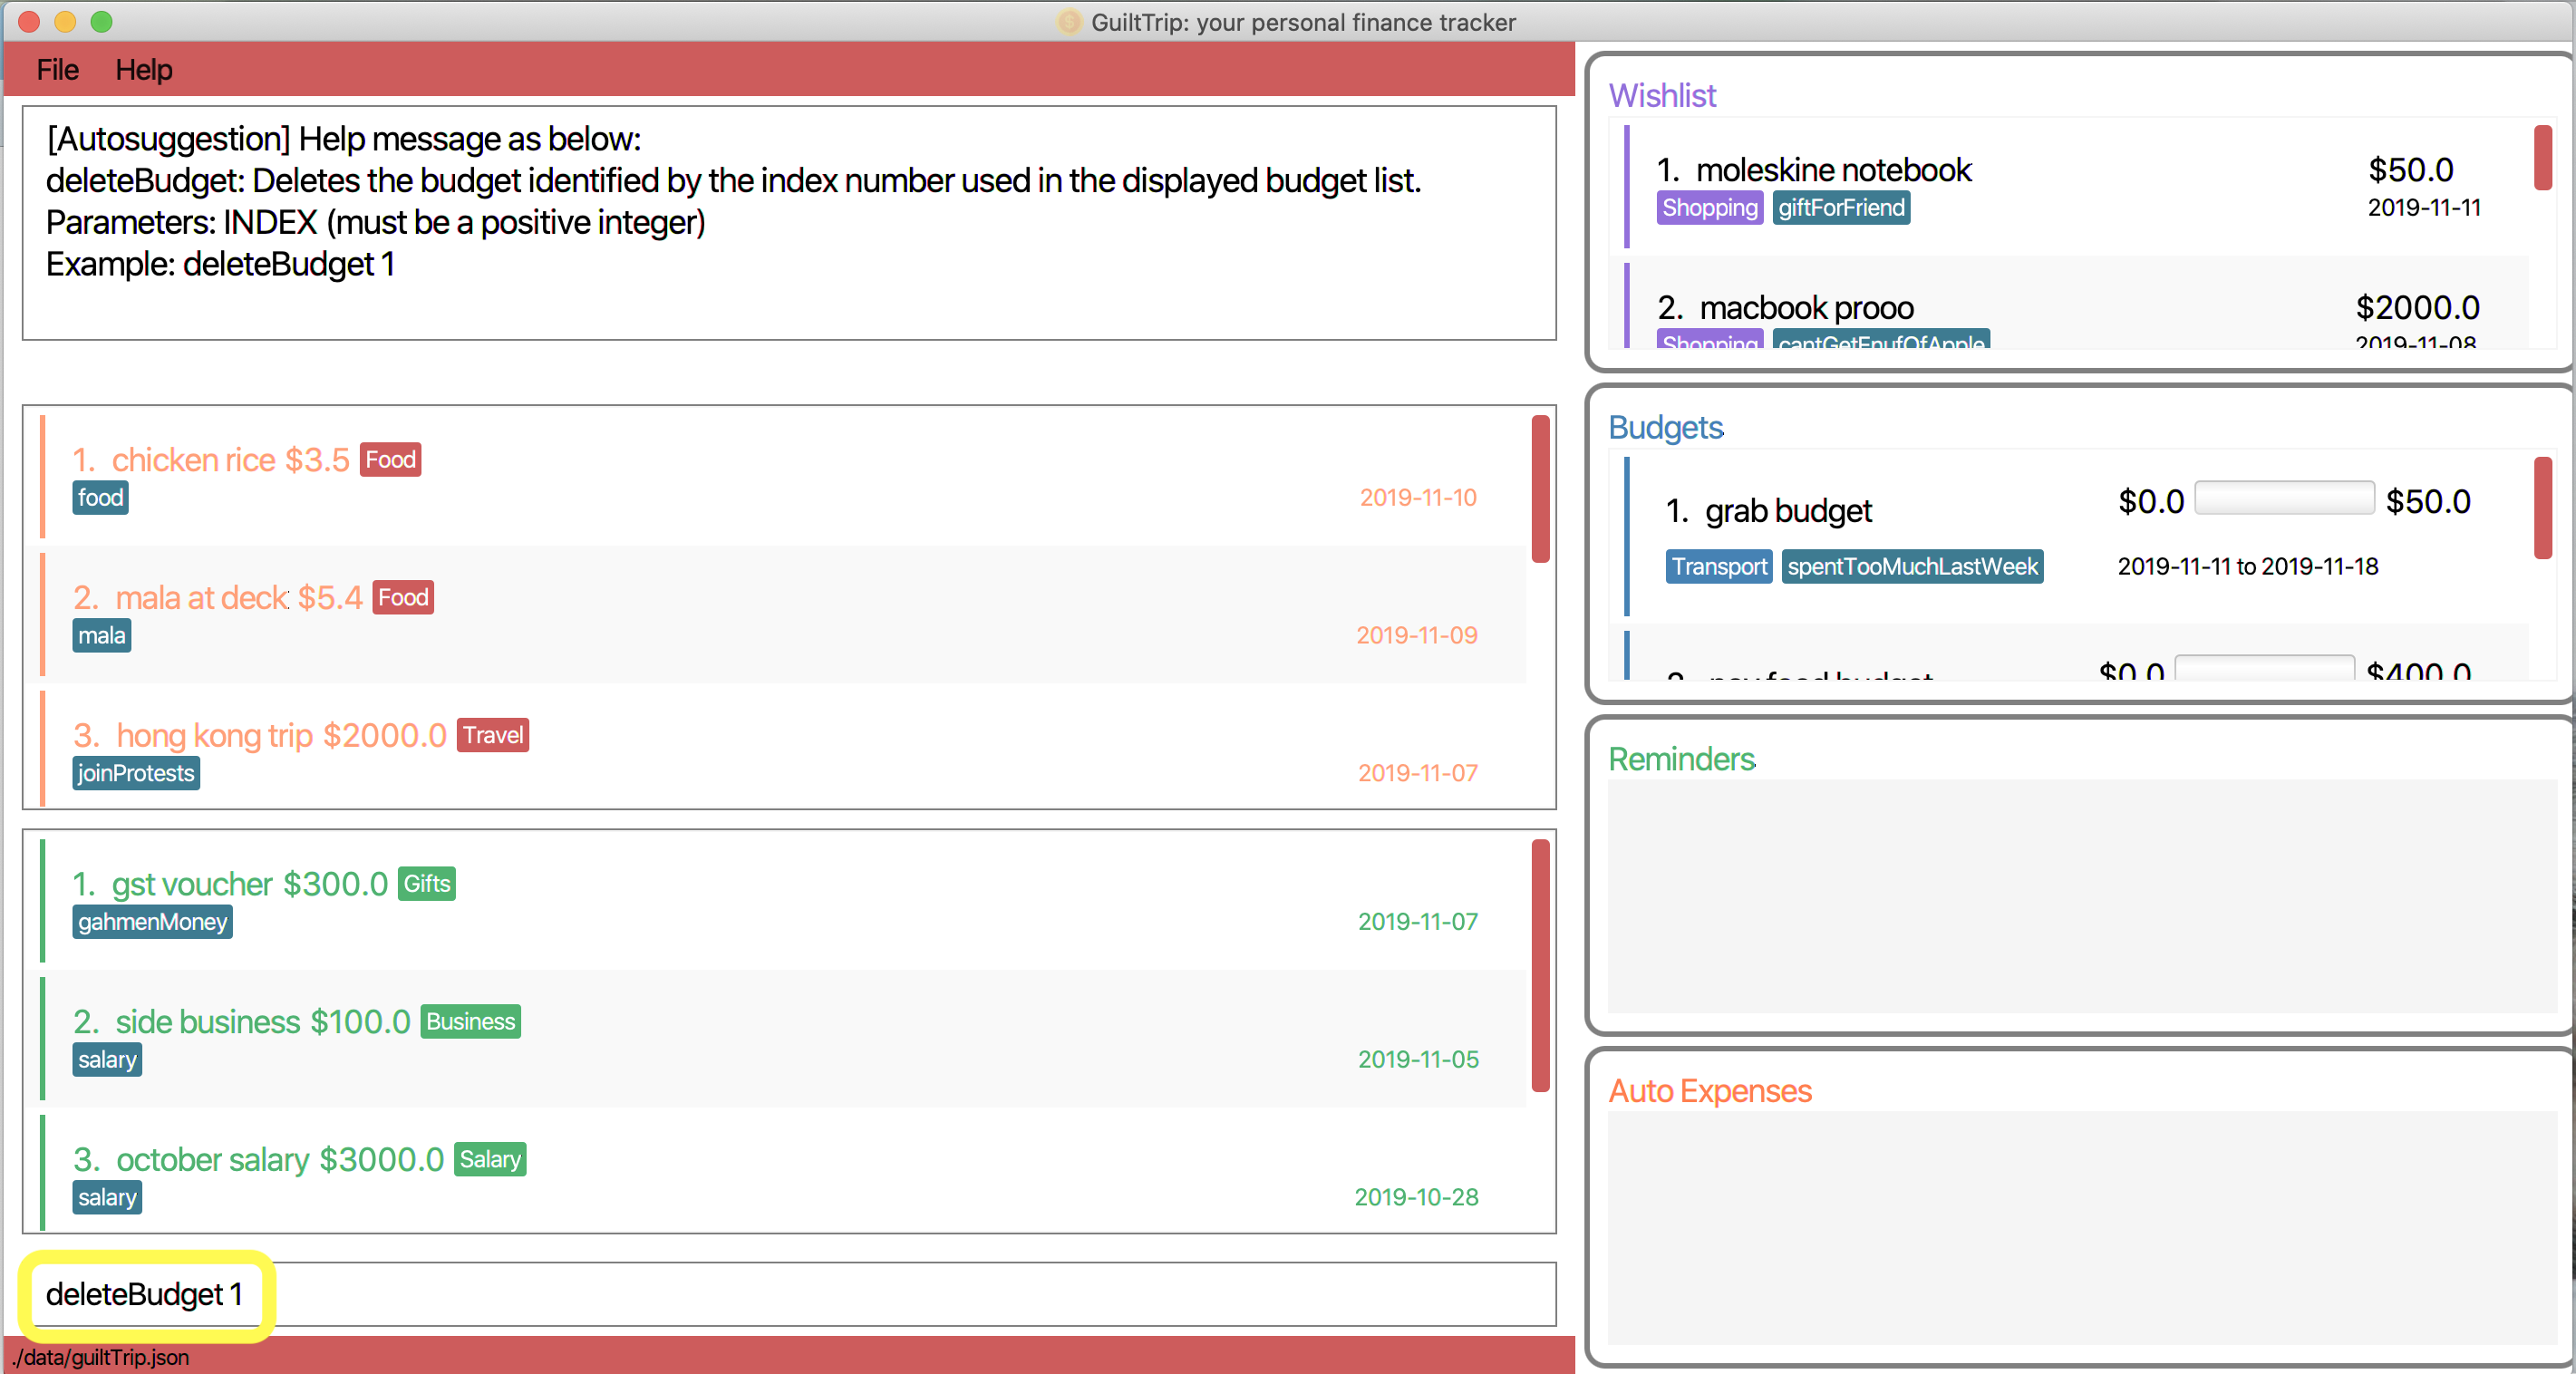
-
You should see the budget being deleted in the list of budgets as displayed below.
-
If you would like to undo your deletion, key in the command
undo.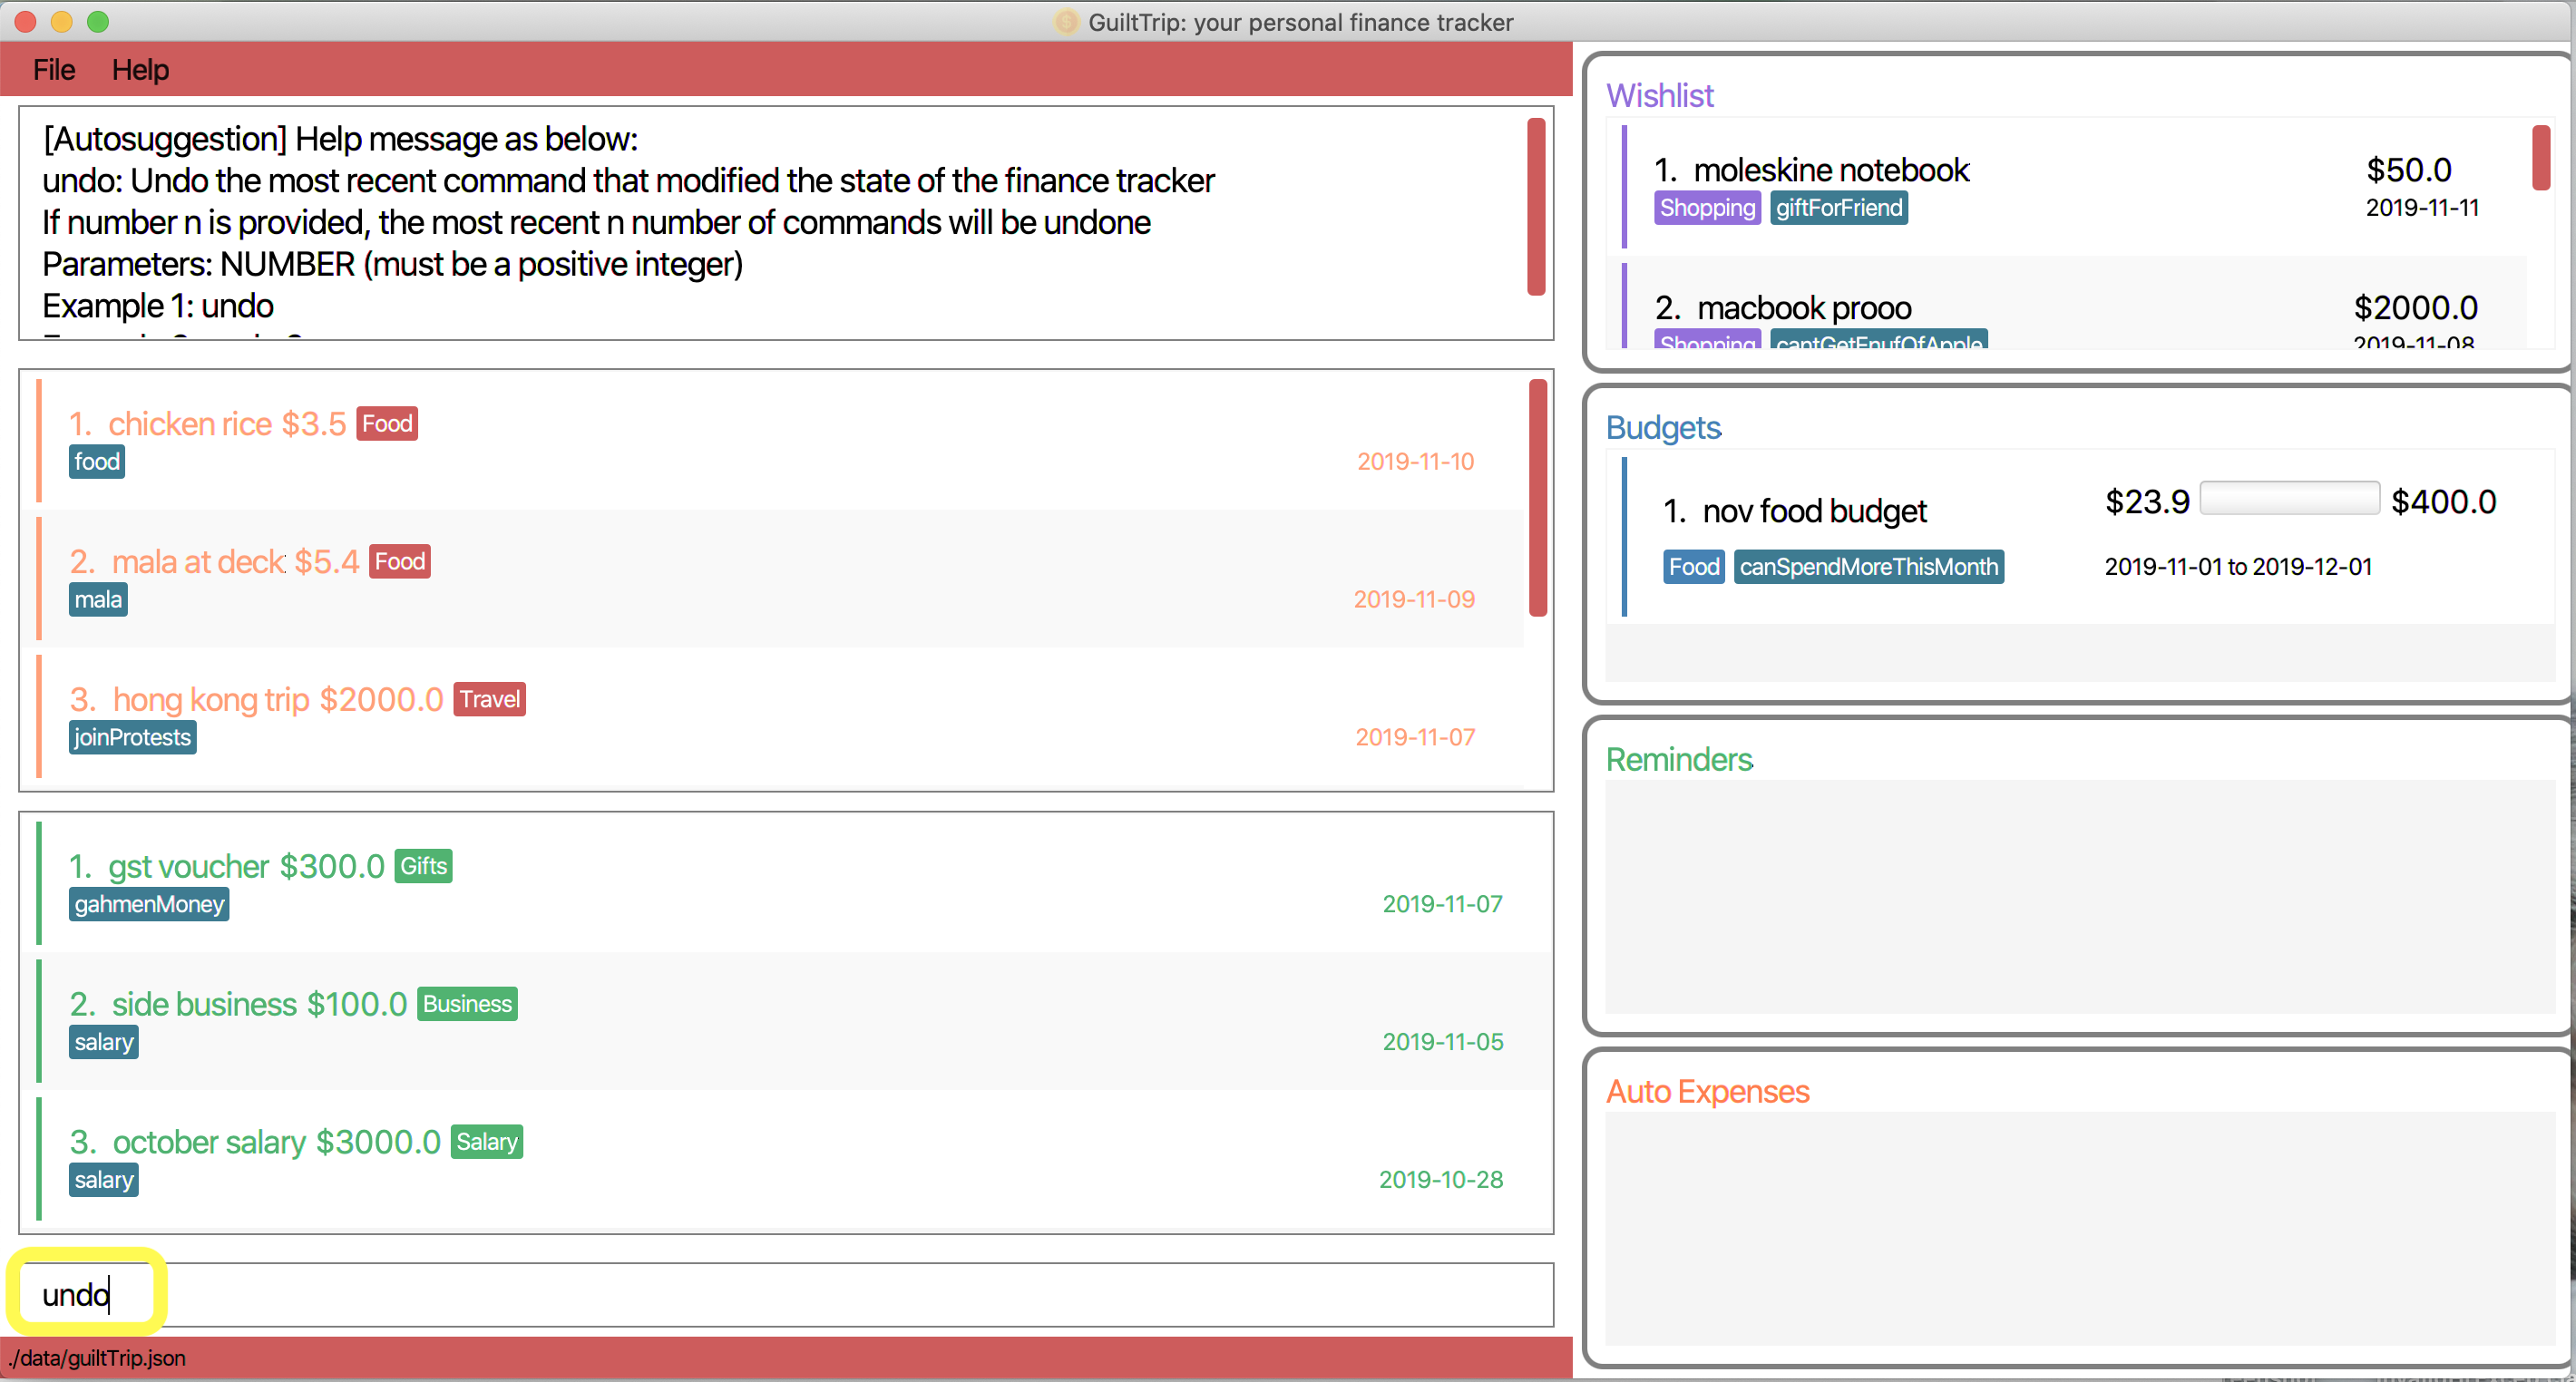
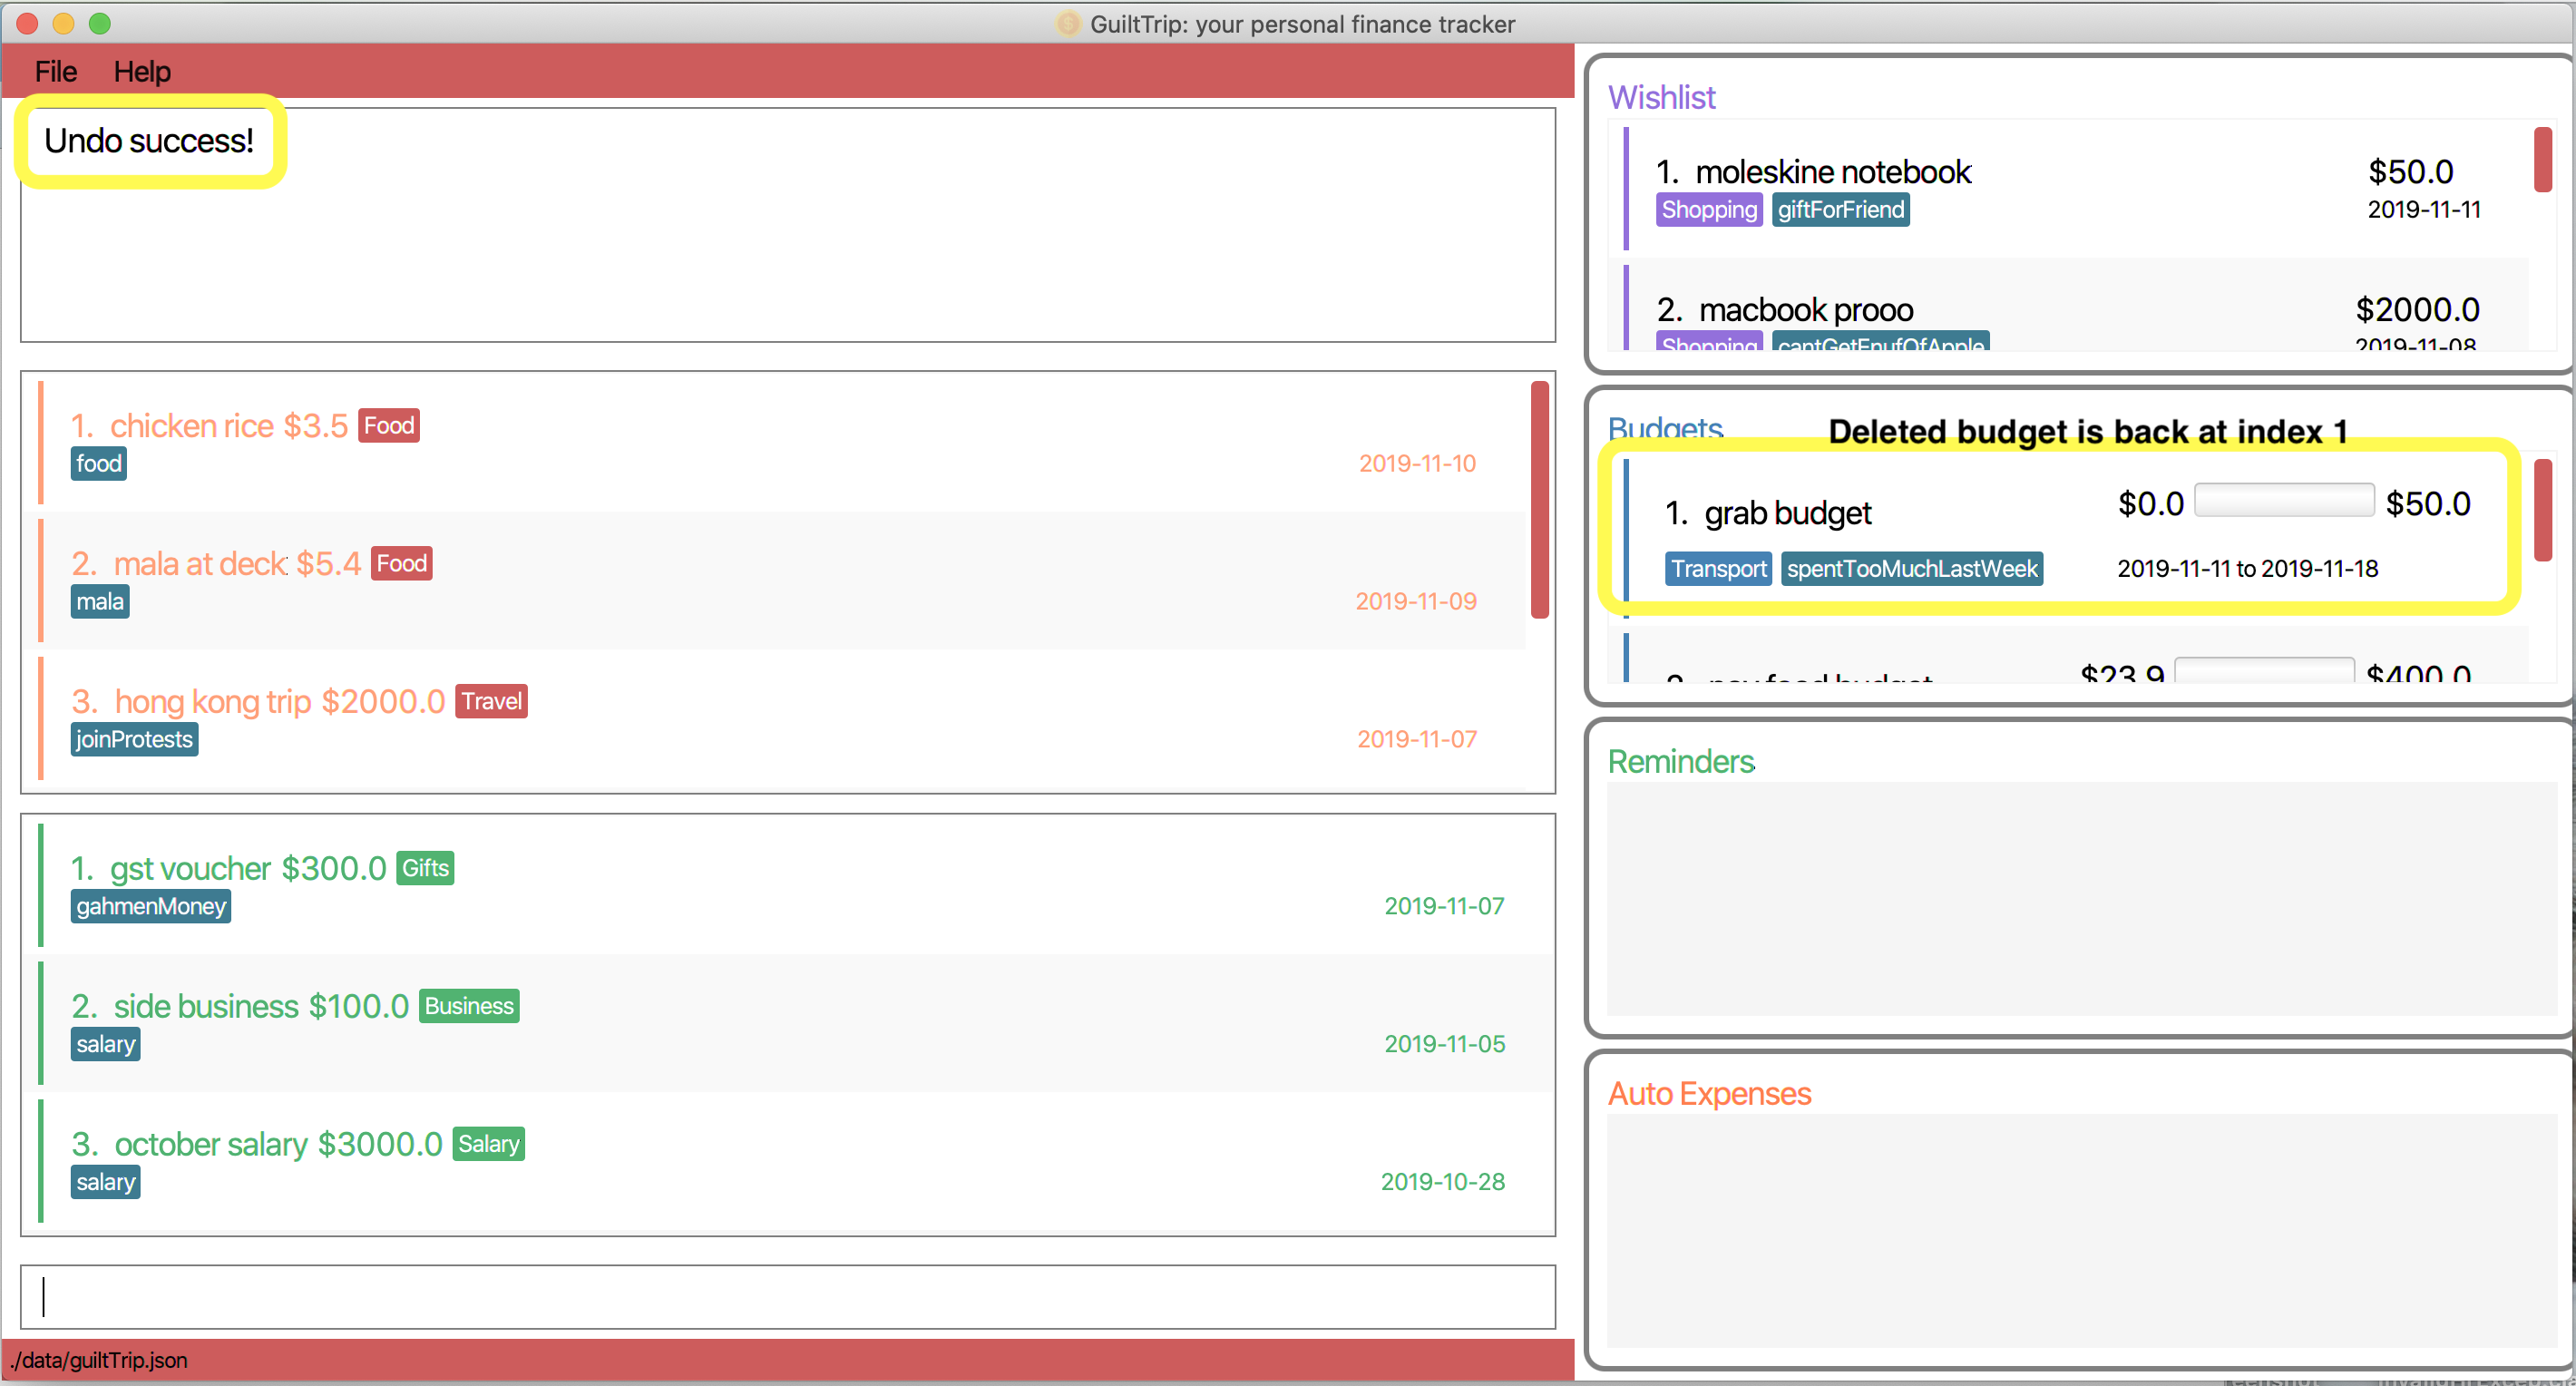
-
You should see the previously deleted budget back in the list of budgets as displayed below.
Other examples:
-
delete 1
delete 2
undo 2(reverses thedelete 2anddelete 1commands)
3.12.8. Redo previously undone command : redo
Reverses the most recent undone command or the specified number of most recent undone commands.
Format: redo redo <step>
-
<step>: The number of undone commands to redo. Additionally the step must be greater than zero and positive. -
redo <step>is only executed if the number of redoable commands is more than or equal to<step>. -
[NOTE]
redo 1has the same function asredo.
Example Usage:
-
If you would like to delete a budget, whereby the budget is located at index 1 as shown below, key in the command
deleteBudget 1.
-
You should see the budget being deleted in the list of budgets as displayed below.
-
If you would like to undo your deletion, key in the command
undo.
-
You should see the previously deleted budget back in the list of budgets as displayed below.
-
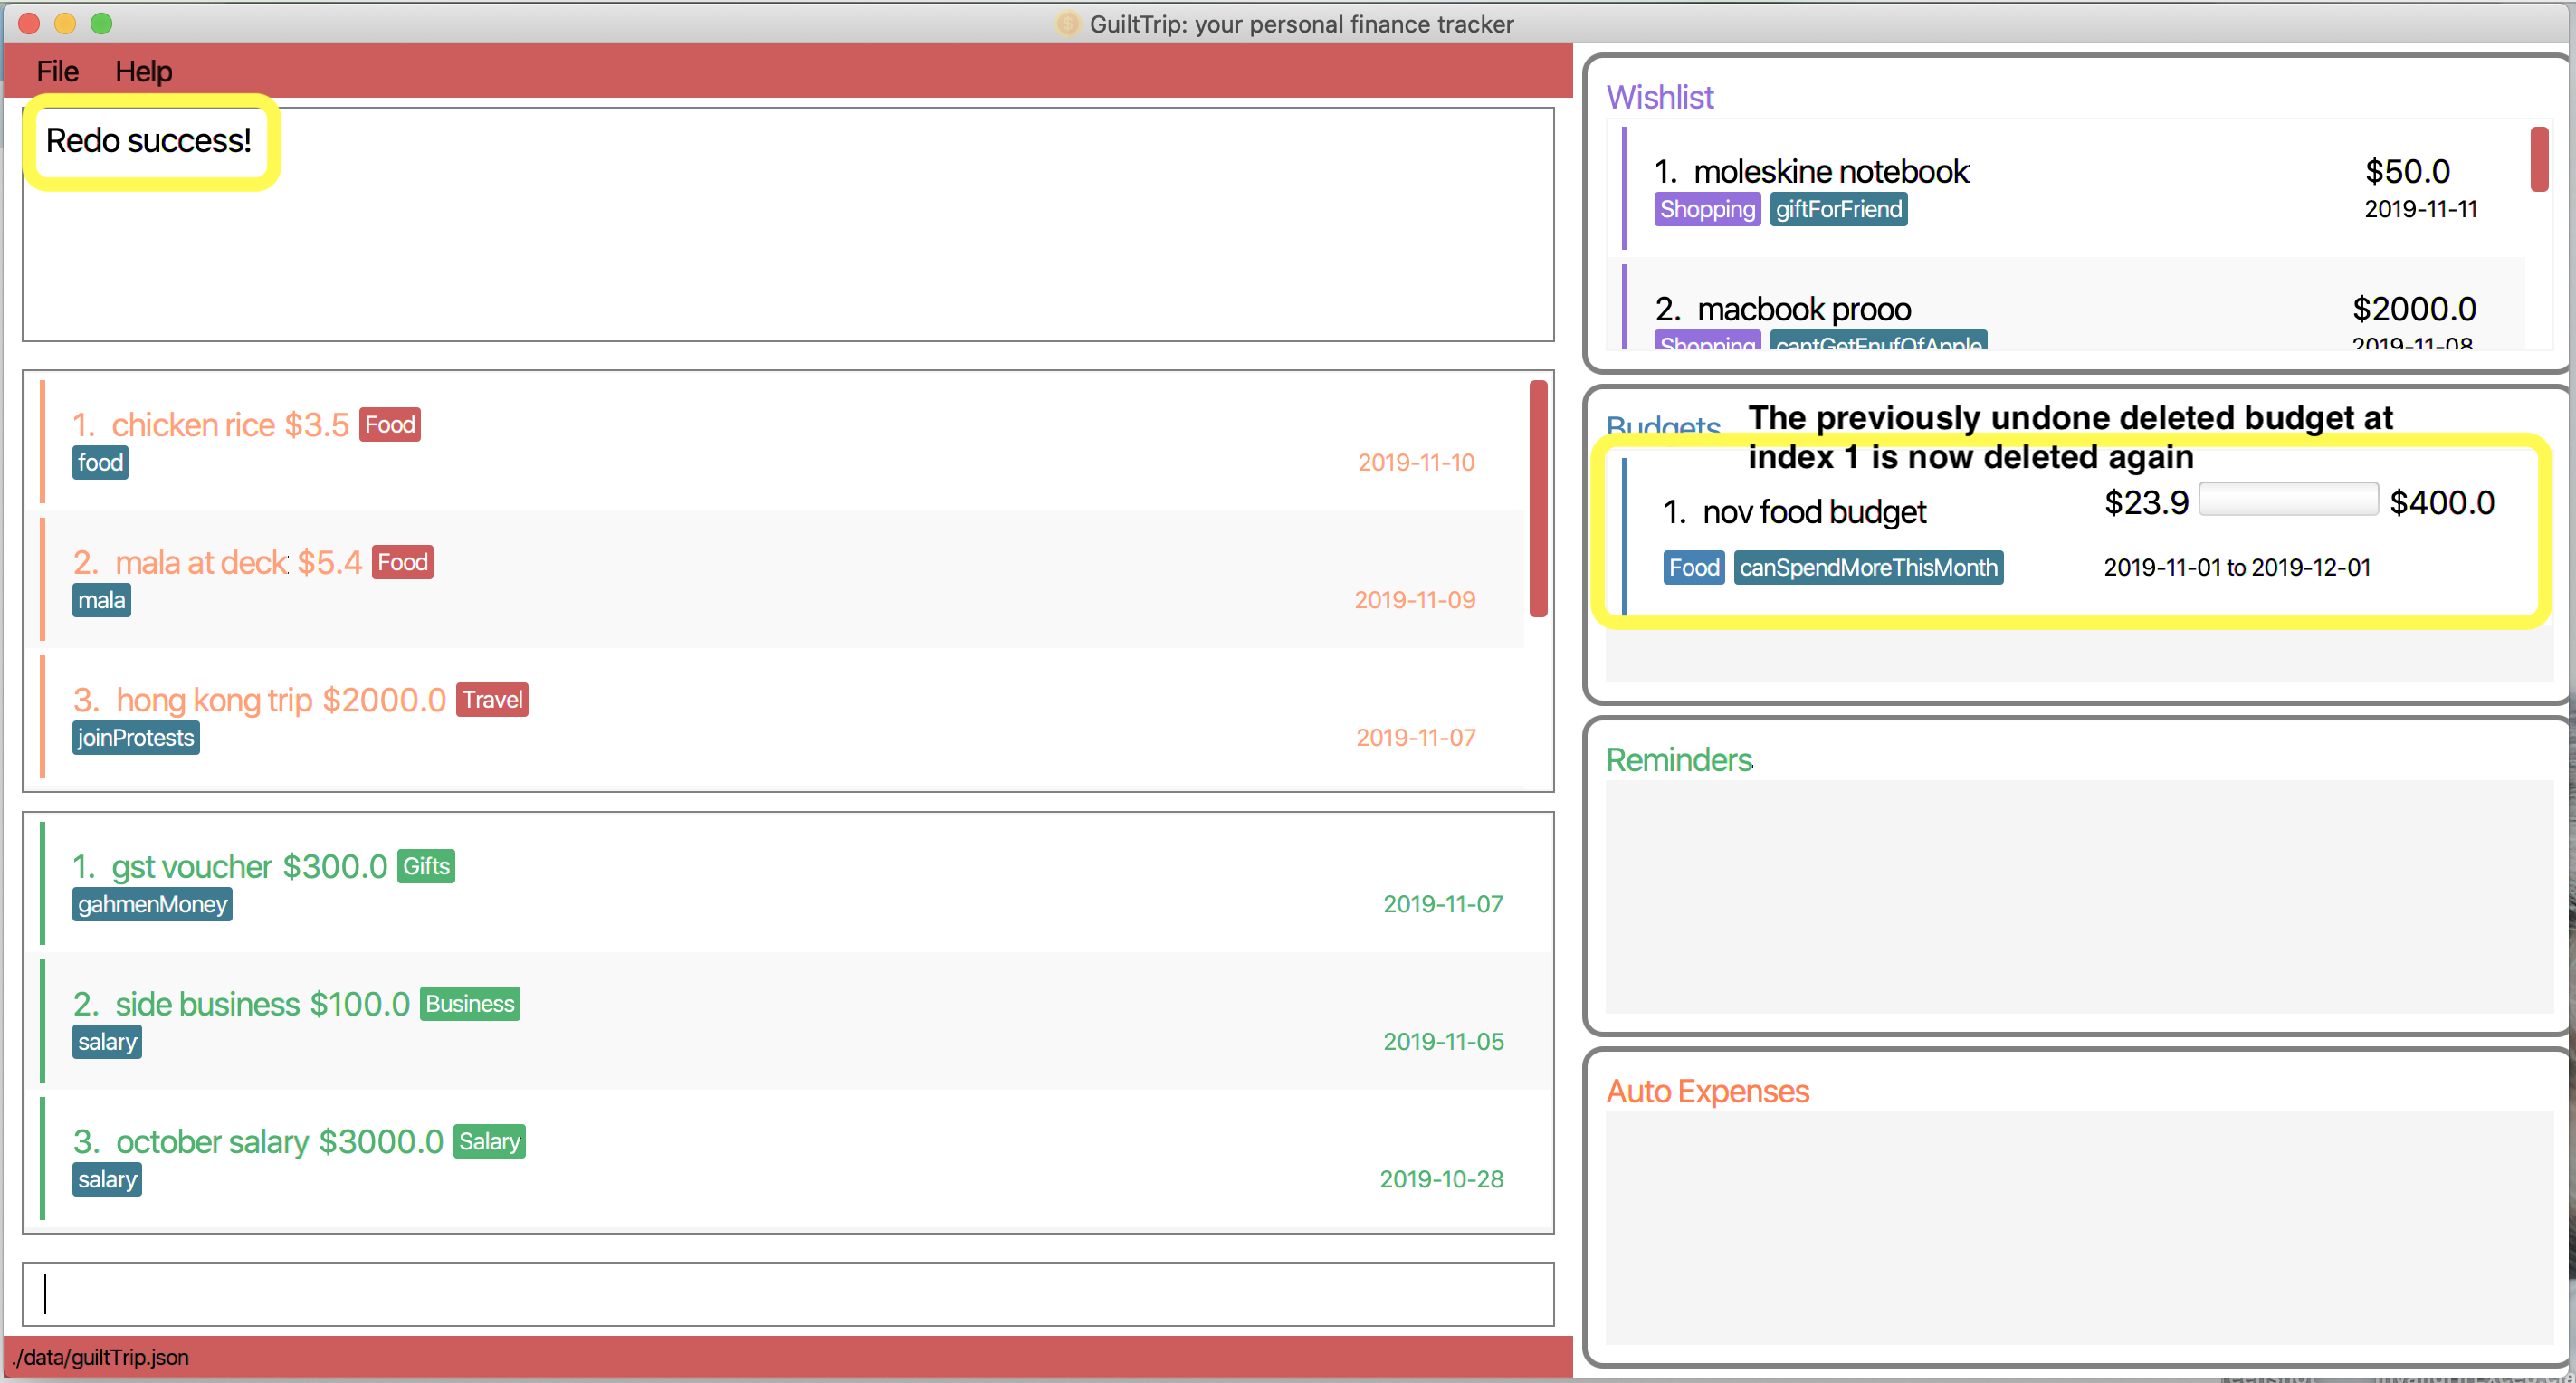
If you would like to redo your undone command, key in the command `redo'.
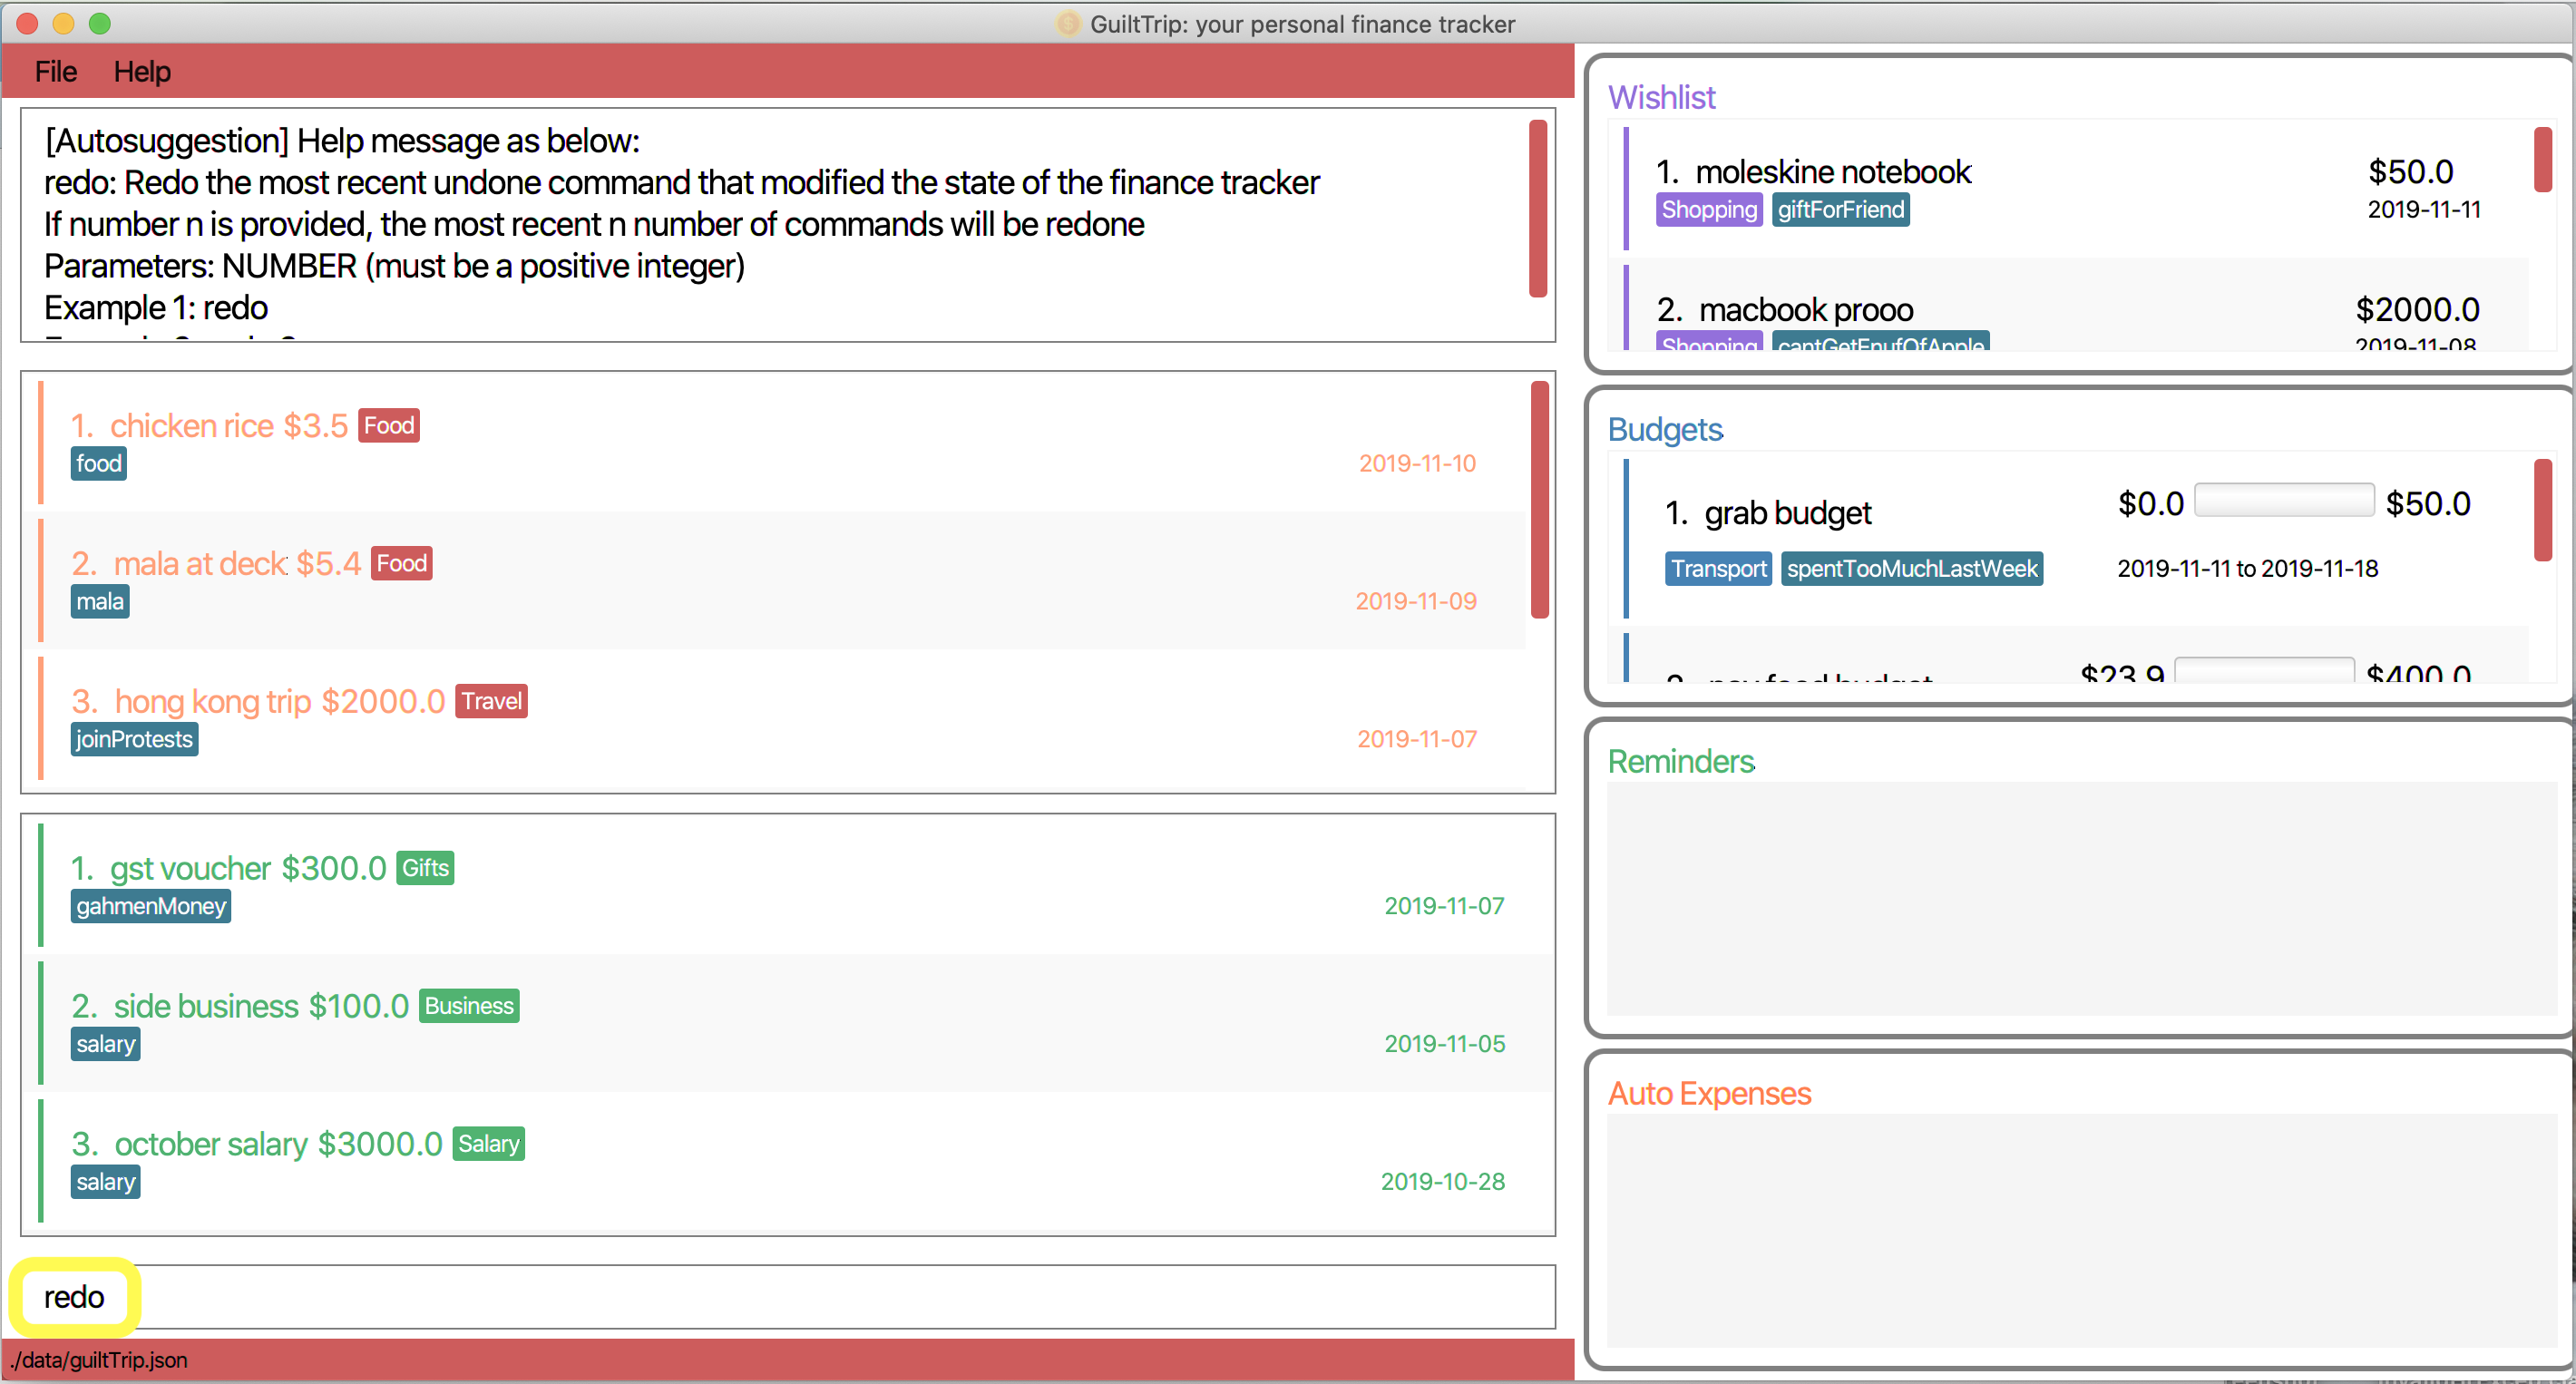
-
You should see that the deleted budget that you previously have undone is now deleted again.
Other examples:
-
delete 1
delete 2
undo(reverses thedelete 2command)
undo(reverses thedelete 1command)
redo(reverses the latestundocommand)
redo(reverse the latestundocommand) -
delete 1
delete 2
undo(reverses thedelete 2command)
undo(reverses thedelete 1command)
redo 2(reverses the 2 latestundocommands)
3.12.9. View the history of commands entered : history
Displays the list of commands entered, from most recent to earliest.
Format: history
-
[NOTE]
historycan only be executed if there were commands already entered before trying to usehistory.
Example Usage:
-
If you would like to display the list of commands entered, key in the command
history.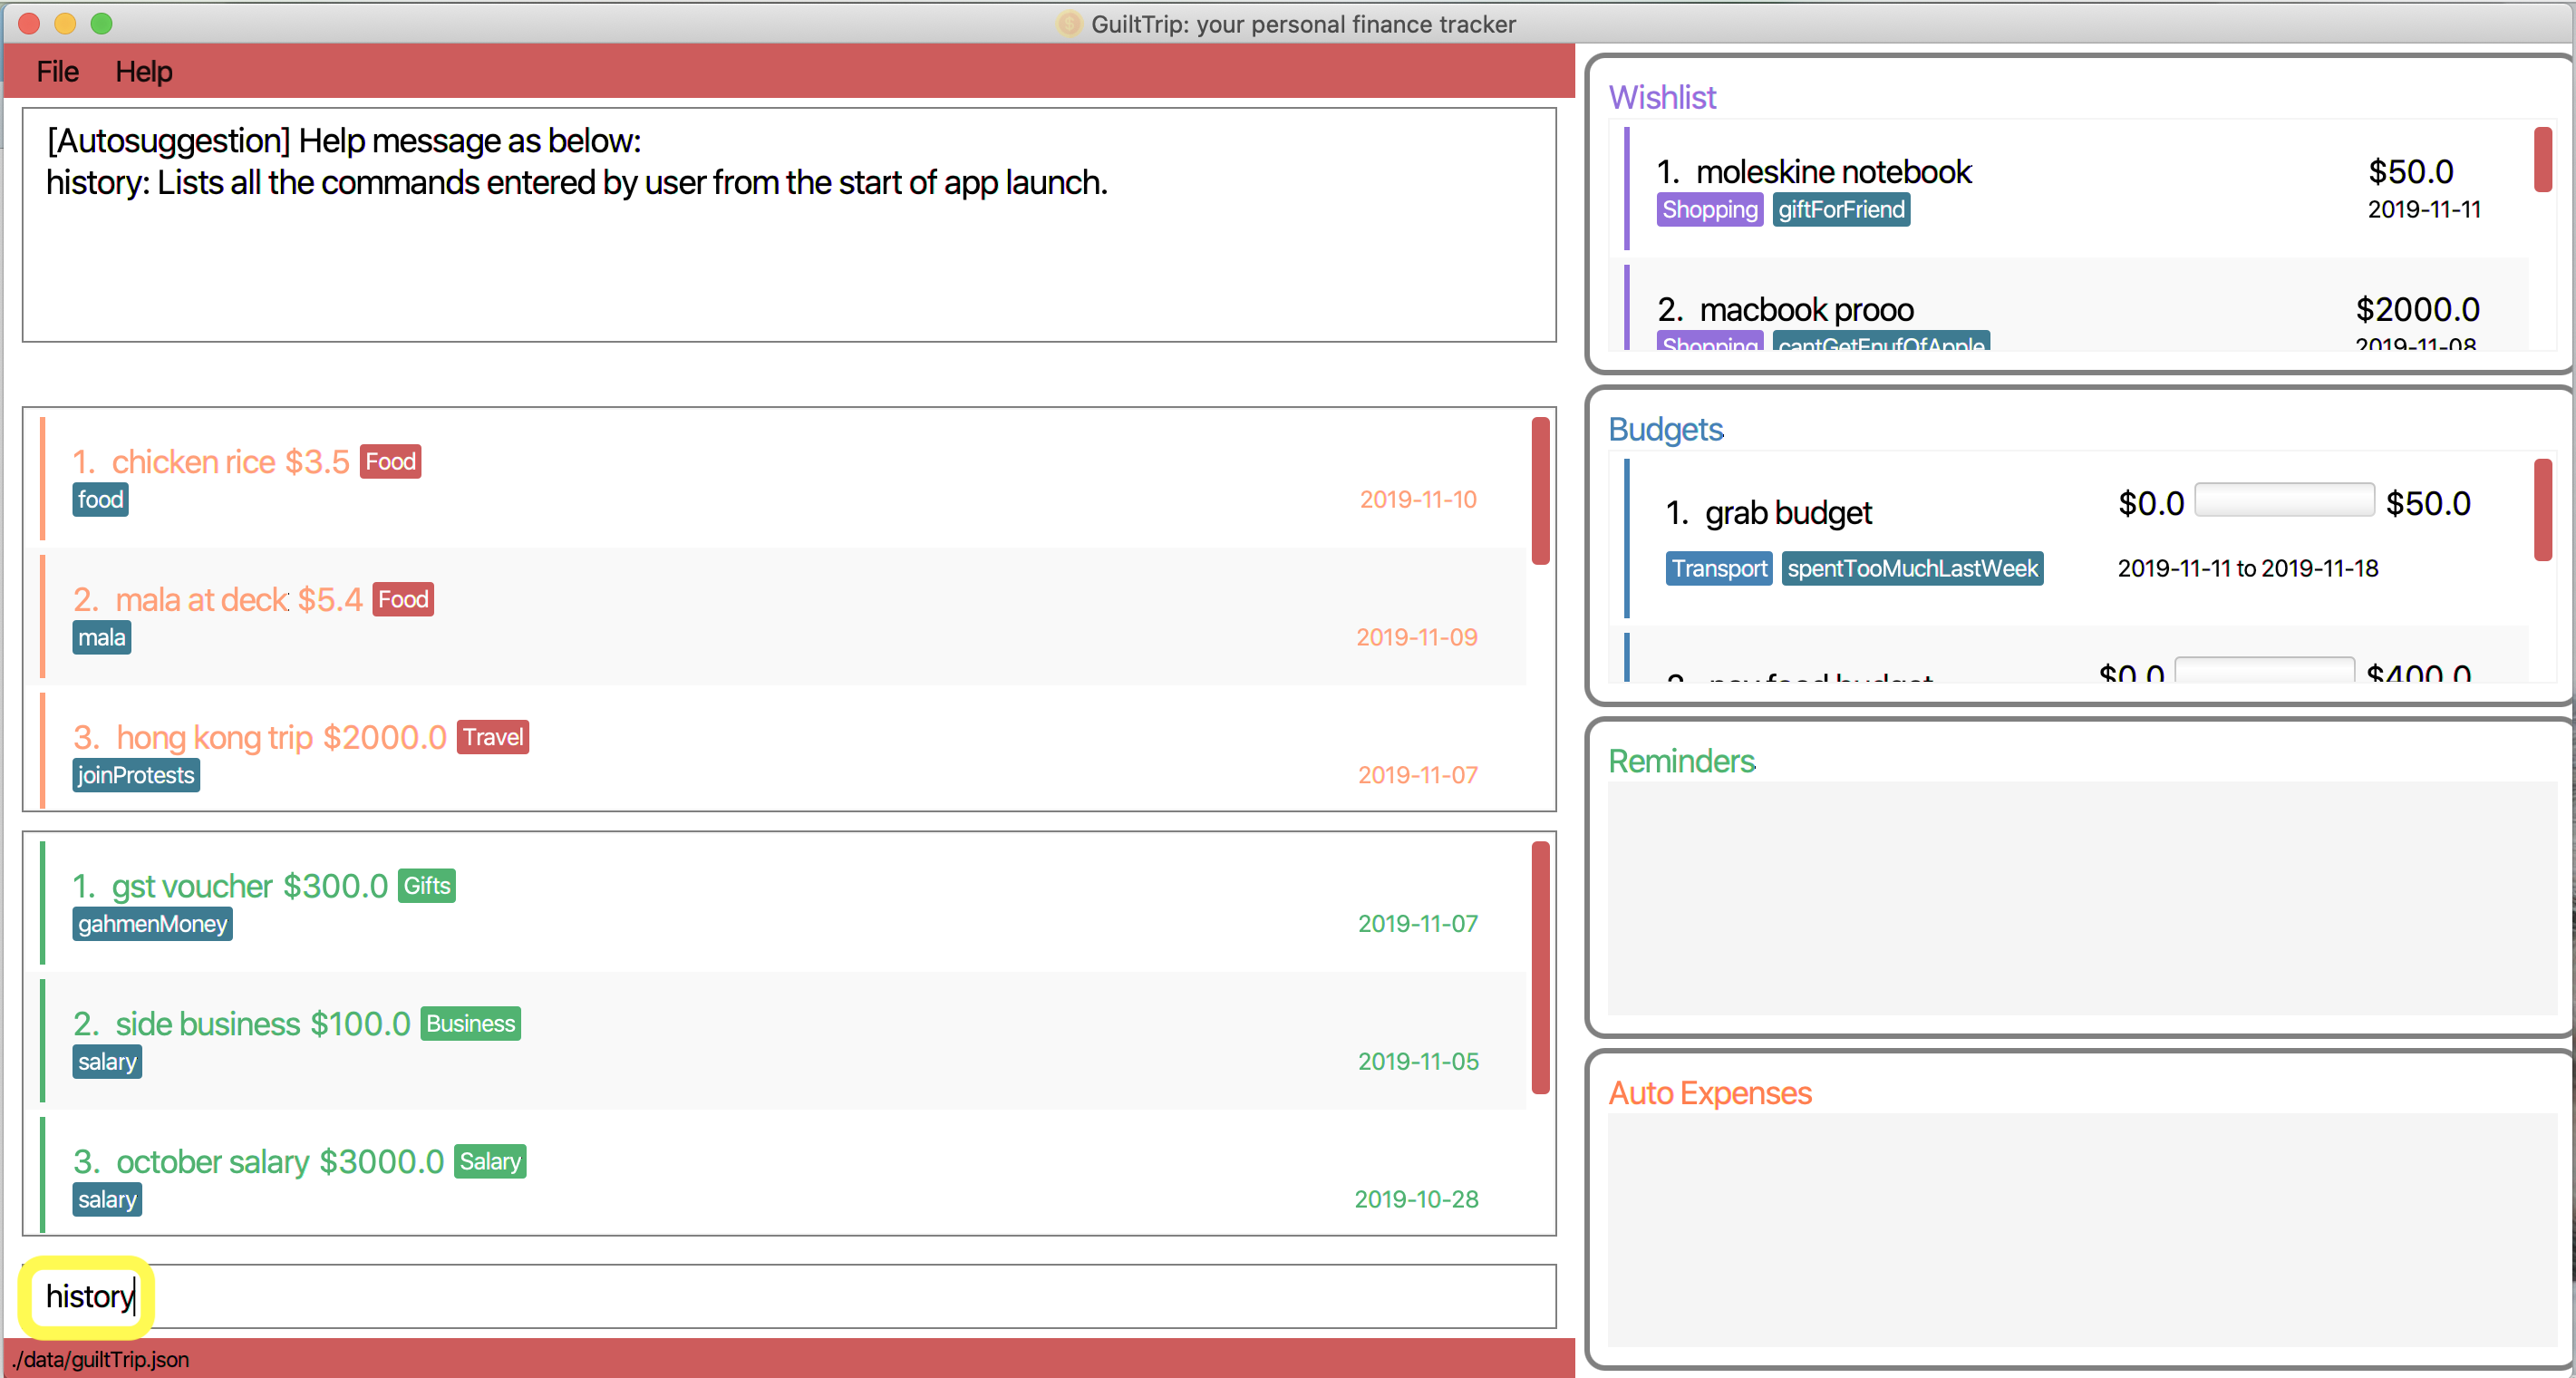
-
You should see that the income and expense lists in the main panel are now replaced with the history panel.

-
If you would like to return the panel display to its original state, key in the command
list.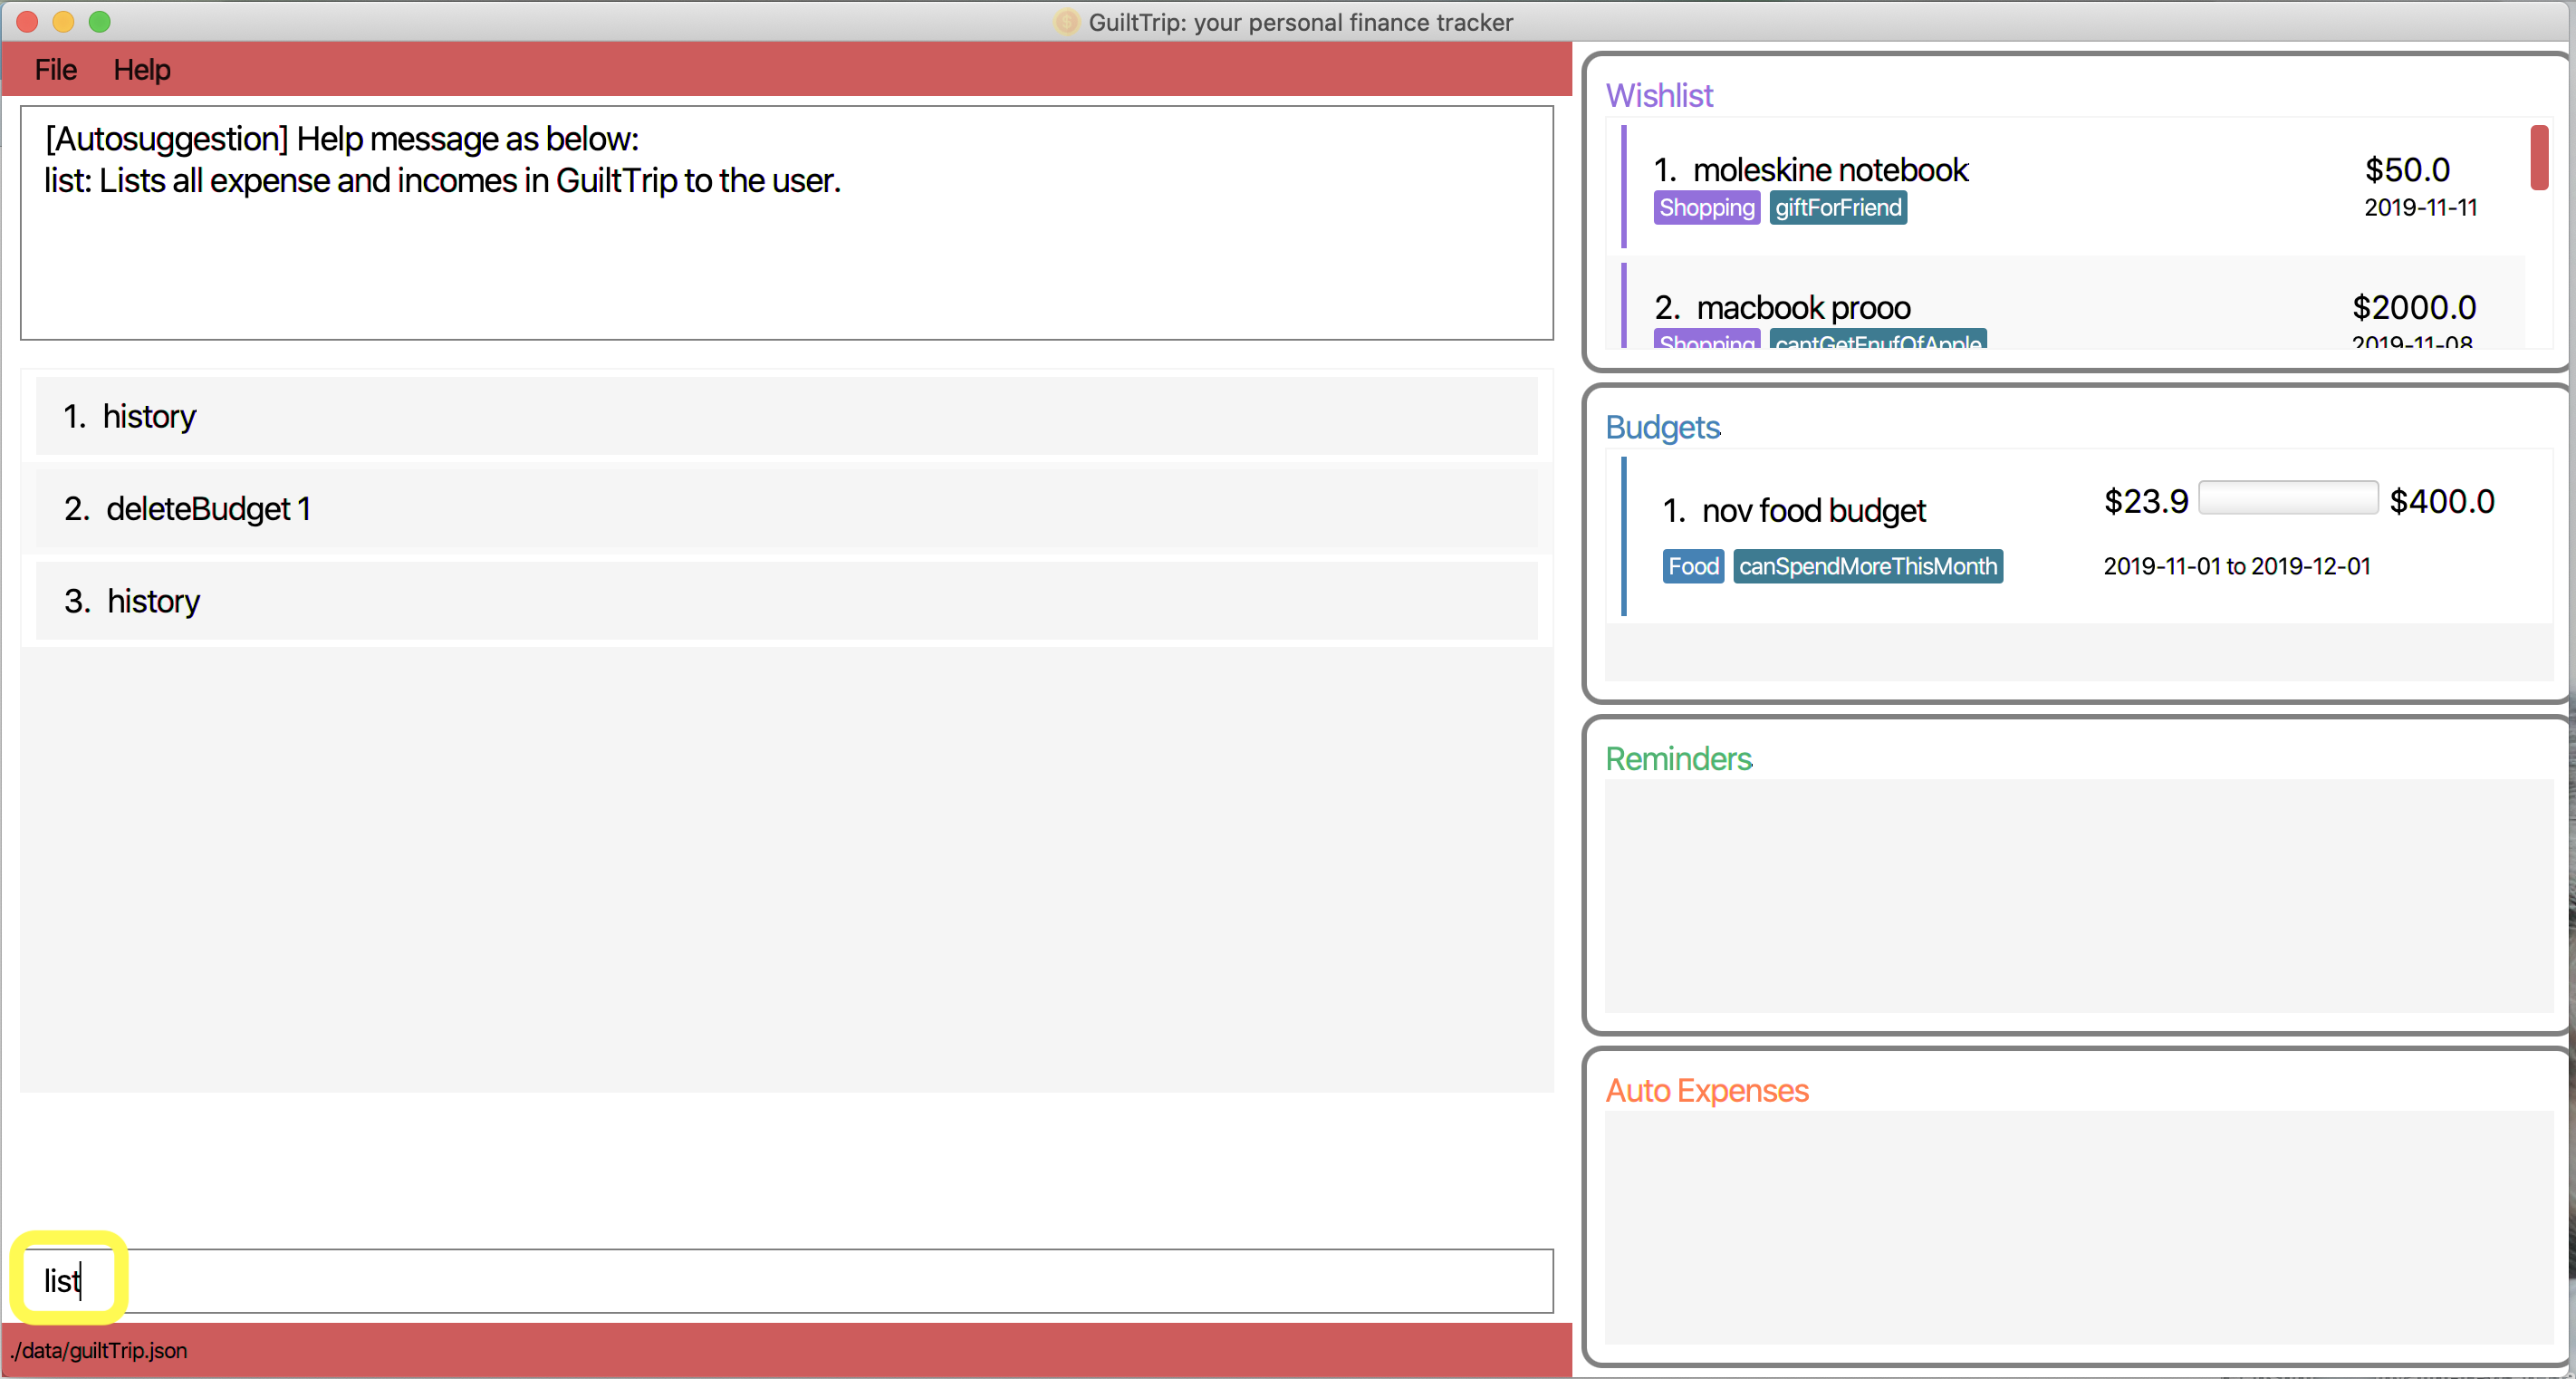
-
You should see that the income and expense panels are now back to their original positions.

3.13. UI features
3.13.1. Toggle Panel : toggle
Toggles visibility of the specified panel on the GUI. Only the following inputs are accepted:
-
for wishlist panel:
wishlist/wishes/wish/w -
for budget panel:
budgets/budget/b -
for reminders panel:
reminders/reminder/r -
for auto expenses panel:
autoexpenses/autoexpense/autoexp/ae
Format: toggle <panel name>
Examples:
-
toggle wishlist -
toggle ae`
Example usage:
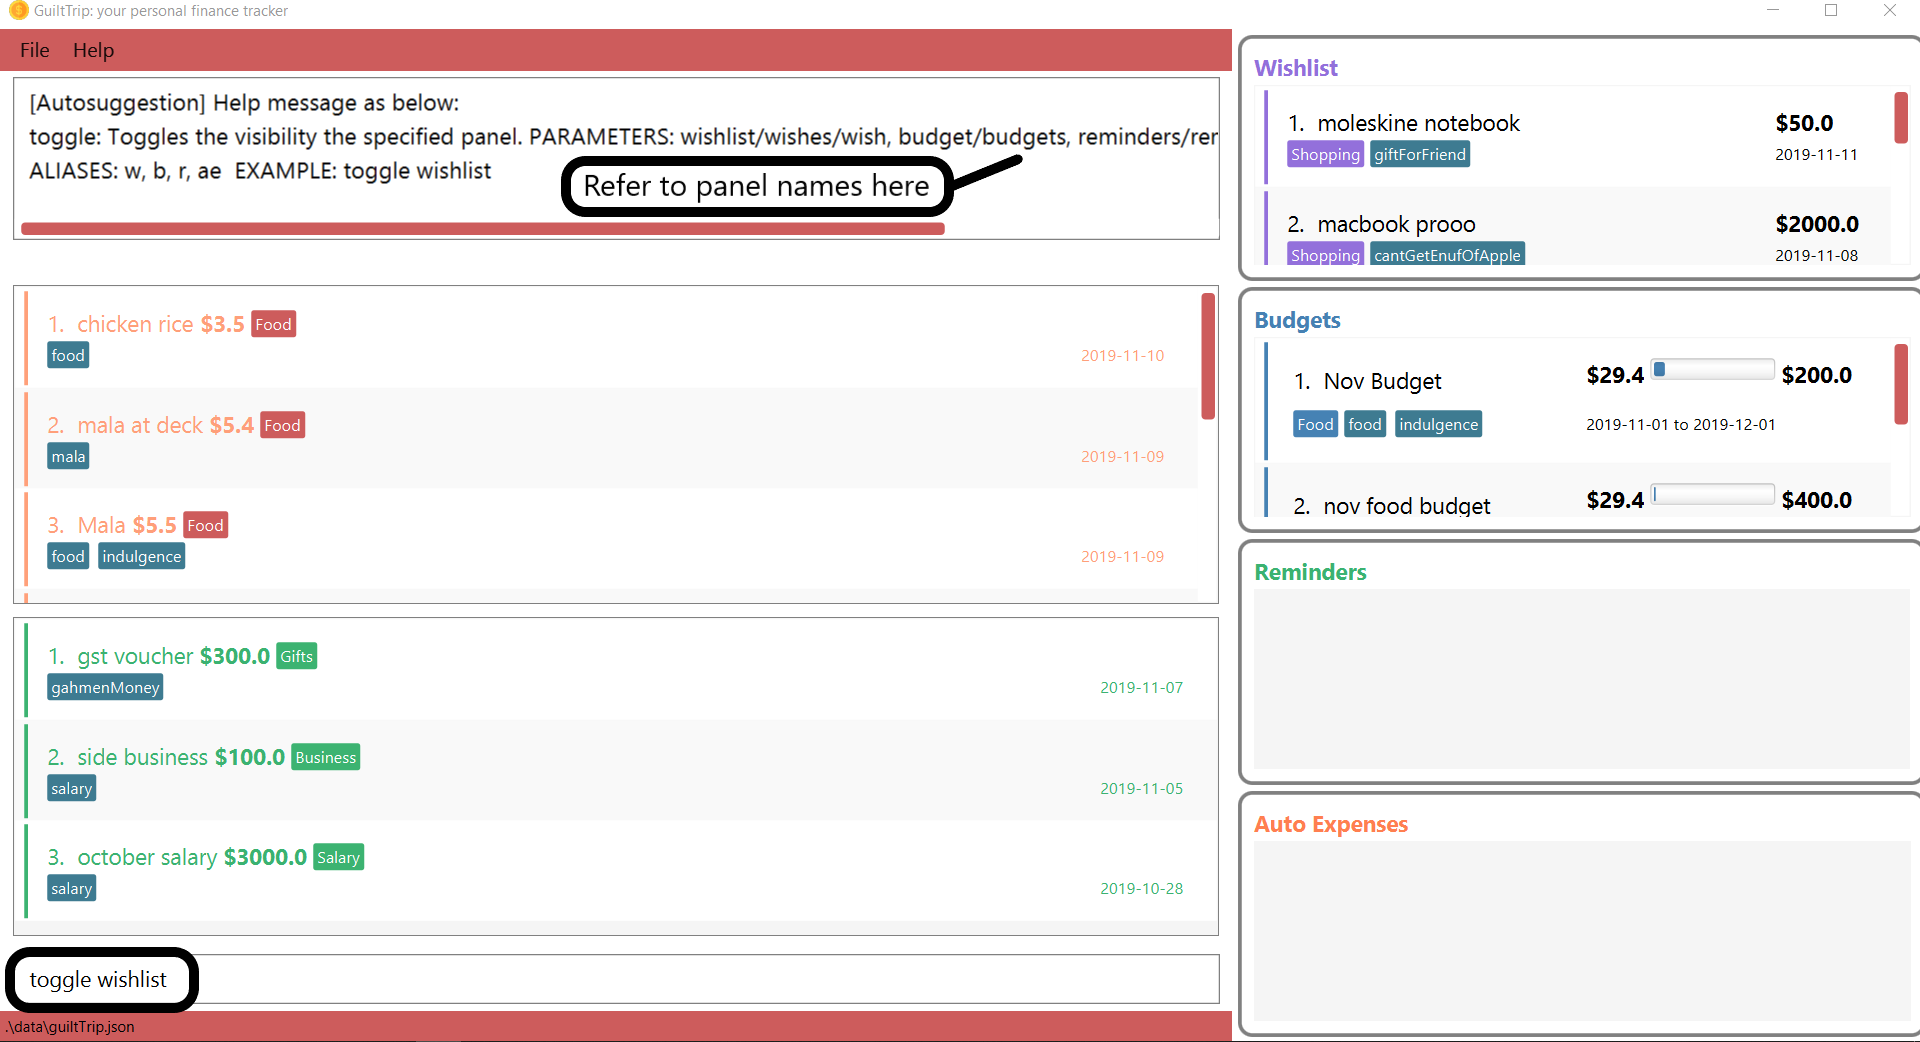
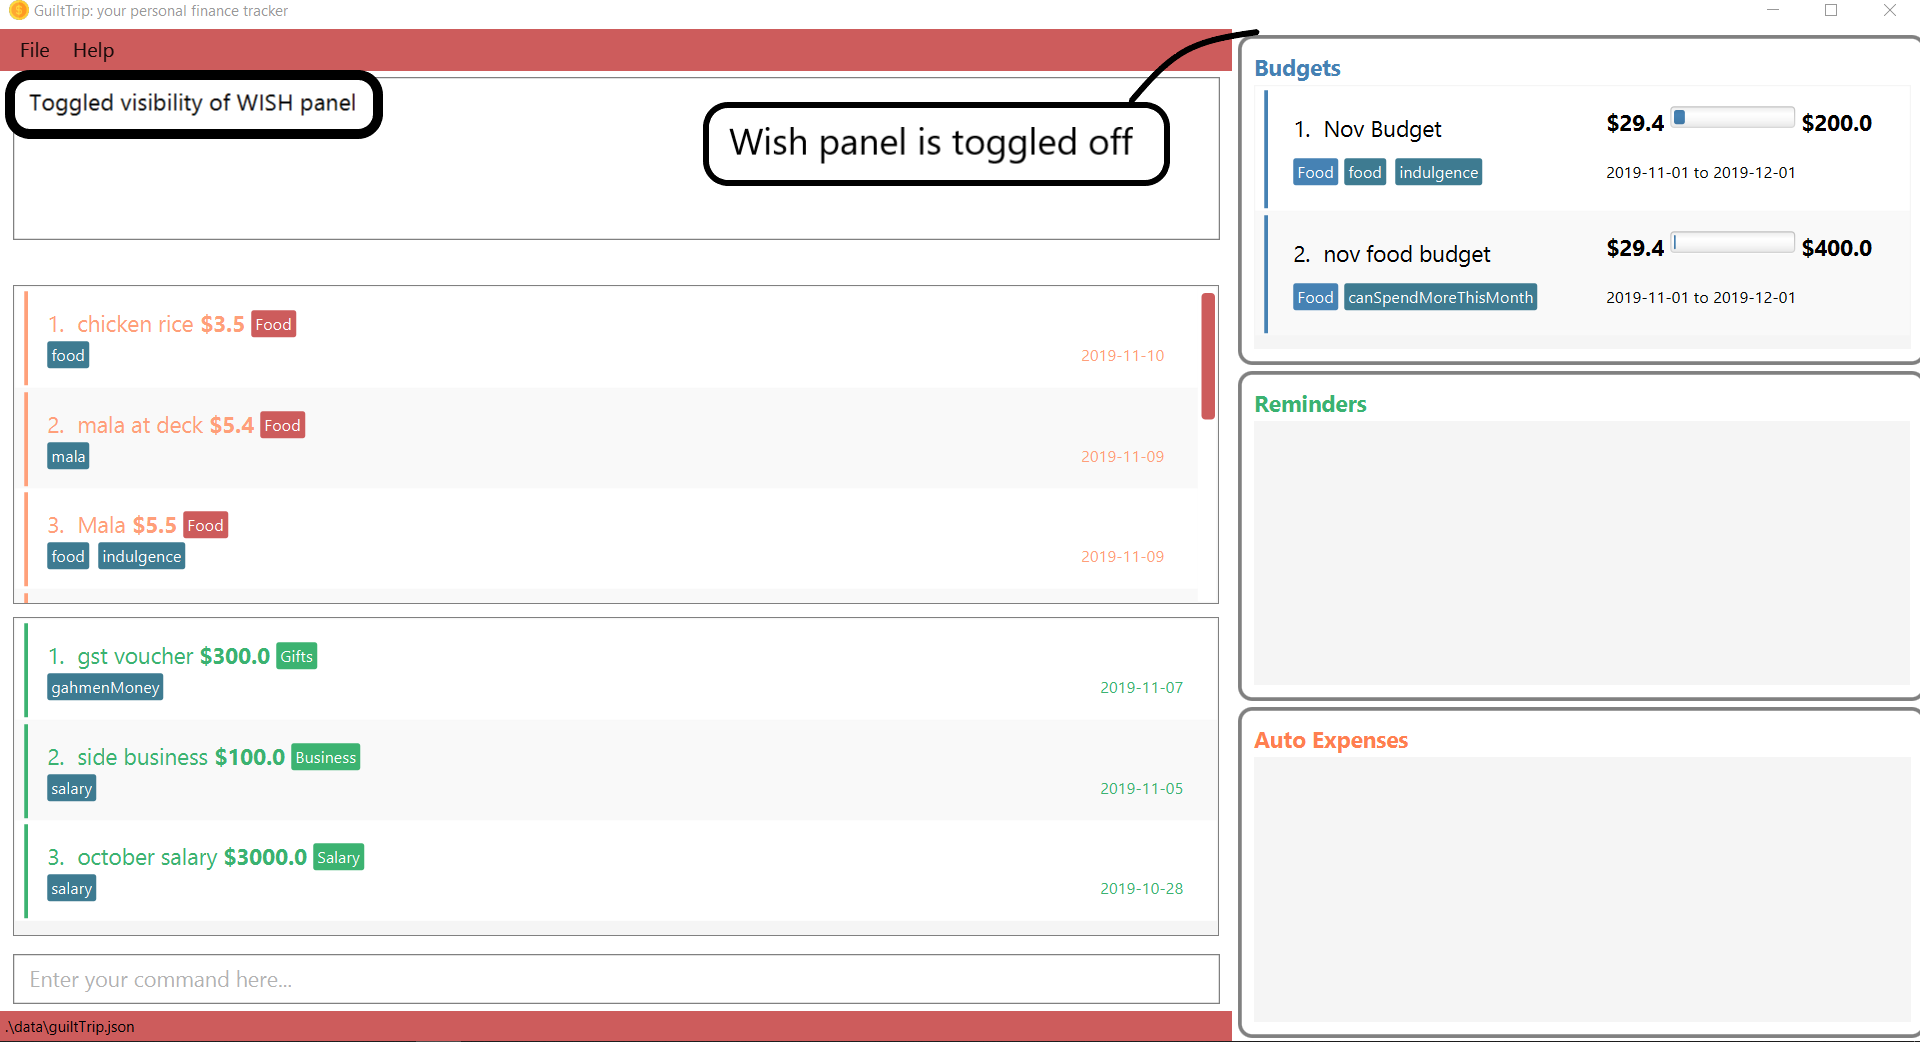
Step 1. If user does not want to view the wishlist panel all the time, he could choose to execute the toggle wishlist command as shown below.
-
He could refer to the panel names in the result display box above when typing in the input panel name.
Step 2. After the command is executed, the wishlist panel is toggled off and no longer in the side panel.
3.13.2. Change Font : changeFont
Changes the font used in application to the specified font. The input is case-sensitive. Only the following font names are accepted: "arial", "calibri", "cambria", "candara", "garamond", "georgia", "rockwell", "segoe UI", "serif", "verdana". The available fonts to change to will be shown in the result display box for the user to refer to easily. The change in font will be saved.
Format: changeFont <font name>
Examples:
-
changeFont rockwell -
changeFont segoe UI
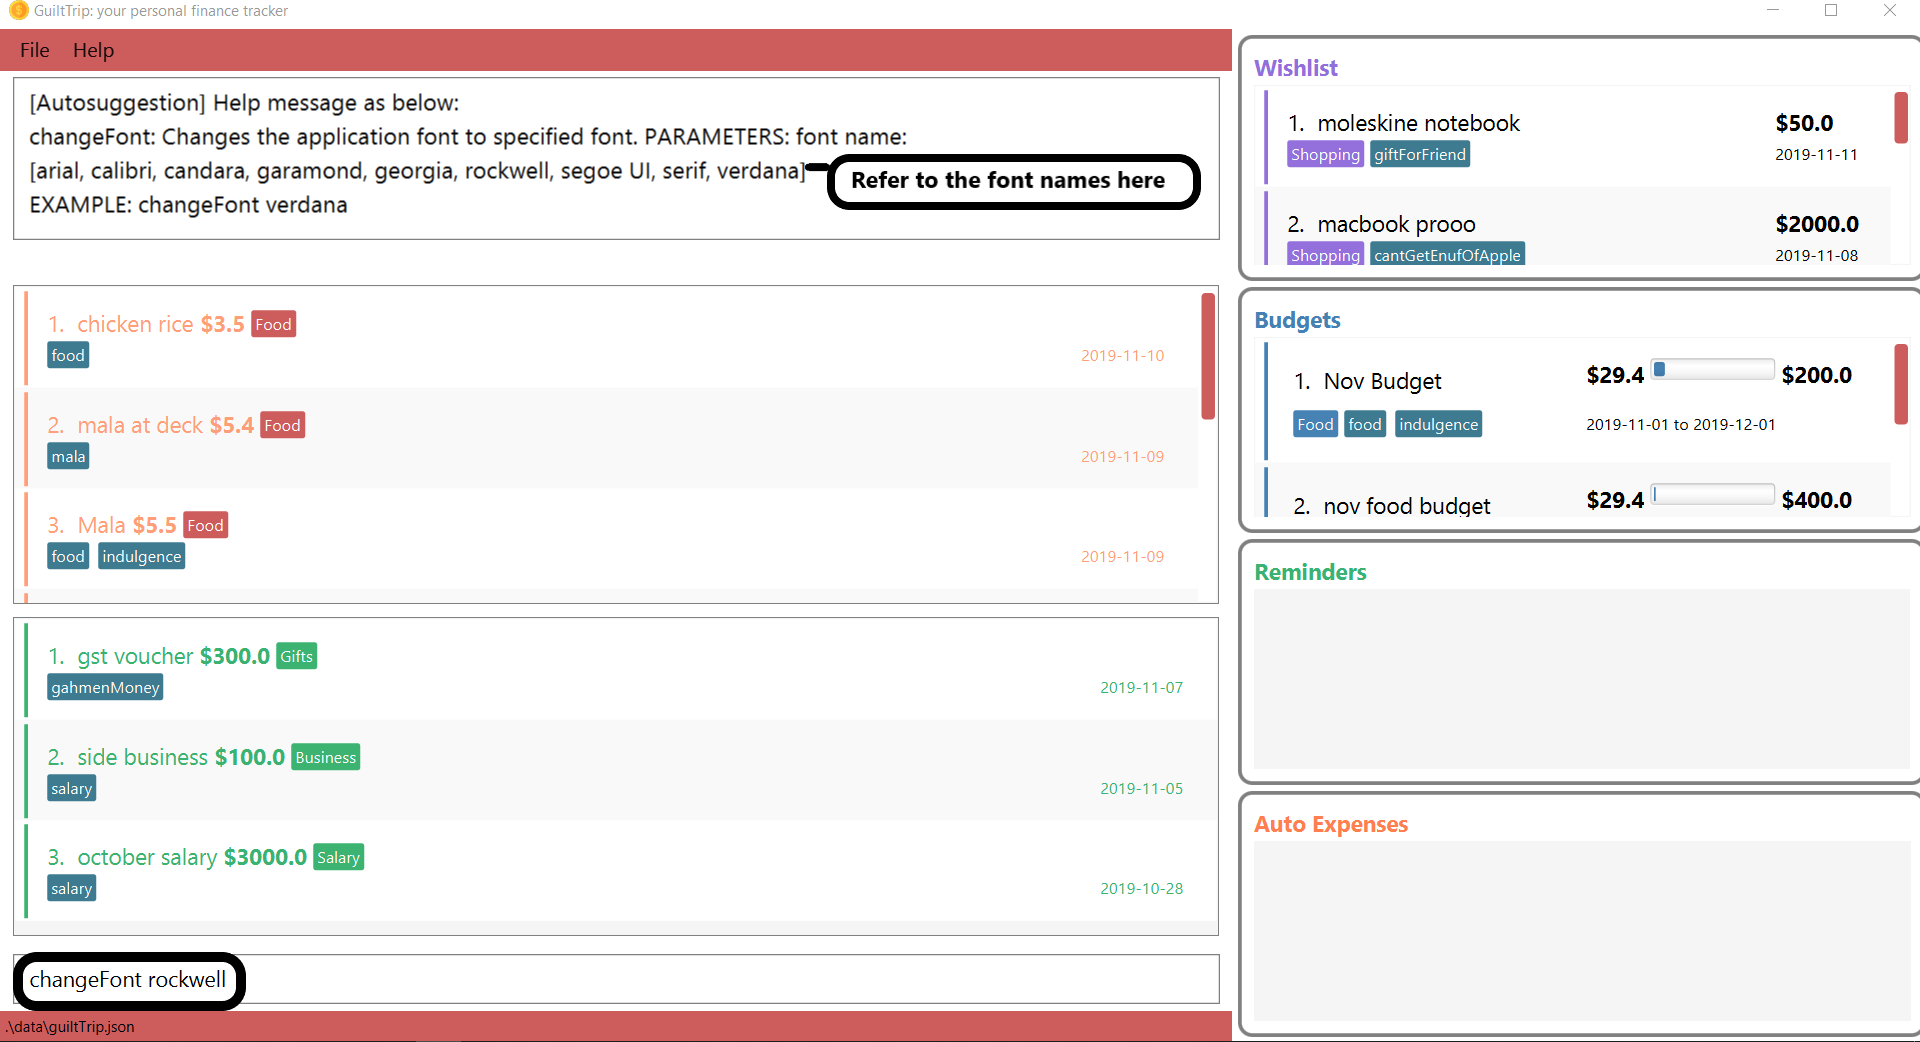
Example usage:
-
User changes the font by executing the
changeFont rockwellcommand as shown below.-
He is also able to refer to the available font names in the result display box above.
-
-
The font is successfully changed to
ROCKWELLas seen in the result display box and the application.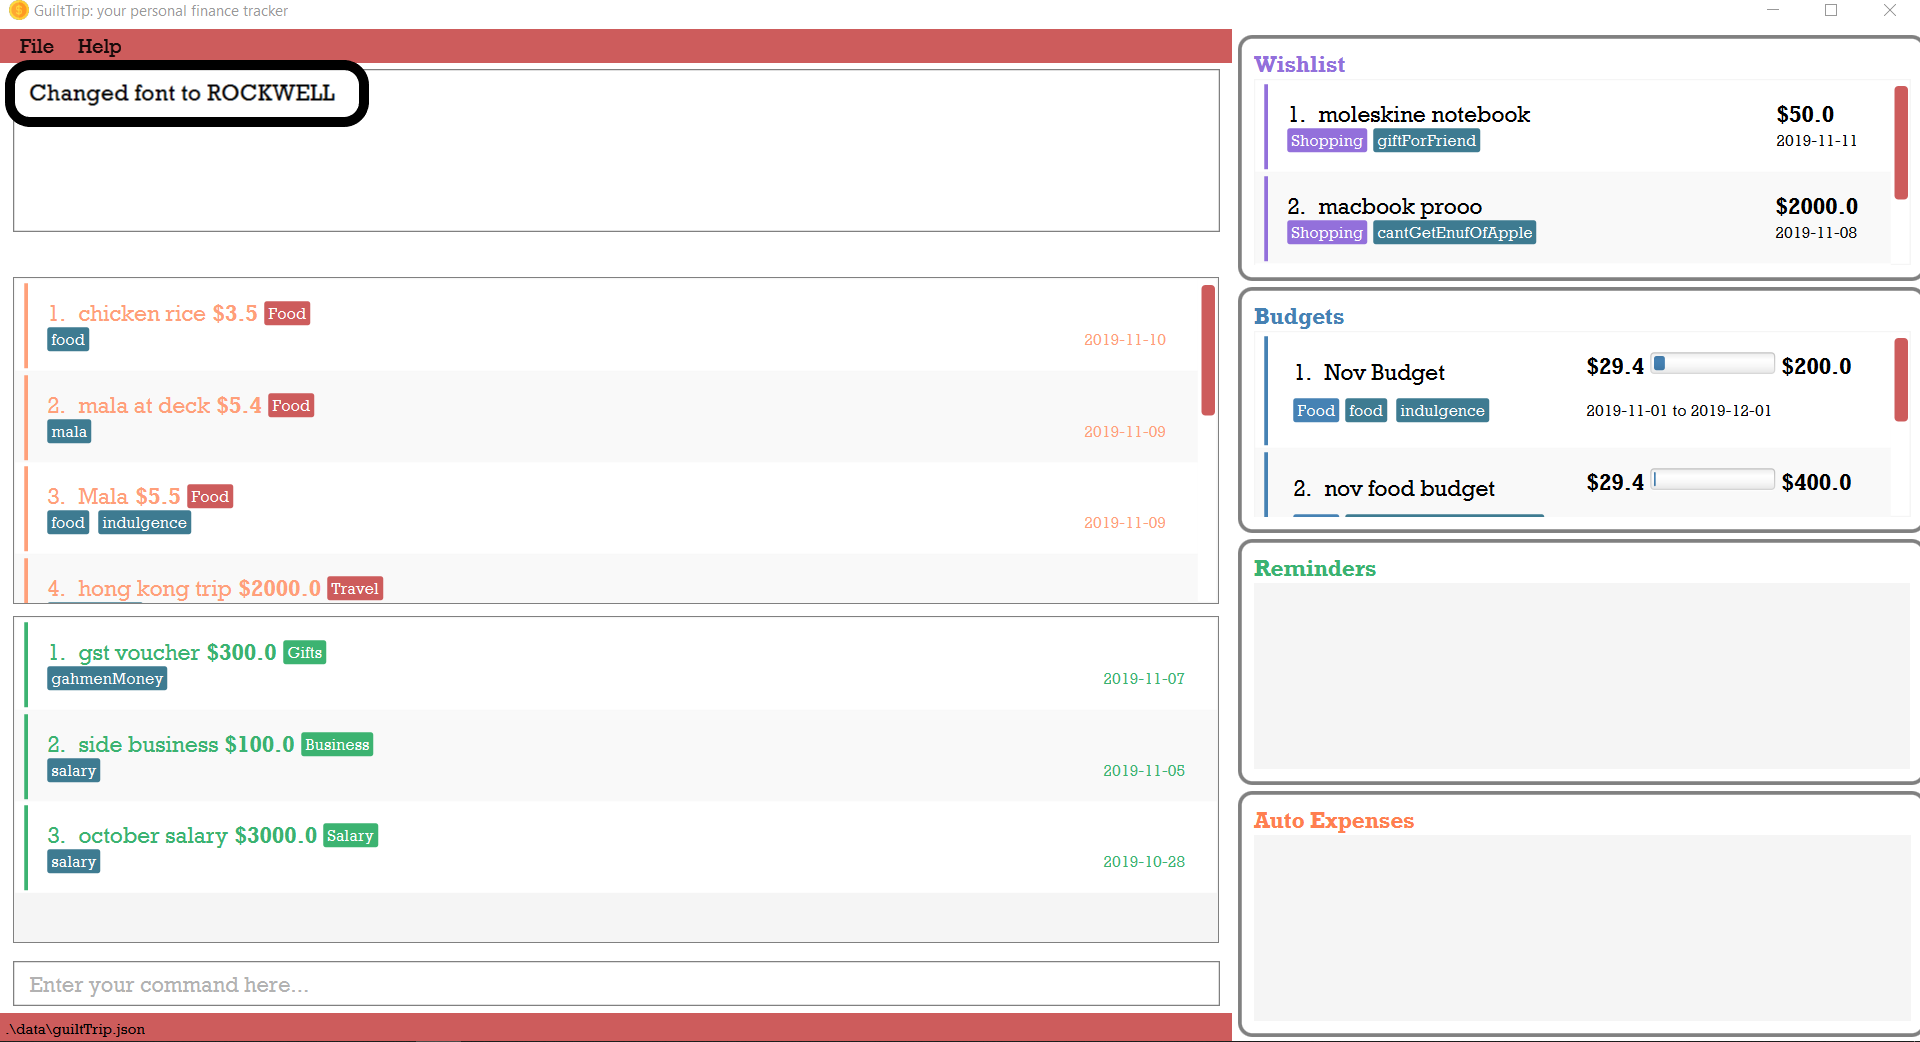
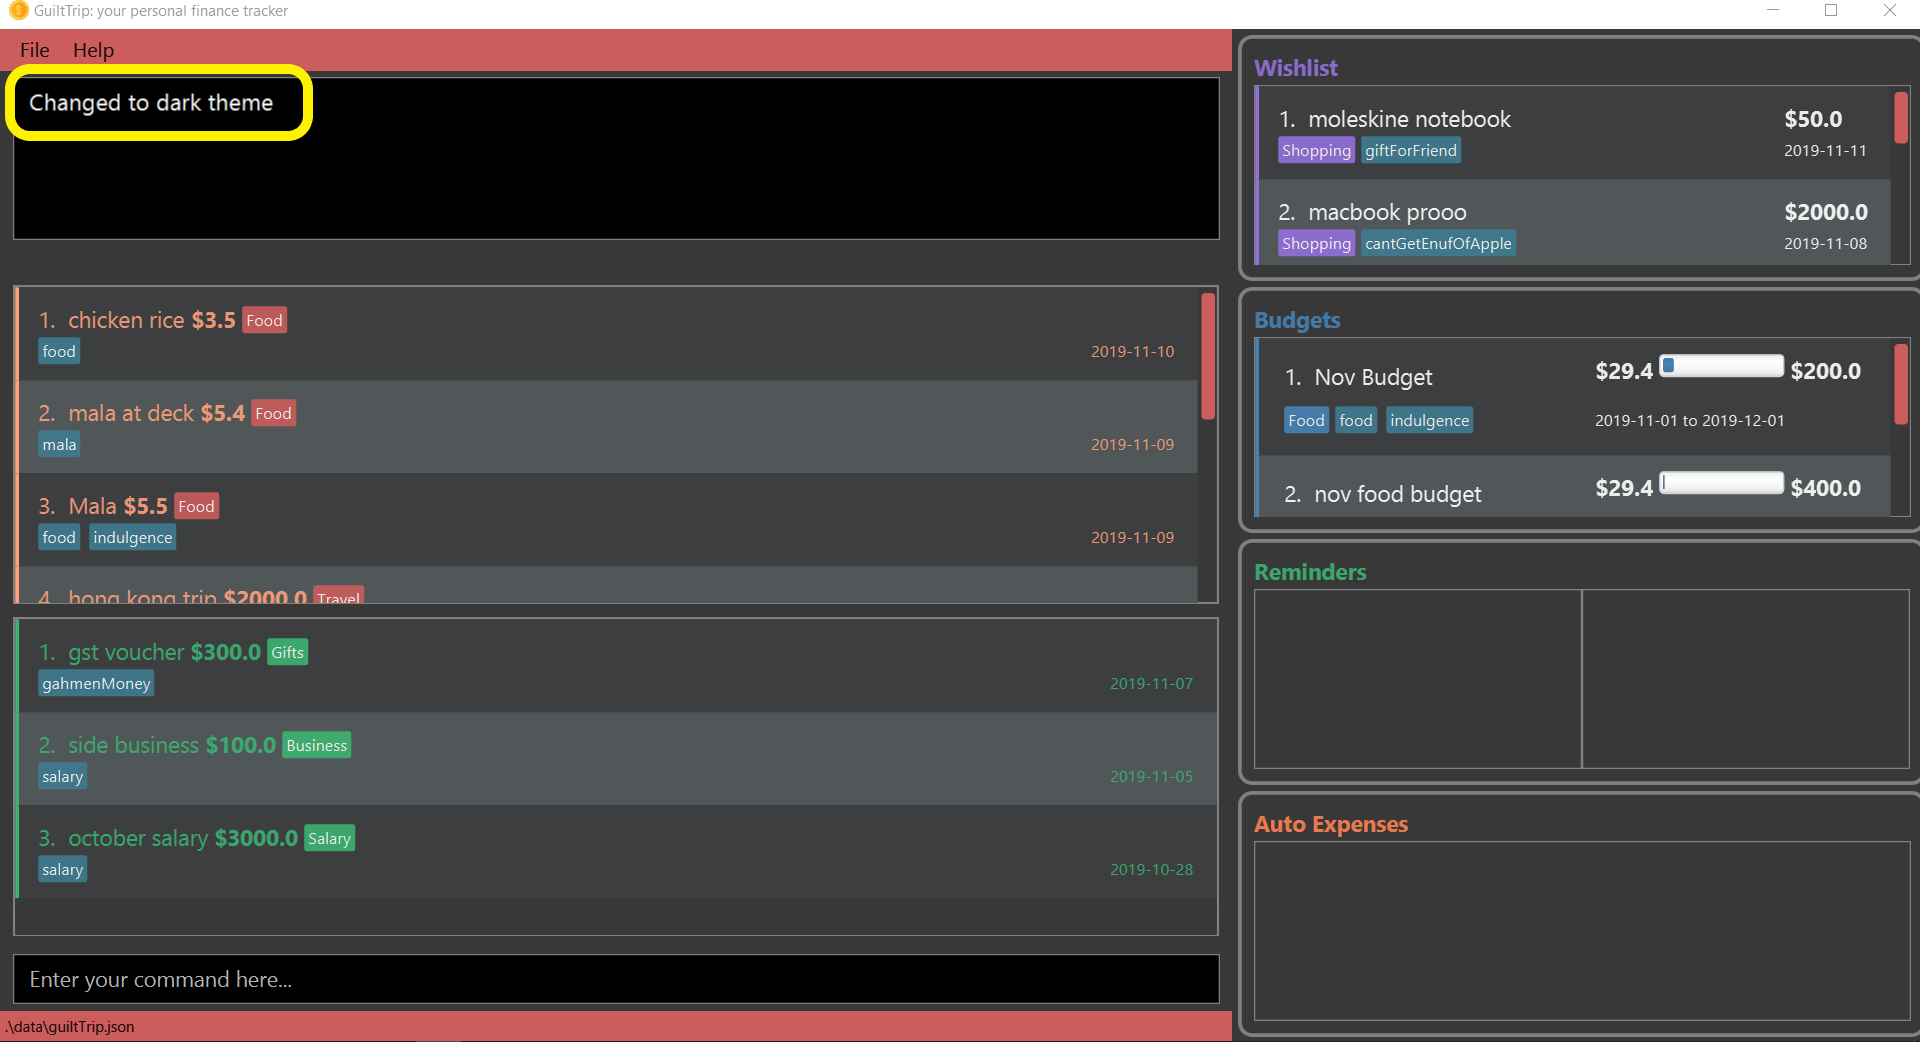
3.13.3. Change to dark theme : setDarkTheme
Changes the theme from light to dark. The change in theme will be saved.
Format: setDarkTheme
Example usage:
-
User executes the command
setDarkThemeas shown below: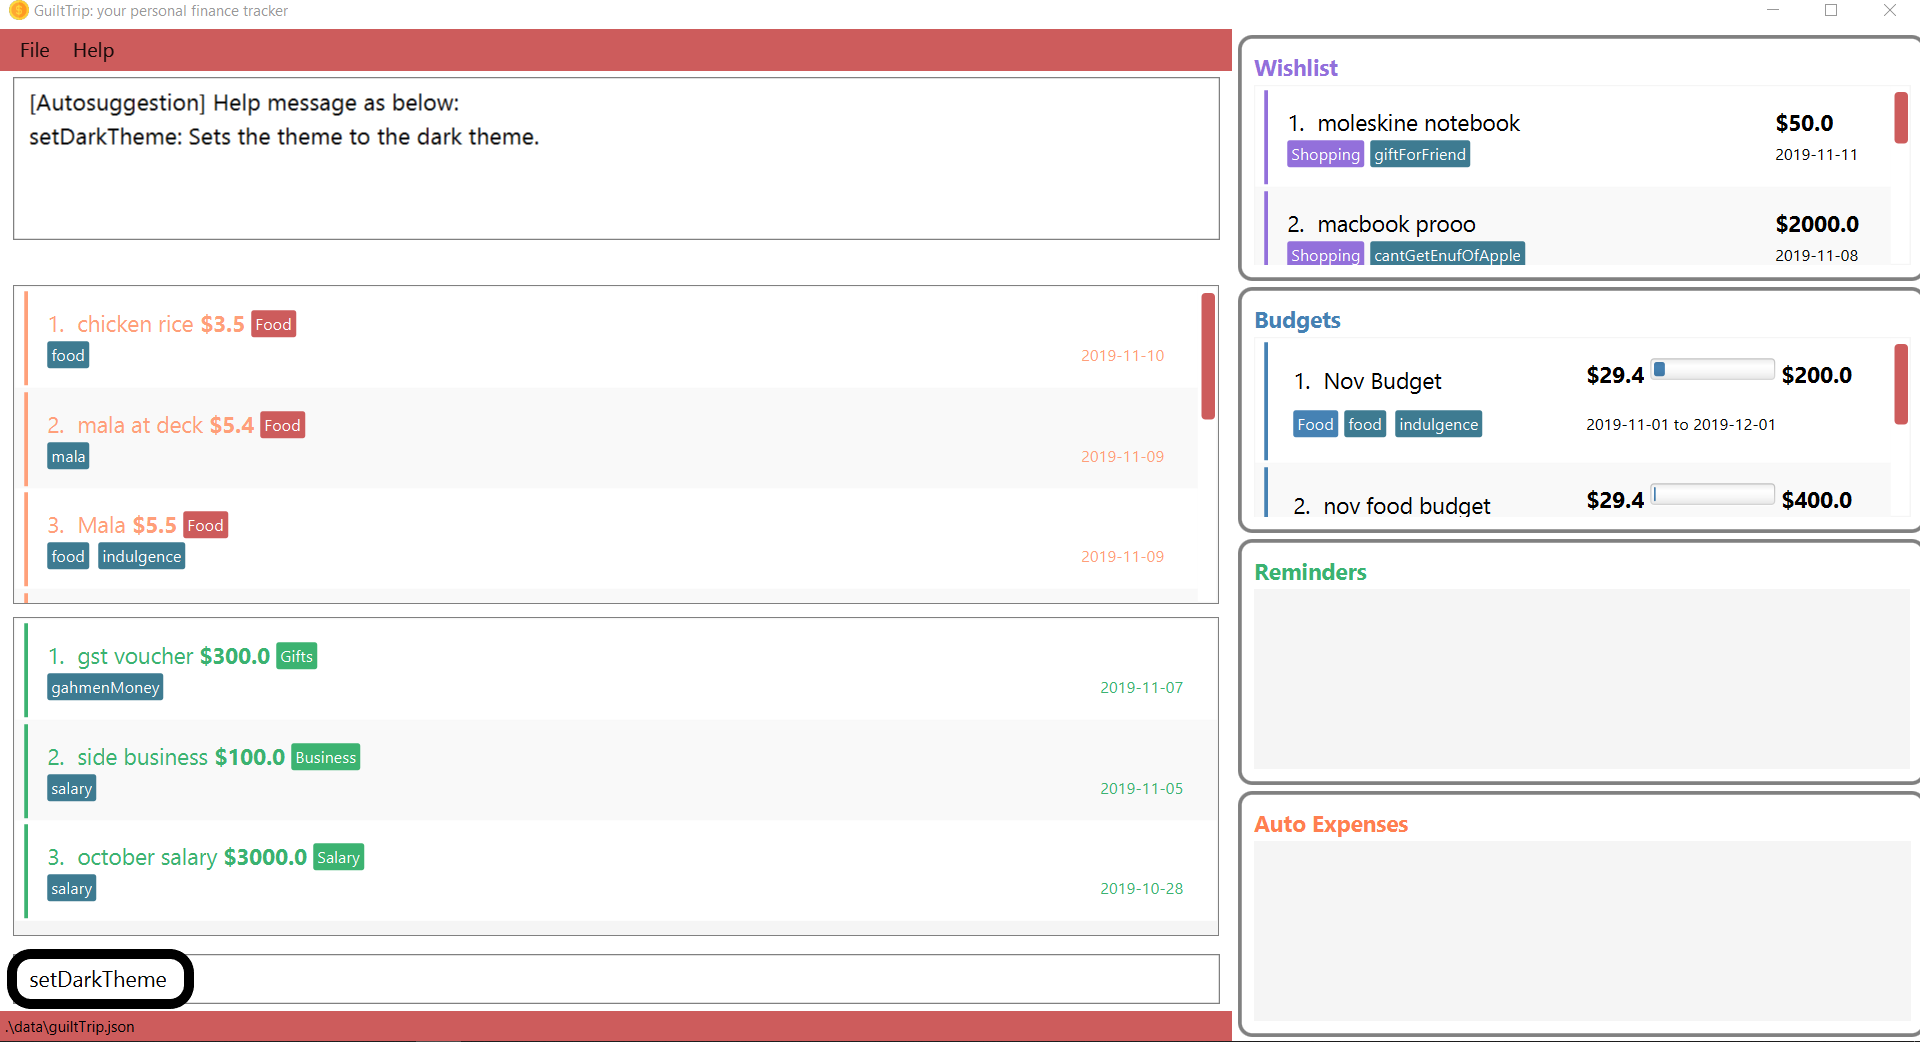
-
After command is executed, the theme is changed to the dark theme and the result display box notifies user that the command is executed successfully.
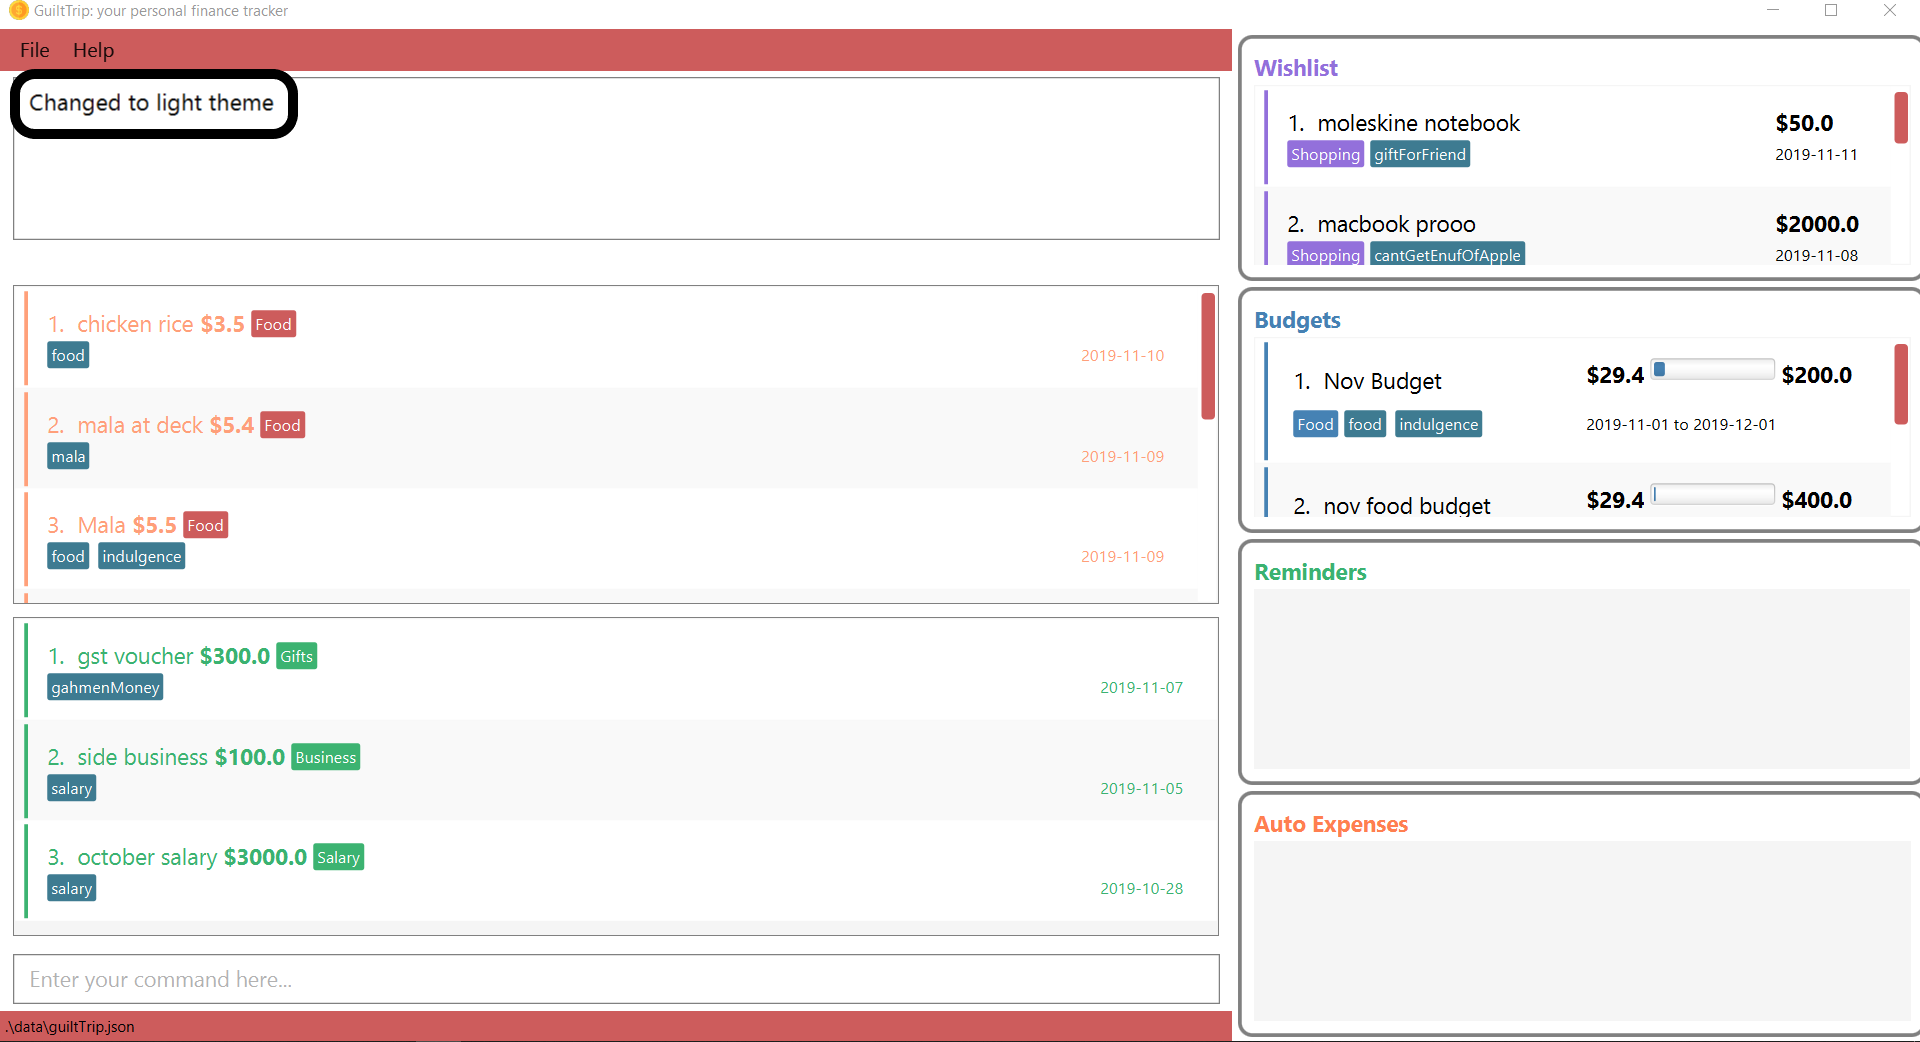
3.13.4. Change to light theme : setLightTheme
Changes the theme from dark to light. The change in theme will be saved.
Format: setLightTheme
-
User executes the command
setLightThemeas shown below: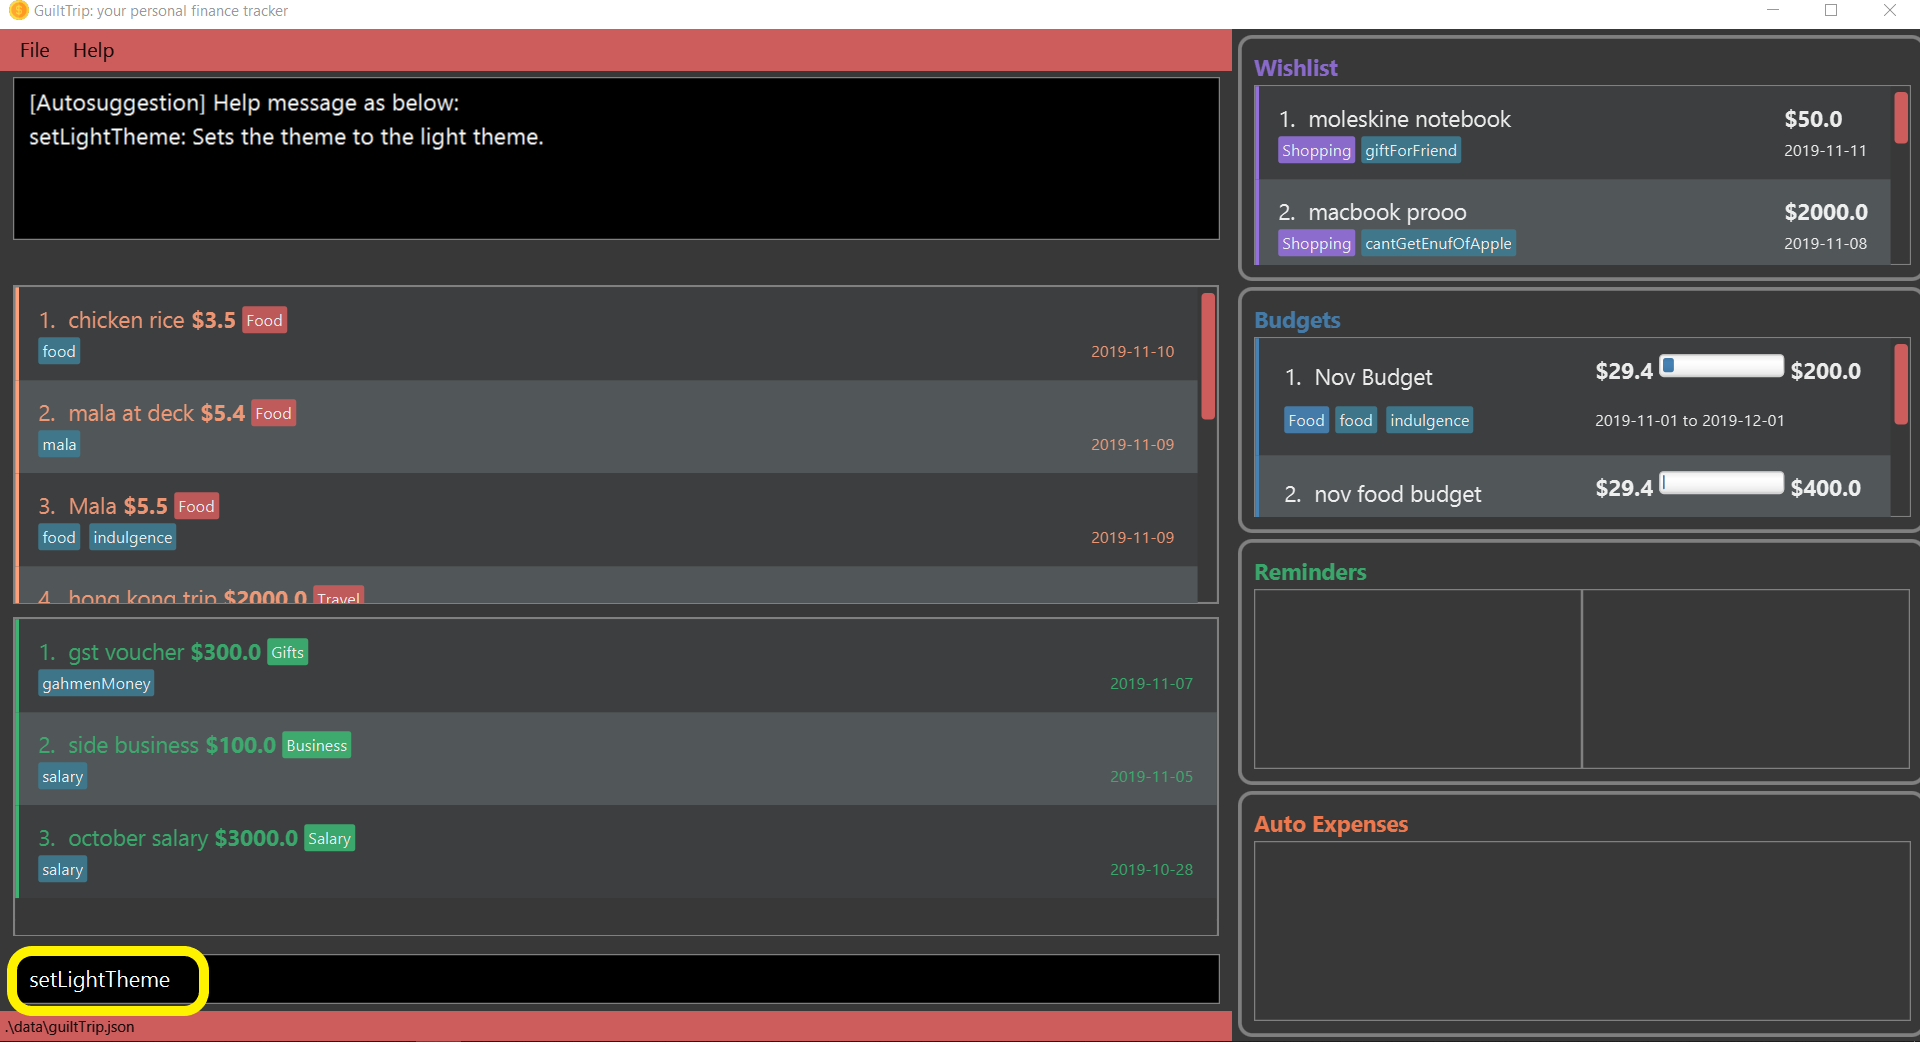
-
After command is executed, the theme is changed to the light theme and the result display box notifies user that the command is executed successfully.
4. FAQ
Q: When will the record of my expenditure be until?
A: It can be as long as you want it to be until! If you want to delete a certain month’s expenditure, you can just call a command to
do so.
Q: How do I transfer my data to another Computer?
A: Install the app in the other computer and overwrite the empty data file it creates with the file that contains the data of your previous Address Book folder.
5. Command Summary
-
Expenses, Income, Budget, Category:
-
addExpense / addExp cat/<category> n/<description> amt/<expenditure> d/<date> [tg/<tag>] -
editExpense <index> [cat/<category>] [n/<description>] [d/<date>] [amt/<expenditure>] [tg/<tag>] -
deleteExpense <index> -
addIncome cat/<category> n/<description> amt/<amount> d/<date> [tg/<tag>] -
editIncome <index> [cat/<category>] [n/<description>] [d/<date>] [amt/<expenditure>] [tg/<tag>] -
deleteIncome <index> -
list -
addAutoExp f/<frequency> n/<description> amt/<expenditure> cat/<category> [tg<tag1> tg/<tag2> d/<starting date>] -
editAutoExp <index> [f/<frequency> n/<description> amt/<expenditure> cat/<category> tg/<tag1> tg/<tag2> d/<starting date>] -
deleteAutoExp <index> -
addBudget cat/<category> n/<description> amt/<budget amount> d/<start date> p/<period> [tg/<tag>]` -
listBudget -
editBudget <index> [n/<description>] [amt/<budget>] [tg/<tag>] -
deleteBudget <index> -
addCategory cat/<category> n/<category name> -
editCategory typ/<category type> cat/<old category name> n/<new category name> -
listCategories -
deleteCategory cat/<category type> n/<category name>
-
-
Statistics:
-
viewTable [p/<RangeOfMonths>] -
viewPie [p/<RangeOfMonths>] -
viewBar [p/<SpecifiedMonth>] -
viewEntry -
sortExpense typ/<sort type> s/<sort sequence> -
sortIncome typ/<sort type> s/<sort sequence> -
sortBudget typ/<sort type> s/<sort sequence> -
sortWish typ/<sort type> s/<sort sequence> -
findExpense [cat/<category>] [n/<description>] [amt/<amount>] [d/<date>] [t/<tag>] -
findIncome [cat/<category>] [n/<description>] amt/<amount>] [d/<date>] [tg/<tag>] -
findBudget [cat/<category>] [n/<description>] [d/<date>] [tg/<tag>] -
findWish [cat/<category>] [n/<description>] [amt/<amount>] [d/<date>] [tg/<tag>]
-
-
Reminders:
-
addReminder n/<Message> i/<Condition Index> [tkr/<Tracker Type>] [a/<Quota>] -
listActiveReminders -
listAllReminders -
editReminder <Reminder Index> [n/<Message>] [i/<Condition Index>] [tkr/<Tracker Type>] [a/<Quota>] -
deleteReminder <index> -
addToReminder <Reminder Index>, <Condition Index> -
removeFromReminder <Reminder Index>, <Condition Index> -
addClassCondition <entryType> -
addDateCondition <Start Date>, <End Date> -
addHasKeyWord <keywords> -
addQuotaCondition <Quota> -
addHasTagsConditions <Tags> -
deleteCondition <Index> -
replaceCondtion <Index of Condition being Replaced>, <Index of Replacing Condition> -
listConditions
-
-
Wishlist:
-
addWish n/<Description> cat/<Category> amt/<Price> d/<Date> -
deleteWish <index> -
editWishlist <index> [n/<Description>] [cat/<Category>] [amt/<Price>] [d/<Date>] [tg/<Tag>] -
sortWishlistTime <ascending/ descending> -
sortWishlistPrice <ascending/ descending> -
sortWishlistName <ascending/descending> -
sortWishlistPriority <ascending/descending> -
findWish [cat/<category>] [n/<description>] [amt/<amount>] [d/<date>] [tg/<tag>] -
purchase <index>
-
-
Undo and Redo:
-
undo -
undo <step> -
redo -
redo <step> -
history
-
-
UI features:
-
toggle <panel name> -
changeFont <font name> -
setLightTheme -
setDarkTheme
-